k8s学习目录1

资源清单

在 k8s 中,一般使用 yaml 格式的文件来创建符合我们预期期望的 pod ,这样的 yaml 文件我们一般
称为资源清单

根据不同的级别,可以将 Kubernetes 中的资源进行多种分类。

Kubernetes 是一个可移植的、可扩展的开源平台,用于管理容器化的工作负载和服务,可促进声明式配置和自动化。Kubernetes 拥有一个庞大且快速增长的生态系统。Kubernetes 的服务、支持和工具广泛可用。以下列举的内容都是 Kubernetes 中的 Object,这些对象都可以在 yaml 文件中作为一种 API 类型来配置。

  • 工作负载型资源
    • Pod、ReplicaSet、Deployment、StatefulSet、DaemonSet、Job、CronJob
  • 服务发现及负载均衡型资源
    • Service、Ingress
  • 配置与存储型资源
    • Volume、CSI
  • 特殊类型的存储卷
    • ConfigMap、Secret、DownwardAPI
  • 集群级别资源
    • Namespace、Node、Role、ClusterRole、RoleBinding、ClusterRoleBinding
  • 元数据型资源
    • HPA、PodTemplate、LimitRange

常用字段说明

必须存在的属性

参数名 字段类型 说明
version String K8S API 的版本,目前基本是v1,可以用 kubectl api-version 命令查询
kind String 这里指的是 yaml 文件定义的资源类型和角色, 比如: Pod
metadata Object 元数据对象,固定值写 metadata
metadata.name String 元数据对象的名字,这里由我们编写,比如命名Pod的名字
metadata.namespace String 元数据对象的命名空间,由我们自身定义
Spec Object 详细定义对象,固定值写Spec
spec.container[] list 这里是Spec对象的容器列表定义,是个列表
spec.container[].name String 这里定义容器的名字
spec.container[].image String 这里定义要用到的镜像名称

spec 主要对象

参数名 字段类型 说明
spec.containers[].name String 定义容器的名字
spec.containers[].image String 定义要用到的镜像的名称
spec.containers[].imagePullPolicy String 定义镜像拉取策略,有 Always,Never,IfNotPresent 三个值课选 (1)Always:意思是每次尝试重新拉取镜像 (2)Never:表示仅使用本地镜像 (3)IfNotPresent:如果本地有镜像就是用本地镜像,没有就拉取在线镜像。上面三个值都没设置的话,默认是 Always.
spec.containers[].command[] List 指定容器启动命令,因为是数组可以指定多个,不指定则使用镜像打包时使用的启动命令。
spec.containers[].args[] List 指定容器启动命令参数,因为是数组可以指定多个。
spec.containers[].workingDir String 指定容器的工作目录
spec.containers[].volumeMounts[] List 指定容器内部的存储卷配置
spec.containers[].volumeMounts[].name String 指定可以被容器挂载的存储卷的名称
spec.containers[].volumeMounts[].mountPath String 指定可以被容器挂载的容器卷的路径
spec.containers[].volumeMounts[].readOnly String 设置存储卷路径的读写模式,true 或者 false,默认为读写模式
spec.containers[].ports[] List 指定容器需要用到的端口列表
spec.containers[].ports[].name String 指定端口名称
spec.containers[].ports[].containerPort String 指定容器需要监听的端口号
spec.containers[].ports.hostPort String 指定容器所在主机需要监听的端口号,默认跟上面 containerPort 相同,注意设置了 hostPort 同一台主机无法启动该容器的相同副本(因为主机的端口号不能相同,这样会冲突)
spec.containers[].ports[].protocol String 指定端口协议,支持TCP和UDP,默认值为TCP
spec.containers[].env[] List 指定容器运行千需设置的环境变量列表
spec.containers[].env[].name String 指定环境变量名称
spec.containers[].env[].value String 指定环境变量值
spec.containers[].resources Object 指定资源限制和资源请求的值(这里开始就是设置容器的资源上限)
spec.containers[].resources.limits Object 指定设置容器运行时资源的运行上限
spec.containers[].resources.limits.cpu String 指定CPU的限制,单位为 core 数,将用于 docker run –cpu-shares 参数
spec.containers[].resources.limits.memory String 指定 MEM 内存的限制,单位为 MIB,GIB
spec.containers[].resources.requests Object 指定容器启动和调度室的限制设置
spec.containers[].resources.requests.cpu String CPU请求,单位为 core 数,容器启动时初始化可用数量
spec.containers[].resources.requests.memory String 内存请求,单位为 MIB,GIB 容器启动的初始化可用数量

额外的参数项

参数名 字段类型 说明
spec.restartPolicy String 定义Pod重启策略,可以选择值为 Always、OnFailure,默认值为 Always。
1.Always:Pod一旦终止运行,则无论容器是如何终止的,kubelet 服务都将重启它。
2.OnFailure:只有 Pod 以非零退出码终止时,kubelet 才会重启该容器。如果容器正常结束(退出码为0),则 kubelet 将不会重启它。
3.Never:Pod 终止后,kubelet 将退出码报告给 Master,不会重启该 Pod
spec.nodeSelector Object 定义 Node 的 Label 过滤标签,以 key:value 格式指定
spec.imagePullSecrets Object 定义pull 镜像是使用 secret 名称,以 name:secretkey 格式指定
spec.hostNetwork Boolean 定义是否使用主机网络模式,默认值为 false。设置 true 表示使用宿主机网络,不使用 docker 网桥,同时设置了 true 将无法在同一台宿主机上启动第二个副本。

查询资源清单说明

举例:查询pod下的资源说明

1
kubectl explain pod
1
2
3
4
5
6
7
8
9
10
11
12
13
14
15
16
17
18
19
20
21
22
23
24
25
26
27
28
29
30
31
32
33
34
35
36
[root@master pod]# kubectl explain pod 
KIND: Pod
VERSION: v1

DESCRIPTION:
Pod is a collection of containers that can run on a host. This resource is
created by clients and scheduled onto hosts.

FIELDS:
apiVersion <string>
APIVersion defines the versioned schema of this representation of an object.
Servers should convert recognized schemas to the latest internal value, and
may reject unrecognized values. More info:
https://git.k8s.io/community/contributors/devel/sig-architecture/api-conventions.md#resources

kind <string>
Kind is a string value representing the REST resource this object
represents. Servers may infer this from the endpoint the client submits
requests to. Cannot be updated. In CamelCase. More info:
https://git.k8s.io/community/contributors/devel/sig-architecture/api-conventions.md#types-kinds

metadata <ObjectMeta>
Standard object's metadata. More info:
https://git.k8s.io/community/contributors/devel/sig-architecture/api-conventions.md#metadata

spec <PodSpec>
Specification of the desired behavior of the pod. More info:
https://git.k8s.io/community/contributors/devel/sig-architecture/api-conventions.md#spec-and-status

status <PodStatus>
Most recently observed status of the pod. This data may not be up to date.
Populated by the system. Read-only. More info:
https://git.k8s.io/community/contributors/devel/sig-architecture/api-conventions.md#spec-and-status


[root@master pod]#

查询pod.spec下面的资源说明

1
kubectl explain pod.spec
1
2
3
4
5
6
7
8
9
10
11
12
13
14
15
16
17
18
19
20
21
22
23
24
25
26
27
28
29
30
31
32
33
34
35
36
37
38
39
40
41
42
43
44
45
[root@master pod]# kubectl explain pod.spec
KIND: Pod
VERSION: v1

FIELD: spec <PodSpec>

DESCRIPTION:
Specification of the desired behavior of the pod. More info:
https://git.k8s.io/community/contributors/devel/sig-architecture/api-conventions.md#spec-and-status
PodSpec is a description of a pod.

FIELDS:
activeDeadlineSeconds <integer>
Optional duration in seconds the pod may be active on the node relative to
StartTime before the system will actively try to mark it failed and kill
associated containers. Value must be a positive integer.

affinity <Affinity>
If specified, the pod's scheduling constraints
...
...
terminationGracePeriodSeconds <integer>
Optional duration in seconds the pod needs to terminate gracefully. May be
decreased in delete request. Value must be non-negative integer. The value
zero indicates stop immediately via the kill signal (no opportunity to shut
down). If this value is nil, the default grace period will be used instead.
The grace period is the duration in seconds after the processes running in
the pod are sent a termination signal and the time when the processes are
forcibly halted with a kill signal. Set this value longer than the expected
cleanup time for your process. Defaults to 30 seconds.

tolerations <[]Toleration>
If specified, the pod's tolerations.

topologySpreadConstraints <[]TopologySpreadConstraint>
TopologySpreadConstraints describes how a group of pods ought to spread
across topology domains. Scheduler will schedule pods in a way which abides
by the constraints. All topologySpreadConstraints are ANDed.

volumes <[]Volume>
List of volumes that can be mounted by containers belonging to the pod. More
info: https://kubernetes.io/docs/concepts/storage/volumes


[root@master pod]#

通过定义清单文件创建 Pod 举例

创建pod

创建yml文件 my-pod.yaml 内容如下

1
2
3
4
5
6
7
8
9
10
11
12
13
14
15
16
17
apiVersion: v1
kind: Pod
metadata:
name: pod-demo
namespace: default
labels:
app: myapp
spec:
containers:
- name: myapp-1
image: 192.168.16.110:20080/stady/myapp:v1
- name: busybox-1
image: 192.168.16.110:20080/stady/busybox:1.28.3
command:
- "/bin/sh"
- "-c"
- "sleep 3600"

执行shell

1
kubectl apply -f my-pod.yaml
1
2
[root@master pod]# kubectl apply -f my-pod.yaml 
pod/pod-demo created

查询pod创建结果

1
2
3
4
[root@master pod]# kubectl get pod -o wide
NAME READY STATUS RESTARTS AGE IP NODE NOMINATED NODE READINESS GATES
pod-demo 2/2 Running 0 2m58s 10.244.1.2 node1 <none> <none>
[root@master pod]#

查询pod启动状态

1
2
3
4
5
6
7
8
9
10
11
12
13
14
15
16
17
18
19
20
21
22
23
24
25
26
27
28
29
30
31
32
33
34
35
36
37
38
39
40
41
42
43
44
45
46
47
48
49
50
51
52
53
54
55
56
57
58
59
60
61
62
63
64
65
66
67
68
69
70
71
72
73
74
[root@master pod]# kubectl describe pod pod-demo
Name: pod-demo
Namespace: default
Priority: 0
Service Account: default
Node: node1/192.168.16.201
Start Time: Wed, 18 Dec 2024 22:36:24 +0800
Labels: app=myapp
Annotations: <none>
Status: Running
IP: 10.244.1.2
IPs:
IP: 10.244.1.2
Containers:
myapp-1:
Container ID: docker://6ff10bb90d05414782cdb45c254b8b6c872f122f48ba55a4820a8ea03c5a2c6b
Image: 192.168.16.110:20080/stady/myapp:v1
Image ID: docker-pullable://192.168.16.110:20080/stady/myapp@sha256:9eeca44ba2d410e54fccc54cbe9c021802aa8b9836a0bcf3d3229354e4c8870e
Port: <none>
Host Port: <none>
State: Running
Started: Wed, 18 Dec 2024 22:36:27 +0800
Ready: True
Restart Count: 0
Environment: <none>
Mounts:
/var/run/secrets/kubernetes.io/serviceaccount from kube-api-access-d6rbf (ro)
busybox-1:
Container ID: docker://9baf3feb8cd4b992d021229f13b8a0c6988c9d02843c94fea04e9647e3faa334
Image: busybox:latest
Image ID: docker-pullable://busybox@sha256:2919d0172f7524b2d8df9e50066a682669e6d170ac0f6a49676d54358fe970b5
Port: <none>
Host Port: <none>
Command:
/bin/sh
-c
sleep 3600
State: Running
Started: Wed, 18 Dec 2024 22:36:33 +0800
Ready: True
Restart Count: 0
Environment: <none>
Mounts:
/var/run/secrets/kubernetes.io/serviceaccount from kube-api-access-d6rbf (ro)
Conditions:
Type Status
Initialized True
Ready True
ContainersReady True
PodScheduled True
Volumes:
kube-api-access-d6rbf:
Type: Projected (a volume that contains injected data from multiple sources)
TokenExpirationSeconds: 3607
ConfigMapName: kube-root-ca.crt
ConfigMapOptional: <nil>
DownwardAPI: true
QoS Class: BestEffort
Node-Selectors: <none>
Tolerations: node.kubernetes.io/not-ready:NoExecute op=Exists for 300s
node.kubernetes.io/unreachable:NoExecute op=Exists for 300s
Events:
Type Reason Age From Message
---- ------ ---- ---- -------
Normal Scheduled 17m default-scheduler Successfully assigned default/pod-demo to node1
Normal Pulling 17m kubelet Pulling image "192.168.16.110:20080/stady/myapp:v1"
Normal Pulled 17m kubelet Successfully pulled image "192.168.16.110:20080/stady/myapp:v1" in 828ms (828ms including waiting)
Normal Created 17m kubelet Created container myapp-1
Normal Started 17m kubelet Started container myapp-1
Normal Pulling 17m kubelet Pulling image "busybox:latest"
Normal Pulled 17m kubelet Successfully pulled image "busybox:latest" in 5.016s (5.016s including waiting)
Normal Created 17m kubelet Created container busybox-1
Normal Started 17m kubelet Started container busybox-1
[root@master pod]#

访问该pod提供的服务测试

1
2
3
4
5
6
7
8
[root@master pod]# kubectl get pod -o wide
NAME READY STATUS RESTARTS AGE IP NODE NOMINATED NODE READINESS GATES
pod-demo 2/2 Running 0 3m34s 10.244.1.3 node1 <none> <none>
[root@master pod]# curl 10.244.1.3
Hello MyApp | Version: v1 | <a href="hostname.html">Pod Name</a>
[root@master pod]# curl 10.244.1.3/hostname.html
pod-demo
[root@master pod]#

容器的生命周期

Pod 能够具有多个容器,应用运行在容器里面,但是它也可能有一个或多个先于应用容器启动的 Init
容器
Init 容器与普通的容器非常像,除了如下两点:

  • Init 容器总是运行到成功完成为止
  • 每个 Init 容器都必须在下一个 Init 容器启动之前成功完成

如果 Pod 的 Init 容器失败,Kubernetes 会不断地重启该 Pod,直到 Init 容器成功为止。然而,

如果 Pod 对应的 restartPolicy 为 Never,它不会重新启动

因为 Init 容器具有与应用程序容器分离的单独镜像,所以它们的启动相关代码具有如下优势:

  • 它们可以包含并运行实用工具,但是出于安全考虑,是不建议在应用程序容器镜像中包含这 些实用工具的
  • 它们可以包含使用工具和定制化代码来安装,但是不能出现在应用程序镜像中。例如,创建 镜像没必要 FROM 另一个镜像,只需要在安装过程中使用类似 sed、 awk、 python 或 dig 这样的工具。
  • 应用程序镜像可以分离出创建和部署的角色,而没有必要联合它们构建一个单独的镜像。
  • Init 容器使用 Linux Namespace,所以相对应用程序容器来说具有不同的文件系统视图。因 此,它们能够具有访问 Secret 的权限,而应用程序容器则不能。
  • 它们必须在应用程序容器启动之前运行完成,而应用程序容器是并行运行的,所以 Init 容 器能够提供了一种简单的阻塞或延迟应用容器的启动的方法,直到满足了一组先决条件。

创建initC的检测容器

  • 在 Pod 启动过程中,Init 容器会按顺序在网络和数据卷初始化之后启动。每个容器必须在下一个容器启动之前成功退出
  • 如果由于运行时或失败退出,将导致容器启动失败,它会根据 Pod 的 restartPolicy 指定的策略 进行重试。然而,如果 Pod 的 restartPolicy 设置为 Always,Init 容器失败时会使用 RestartPolicy 策略
  • 在所有的 Init 容器没有成功之前,Pod 将不会变成 Ready 状态。Init容器的端口将不会在 Service 中进行聚集。 正在初始化中的 Pod 处于 Pending 状态,但应该会将 Initializing 状态设置为 true
  • 如果 Pod 重启,所有 Init 容器必须重新执行
  • 对 Init 容器 spec 的修改被限制在容器 image 字段,修改其他字段都不会生效。更改 Init容器的 image 字段,等价于重启该 Pod
  • Init 容器具有应用容器的所有字段。除了 readinessProbe,因为 Init 容器无法定义不同于完成 (completion)的就绪(readiness)之外的其他状态。这会在验证过程中强制执行
  • 在 Pod 中的每个 app 和 Init 容器的名称必须唯一;与任何其它容器共享同一个名称,会在验证时抛出错误

demo配置样例如下

1
2
3
4
5
6
7
8
9
10
11
12
13
14
15
16
17
18
apiVersion: v1
kind: Pod
metadata:
name: myapp-pod
labels:
app: myapp
spec:
containers:
- name: myapp-container
image: 192.168.16.110:20080/stady/busybox:1.28.3
command: ['sh', '-c', 'echo The app is running! && sleep 3600']
initContainers:
- name: init-myservice
image: 192.168.16.110:20080/stady/busybox:1.28.3
command: ['sh', '-c', 'until nslookup myservice; do echo waiting for myservice; sleep 2; done;']
- name: init-mydb
image: 192.168.16.110:20080/stady/busybox:1.28.3
command: ['sh', '-c', 'until nslookup mydb; do echo waiting for mydb; sleep 2; done;']
  • 特殊说明: busybox 高版本的域名解析有bug 无法正确的解析到DNS. 这里指定了版本号1.28.3

检查POD状态 1

可以查询到 initC 容器成功数量 0/2

1
2
3
4
5
6
7
8
[root@master pod]# kubectl apply -f init-demo.yaml 
pod/myapp-pod created
[root@master pod]#
[root@master pod]# kubectl get pod -o wide
NAME READY STATUS RESTARTS AGE IP NODE NOMINATED NODE READINESS GATES
myapp-pod 0/1 Init:0/2 0 10s 10.244.1.4 node1 <none> <none>
...
[root@master pod]#

查询pod状态, 第一个initC容器 Running 其他容器没有启动

1
2
3
4
5
6
7
8
9
10
11
12
13
14
15
16
17
18
19
20
21
22
23
24
25
26
27
28
29
30
31
32
33
34
35
36
37
38
39
40
41
42
43
44
45
46
47
48
49
50
51
52
53
54
55
56
57
58
59
60
61
62
63
64
65
66
67
68
69
70
71
72
73
74
75
76
77
78
79
80
81
82
83
84
85
86
87
88
89
90
[root@master pod]# kubectl describe pod myapp-pod 
Name: myapp-pod
Namespace: default
Priority: 0
Service Account: default
Node: node1/192.168.16.201
Start Time: Wed, 18 Dec 2024 23:45:30 +0800
Labels: app=myapp
Annotations: <none>
Status: Pending
IP: 10.244.1.6
IPs:
IP: 10.244.1.6
Init Containers:
init-myservice:
Container ID: docker://dba9afa4147ec142ad25fdbd0e7dc74c9d592f4d272425ea9adf40f5c4bc5d4c
Image: 192.168.16.110:20080/stady/busybox:1.28.3
Image ID: docker-pullable://192.168.16.110:20080/stady/busybox@sha256:186694df7e479d2b8bf075d9e1b1d7a884c6de60470006d572350573bfa6dcd2
Port: <none>
Host Port: <none>
Command:
sh
-c
until nslookup myservice; do echo waiting for myservice; sleep 2; done;
State: Running
Started: Wed, 18 Dec 2024 23:45:30 +0800
Ready: False
Restart Count: 0
Environment: <none>
Mounts:
/var/run/secrets/kubernetes.io/serviceaccount from kube-api-access-54rjz (ro)
init-mydb:
Container ID:
Image: 192.168.16.110:20080/stady/busybox:1.28.3
Image ID:
Port: <none>
Host Port: <none>
Command:
sh
-c
until nslookup mydb; do echo waiting for mydb; sleep 2; done;
State: Waiting
Reason: PodInitializing
Ready: False
Restart Count: 0
Environment: <none>
Mounts:
/var/run/secrets/kubernetes.io/serviceaccount from kube-api-access-54rjz (ro)
Containers:
myapp-container:
Container ID:
Image: 192.168.16.110:20080/stady/busybox:1.28.3
Image ID:
Port: <none>
Host Port: <none>
Command:
sh
-c
echo The app is running! && sleep 3600
State: Waiting
Reason: PodInitializing
Ready: False
Restart Count: 0
Environment: <none>
Mounts:
/var/run/secrets/kubernetes.io/serviceaccount from kube-api-access-54rjz (ro)
Conditions:
Type Status
Initialized False
Ready False
ContainersReady False
PodScheduled True
Volumes:
kube-api-access-54rjz:
Type: Projected (a volume that contains injected data from multiple sources)
TokenExpirationSeconds: 3607
ConfigMapName: kube-root-ca.crt
ConfigMapOptional: <nil>
DownwardAPI: true
QoS Class: BestEffort
Node-Selectors: <none>
Tolerations: node.kubernetes.io/not-ready:NoExecute op=Exists for 300s
node.kubernetes.io/unreachable:NoExecute op=Exists for 300s
Events:
Type Reason Age From Message
---- ------ ---- ---- -------
Normal Scheduled 2m19s default-scheduler Successfully assigned default/myapp-pod to node1
Normal Pulled 2m19s kubelet Container image "192.168.16.110:20080/stady/busybox:1.28.3" already present on machine
Normal Created 2m19s kubelet Created container init-myservice
Normal Started 2m19s kubelet Started container init-myservice

查询initC第一个容器的日志. 解析不到 myservice 的域名.所以阻塞的initC容器

1
2
3
4
5
6
7
8
9
10
11
12
13
14
15
16
17
18
19
20
21
22
[root@master pod]# kubectl logs myapp-pod -c init-myservice  |tail -20
Server: 10.96.0.10
Address: 10.96.0.10:53

** server can't find myservice.localdomain: NXDOMAIN

** server can't find myservice.localdomain: NXDOMAIN

** server can't find myservice.default.svc.cluster.local: NXDOMAIN

** server can't find myservice.svc.cluster.local: NXDOMAIN

** server can't find myservice.cluster.local: NXDOMAIN

** server can't find myservice.svc.cluster.local: NXDOMAIN

** server can't find myservice.cluster.local: NXDOMAIN

** server can't find myservice.default.svc.cluster.local: NXDOMAIN

waiting for myservice
[root@master pod]#

创建Service服务1

创建 myservice 的服务 init-service1.yml 文件

1
2
3
4
5
6
7
8
9
10
kind: Service
apiVersion: v1
metadata:
name: myservice
spec:
ports:
- protocol: TCP
port: 80
targetPort: 9376

1
kubectl apply -f init-service1.yml
1
2
[root@master pod]# kubectl apply -f init-service1.yml
service/myservice created

检查POD状态 2

此时第一个initC容器已经 检查成功正常退出, init:1/2

1
2
3
4
5
[root@master pod]# kubectl get pod
NAME READY STATUS RESTARTS AGE
myapp-pod 0/1 Init:1/2 0 5m5s
pod-demo 2/2 Running 0 52m
[root@master pod]#

创建Service服务2

再创建第二个initC 服务配置 init-service2.yml

1
2
3
4
5
6
7
8
9
kind: Service
apiVersion: v1
metadata:
name: mydb
spec:
ports:
- protocol: TCP
port: 80
targetPort: 9377
1
kubectl apply -f init-service2.yml

检查POD状态 3

执行完了之后请多次执行

1
kubectl get pod

会看到init状态结束 PodInitializing
工作容器启动成 Running

1
2
3
4
5
6
7
8
9
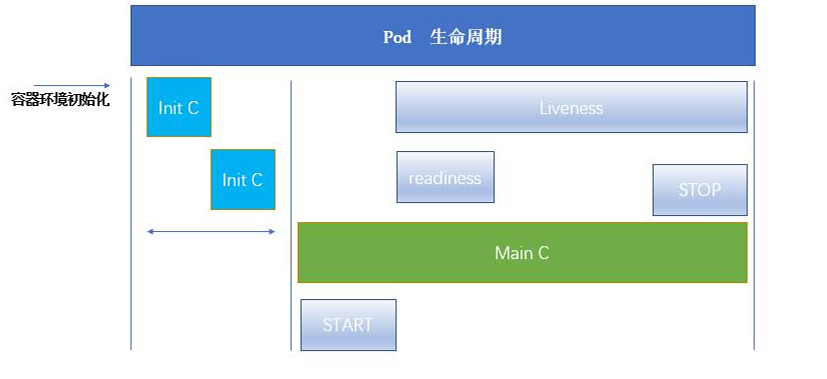
[root@master pod]# kubectl get pod
NAME READY STATUS RESTARTS AGE
myapp-pod 0/1 PodInitializing 0 7m32s
pod-demo 2/2 Running 0 54m
[root@master pod]# kubectl get pod
NAME READY STATUS RESTARTS AGE
myapp-pod 1/1 Running 0 7m43s
pod-demo 2/2 Running 0 55m
[root@master pod]#

就绪检测

readinessProbe:指示容器是否准备好服务请求。如果就绪探测失败,端点控制器将从与 Pod 匹配的所有 Service 的端点中删除该 Pod 的 IP 地址。初始延迟之前的就绪状态默认为 Failure。如果容器不提供就绪探针,则默认状态为 Success

就绪检测样例配置文件 readinessProbe-httpget.yml

1
2
3
4
5
6
7
8
9
10
11
12
13
14
15
16
17
apiVersion: v1
kind: Pod
metadata:
name: readiness-httpget-pod
namespace: default
spec:
containers:
- name: readiness-httpget-container
image: 192.168.16.110:20080/stady/myapp:v1
imagePullPolicy: IfNotPresent
readinessProbe:
httpGet:
port: 80
path: /index1.html
initialDelaySeconds: 1
periodSeconds: 3

1
2
3
4
5
6
7
[root@master pod]# kubectl apply -f readinessProbe-httpget.yml 
pod/readiness-httpget-pod created
[root@master pod]# kubectl get pod -o wide
NAME READY STATUS RESTARTS AGE IP NODE NOMINATED NODE READINESS GATES
...
readiness-httpget-pod 0/1 Running 0 16s 10.244.2.19 node2 <none> <none>
[root@master pod]#

看容器状态描述

Readiness probe failed: HTTP probe failed with statuscode: 404

1
2
3
4
5
6
7
8
9
10
11
12
13
14
15
16
17
18
19
20
21
22
23
24
25
26
27
28
29
30
31
32
33
34
35
36
37
38
39
40
41
42
43
44
45
46
47
48
49
50
51
52
53
54
55
[root@master pod]# kubectl describe pod readiness-httpget-pod
Name: readiness-httpget-pod
Namespace: default
Priority: 0
Service Account: default
Node: node2/192.168.16.202
Start Time: Thu, 19 Dec 2024 22:22:09 +0800
Labels: <none>
Annotations: <none>
Status: Running
IP: 10.244.2.19
IPs:
IP: 10.244.2.19
Containers:
readiness-httpget-container:
Container ID: docker://bee1c02521da468d2e15c5f06dc5eca440227321092a663f31002a8faa8e617c
Image: 192.168.16.110:20080/stady/myapp:v1
Image ID: docker-pullable://192.168.16.110:20080/stady/myapp@sha256:9eeca44ba2d410e54fccc54cbe9c021802aa8b9836a0bcf3d3229354e4c8870e
Port: <none>
Host Port: <none>
State: Running
Started: Thu, 19 Dec 2024 22:22:13 +0800
Ready: False
Restart Count: 0
Readiness: http-get http://:80/index1.html delay=1s timeout=1s period=3s #success=1 #failure=3
Environment: <none>
Mounts:
/var/run/secrets/kubernetes.io/serviceaccount from kube-api-access-mfqxj (ro)
Conditions:
Type Status
Initialized True
Ready False
ContainersReady False
PodScheduled True
Volumes:
kube-api-access-mfqxj:
Type: Projected (a volume that contains injected data from multiple sources)
TokenExpirationSeconds: 3607
ConfigMapName: kube-root-ca.crt
ConfigMapOptional: <nil>
DownwardAPI: true
QoS Class: BestEffort
Node-Selectors: <none>
Tolerations: node.kubernetes.io/not-ready:NoExecute op=Exists for 300s
node.kubernetes.io/unreachable:NoExecute op=Exists for 300s
Events:
Type Reason Age From Message
---- ------ ---- ---- -------
Normal Scheduled 2m44s default-scheduler Successfully assigned default/readiness-httpget-pod to node2
Normal Pulling 2m42s kubelet Pulling image "192.168.16.110:20080/stady/myapp:v1"
Normal Pulled 2m41s kubelet Successfully pulled image "192.168.16.110:20080/stady/myapp:v1" in 1.064s (1.064s including waiting)
Normal Created 2m41s kubelet Created container readiness-httpget-container
Normal Started 2m40s kubelet Started container readiness-httpget-container
Warning Unhealthy 100s (x21 over 2m39s) kubelet Readiness probe failed: HTTP probe failed with statuscode: 404
[root@master pod]#

进入pod容器中,构造index.html页面.

1
2
3
4
5
[root@master pod]# kubectl exec -it readiness-httpget-pod -- /bin/sh
/ # cd /usr/share/nginx/html/
/usr/share/nginx/html #
/usr/share/nginx/html # echo "123" >> index1.html
/usr/share/nginx/html # exit

再次检查pod状态

READY 1/1

1
2
3
4
[root@master pod]# kubectl get pod -o wide
NAME READY STATUS RESTARTS AGE IP NODE NOMINATED NODE READINESS GATES
...
readiness-httpget-pod 1/1 Running 0 6m54s 10.244.2.19 node2 <none> <none>

探针

探针是由 kubelet 对容器执行的定期诊断。要执行诊断,kubelet 调用由容器实现的 Handler。有三
种类型的处理程序:

  • ExecAction:在容器内执行指定命令。如果命令退出时返回码为 0 则认为诊断成功。
  • TCPSocketAction:对指定端口上的容器的 IP 地址进行 TCP 检查。如果端口打开,则诊断被认为是成功的。
  • HTTPGetAction:对指定的端口和路径上的容器的 IP 地址执行 HTTP Get 请求。如果响应的状态码大于等于200 且小于 400,则诊断被认为是成功的

每次探测都将获得以下三种结果之一:

  • 成功:容器通过了诊断。
  • 失败:容器未通过诊断。
  • 未知:诊断失败,因此不会采取任何行动

检测配置文件 livenessProbe-exec.yml

1
2
3
4
5
6
7
8
9
10
11
12
13
14
15
16
17
apiVersion: v1
kind: Pod
metadata:
name: liveness-exec-pod
namespace: default
spec:
containers:
- name: liveness-exec-container
image: 192.168.16.110:20080/stady/busybox:1.28.3
imagePullPolicy: IfNotPresent
command: ["/bin/sh","-c","touch /tmp/live ; sleep 60; rm -rf /tmp/live; sleep 3600"]
livenessProbe:
exec:
command: ["test","-e","/tmp/live"]
initialDelaySeconds: 1
periodSeconds: 3

使用 -w 参数监控一分钟 ,关注 RESTARTS 字段
每经过60秒会重启.

1
2
3
4
5
6
7
8
9
10
11
12
13
14
15
16
17
18
19
[root@master pod]# kubectl apply -f livenessProbe-exec.yml 
pod/liveness-exec-pod created
[root@master pod]# kubectl get pod
NAME READY STATUS RESTARTS AGE
liveness-exec-pod 1/1 Running 0 86s
[root@master pod]#
[root@master pod]# kubectl get pod
NAME READY STATUS RESTARTS AGE
liveness-exec-pod 1/1 Running 0 86s
[root@master pod]# kubectl get pod -w
NAME READY STATUS RESTARTS AGE
liveness-exec-pod 1/1 Running 1 (14s ago) 114s

liveness-exec-pod 1/1 Running 2 (0s ago) 3m19s

liveness-exec-pod 1/1 Running 3 (0s ago) 4m58s


检测配置文件 livenessProbe-httpget.yml

1
2
3
4
5
6
7
8
9
10
11
12
13
14
15
16
17
18
19
20
21
apiVersion: v1
kind: Pod
metadata:
name: liveness-httpget-pod
namespace: default
spec:
containers:
- name: liveness-httpget-container
image: 192.168.16.110:20080/stady/myapp:v1
imagePullPolicy: IfNotPresent
ports:
- name: http
containerPort: 80
livenessProbe:
httpGet:
port: http
path: /index.html
initialDelaySeconds: 1
periodSeconds: 3
timeoutSeconds: 10

1
2
3
4
5
6
7
[root@master pod]# kubectl apply -f livenessProbe-httpget.yml
pod/liveness-httpget-pod created
[root@master pod]#
[root@master pod]# kubectl get pod -o wide
NAME READY STATUS RESTARTS AGE IP NODE NOMINATED NODE READINESS GATES
liveness-httpget-pod 1/1 Running 0 45s 10.244.1.13 node1 <none> <none>
[root@master pod]#

登录这个容器,删除index.html文件 关注 RESTARTS 次数

1
2
3
4
5
6
7
8
9
10
[root@master pod]# kubectl exec -it  liveness-httpget-pod -- /bin/sh
/ # rm -rf /usr/share/nginx/html/index.html
/ # exit
command terminated with exit code 127
[root@master pod]#
[root@master pod]# kubectl get pod -o wide
NAME READY STATUS RESTARTS AGE IP NODE NOMINATED NODE READINESS GATES
liveness-httpget-pod 1/1 Running 1 (1s ago) 113s 10.244.1.13 node1 <none> <none>
[root@master pod]#

检测配置文件 livenessProbe-TCPSocket.yml

根据检测8080端口是否存在

1
2
3
4
5
6
7
8
9
10
11
12
13
14
15
apiVersion: v1
kind: Pod
metadata:
name: probe-tcp
spec:
containers:
- name: nginx
image: 192.168.16.110:20080/stady/myapp:v1
livenessProbe:
initialDelaySeconds: 5
timeoutSeconds: 1
tcpSocket:
port: 8080
periodSeconds: 3

通过 -w 监控 会重复启动.

1
2
3
4
5
6
7
[root@master pod]# kubectl get pod -w
NAME READY STATUS RESTARTS AGE
probe-tcp 1/1 Running 2 (4s ago) 29s
probe-tcp 1/1 Running 3 (0s ago) 37s
probe-tcp 0/1 CrashLoopBackOff 3 (0s ago) 49s
probe-tcp 1/1 Running 4 (30s ago) 79s
probe-tcp 1/1 Running 5 (0s ago) 91s

启动与退出动作

配置启动退出的配置文件 startAstopProc.yml

1
2
3
4
5
6
7
8
9
10
11
12
13
14
15
apiVersion: v1
kind: Pod
metadata:
name: lifecycle-demo
spec:
containers:
- name: lifecycle-demo-container
image: 192.168.16.110:20080/stady/myapp:v1
lifecycle:
postStart:
exec:
command: ["/bin/sh", "-c", "echo Hello from the postStart handler > /usr/share/message"]
preStop:
exec:
command: ["/bin/sh", "-c", "echo Hello from the poststop handler > /usr/share/message"]

查询 写入的信息

1
2
3
4
5
6
7
8
[root@master pod]# kubectl get pod 
NAME READY STATUS RESTARTS AGE
lifecycle-demo 1/1 Running 0 52s
[root@master pod]#
[root@master pod]# kubectl exec lifecycle-demo -- cat /usr/share/message
Hello from the postStart handler
[root@master pod]#

  • 退出的话容器会消失这个文件也会消失.这里不再做演示

资源控制器

Kubernetes 中内建了很多 controller(控制器),这些相当于一个状态机,用来控制 Pod 的具体状态和行为
控制器类型

  • ReplicationController 和 ReplicaSet
  • Deployment
  • DaemonSet
  • StateFulSet
  • Job/CronJob
  • Horizontal Pod Autoscalin

RS

ReplicationController(RC)用来确保容器应用的副本数始终保持在用户定义的副本数,即如果有容器异常退出,会自动创建新的 Pod 来替代;而如果异常多出来的容器也会自动回收;
在新版本的 Kubernetes 中建议使用 ReplicaSet(RS) 来取代 ReplicationController 。ReplicaSet 跟ReplicationController 没有本质的不同,只是名字不一样,并且 ReplicaSet 支持集合式的 selector;

构造配置文件 RS.yml

1
2
3
4
5
6
7
8
9
10
11
12
13
14
15
16
17
18
19
20
21
22
apiVersion: apps/v1
kind: ReplicaSet
metadata:
name: frontend
spec:
replicas: 3
selector:
matchLabels:
tier: frontend
template:
metadata:
labels:
tier: frontend
spec:
containers:
- name: myapp
image: 192.168.16.110:20080/stady/myapp:v1
env:
- name: GET_HOSTS_FROM
value: dns
ports:
- containerPort: 80

查看启动之后有3个pod

1
2
3
4
5
6
7
8
[root@master conller]# kubectl apply -f RS.yml 
replicaset.apps/frontend created
[root@master conller]# kubectl get pod
NAME READY STATUS RESTARTS AGE
frontend-cp6qr 1/1 Running 0 9s
frontend-r5r97 1/1 Running 0 9s
frontend-ztw82 1/1 Running 0 9s

删除pod之后 再查看pod列表.
还会查看到三个pod(新建三个)

1
2
3
4
5
6
7
8
9
10
[root@master conller]# kubectl delete pod --all
pod "frontend-cp6qr" deleted
pod "frontend-r5r97" deleted
pod "frontend-ztw82" deleted
[root@master conller]# kubectl get pod
NAME READY STATUS RESTARTS AGE
frontend-hkdxn 1/1 Running 0 5s
frontend-t2p4v 1/1 Running 0 5s
frontend-xpwqs 1/1 Running 0 5s
[root@master conller]#

使用 –show-labels 参数会显示标签信息

1
2
3
4
5
6
[root@master conller]# kubectl get pod --show-labels
NAME READY STATUS RESTARTS AGE LABELS
frontend-hkdxn 1/1 Running 0 70s tier=frontend
frontend-t2p4v 1/1 Running 0 70s tier=frontend
frontend-xpwqs 1/1 Running 0 70s tier=frontend
[root@master conller]#

修改其中一个pod的标签, 自动会将 frontend 的pod 增加至三个(新增一个)

1
2
3
4
5
6
7
8
9
[root@master conller]# kubectl label pod frontend-hkdxn tier=frontend1 --overwrite=True
pod/frontend-hkdxn labeled
[root@master conller]# kubectl get pod --show-labels
NAME READY STATUS RESTARTS AGE LABELS
frontend-9kwp8 1/1 Running 0 3s tier=frontend
frontend-hkdxn 1/1 Running 0 3m33s tier=frontend1
frontend-t2p4v 1/1 Running 0 3m33s tier=frontend
frontend-xpwqs 1/1 Running 0 3m33s tier=frontend
[root@master conller]#

再将该标签改回成 frontend , 自动会将 frontend 的pod 缩减至三个(减少一个)

1
2
3
4
5
6
7
8
9
[root@master conller]# kubectl label pod frontend-hkdxn tier=frontend --overwrite=True
pod/frontend-hkdxn labeled
[root@master conller]# kubectl get pod --show-labels
NAME READY STATUS RESTARTS AGE LABELS
frontend-hkdxn 1/1 Running 0 4m34s tier=frontend
frontend-t2p4v 1/1 Running 0 4m34s tier=frontend
frontend-xpwqs 1/1 Running 0 4m34s tier=frontend
[root@master conller]#

Deployment

Deployment 为 Pod 和 ReplicaSet 提供了一个声明式定义(declarative)方法,用来替代以前的
ReplicationController 来方便的管理应用。典型的应用场景包括:

  • 定义Deployment来创建Pod和ReplicaSet
  • 滚动升级和回滚应用
  • 扩容和缩容
  • 暂停和继续Deployment

部署一个简单的 Nginx 应用

1
2
3
4
5
6
7
8
9
10
11
12
13
14
15
16
17
18
19
apiVersion: apps/v1
kind: Deployment
metadata:
name: my-nginx
spec:
selector:
matchLabels:
app: my-nginx
replicas: 3
template:
metadata:
labels:
app: my-nginx
spec:
containers:
- name: my-nginx
image: 192.168.16.110:20080/stady/myapp:v1
ports:
- containerPort: 80
1
kubectl apply -f deployment.yml
1
2
3
4
5
6
7
8
[root@master conller]# kubectl apply -f deployment.yml 
deployment.apps/my-nginx created
[root@master conller]# kubectl get pod
NAME READY STATUS RESTARTS AGE
my-nginx-86bdff5685-7fkmq 1/1 Running 0 6s
my-nginx-86bdff5685-npwvs 1/1 Running 0 6s
my-nginx-86bdff5685-vv7d6 1/1 Running 0 6s
[root@master conller]#

扩容

1
kubectl scale deployment my-nginx --replicas 10

查看pod

1
2
3
4
5
6
7
8
9
10
11
12
13
14
15
16
17
18
19
20
21
22
23
24
25
26
27
28
29
30
31
32
33
34
35
36
37
38
39
40
41
42
43
44
45
46
47
48
49
50
51
52
53
[root@master conller]# kubectl scale deployment my-nginx --replicas 10
deployment.apps/my-nginx scaled
[root@master conller]#
[root@master conller]#
[root@master conller]# kubectl get pod
NAME READY STATUS RESTARTS AGE
my-nginx-86bdff5685-7fkmq 1/1 Running 0 4m2s
my-nginx-86bdff5685-c5t44 0/1 ContainerCreating 0 3s
my-nginx-86bdff5685-h7qfh 0/1 ContainerCreating 0 3s
my-nginx-86bdff5685-hj7rb 0/1 ContainerCreating 0 3s
my-nginx-86bdff5685-k4zht 0/1 ContainerCreating 0 3s
my-nginx-86bdff5685-npwvs 1/1 Running 0 4m2s
my-nginx-86bdff5685-q6jbn 0/1 ContainerCreating 0 3s
my-nginx-86bdff5685-rcbhv 0/1 ContainerCreating 0 3s
my-nginx-86bdff5685-vn6g4 0/1 ContainerCreating 0 3s
my-nginx-86bdff5685-vv7d6 1/1 Running 0 4m2s
[root@master conller]# kubectl get pod
NAME READY STATUS RESTARTS AGE
my-nginx-86bdff5685-7fkmq 1/1 Running 0 4m5s
my-nginx-86bdff5685-c5t44 0/1 ContainerCreating 0 6s
my-nginx-86bdff5685-h7qfh 1/1 Running 0 6s
my-nginx-86bdff5685-hj7rb 0/1 ContainerCreating 0 6s
my-nginx-86bdff5685-k4zht 0/1 ContainerCreating 0 6s
my-nginx-86bdff5685-npwvs 1/1 Running 0 4m5s
my-nginx-86bdff5685-q6jbn 1/1 Running 0 6s
my-nginx-86bdff5685-rcbhv 1/1 Running 0 6s
my-nginx-86bdff5685-vn6g4 0/1 ContainerCreating 0 6s
my-nginx-86bdff5685-vv7d6 1/1 Running 0 4m5s
[root@master conller]# kubectl get pod
NAME READY STATUS RESTARTS AGE
my-nginx-86bdff5685-7fkmq 1/1 Running 0 4m6s
my-nginx-86bdff5685-c5t44 0/1 ContainerCreating 0 7s
my-nginx-86bdff5685-h7qfh 1/1 Running 0 7s
my-nginx-86bdff5685-hj7rb 0/1 ContainerCreating 0 7s
my-nginx-86bdff5685-k4zht 0/1 ContainerCreating 0 7s
my-nginx-86bdff5685-npwvs 1/1 Running 0 4m6s
my-nginx-86bdff5685-q6jbn 1/1 Running 0 7s
my-nginx-86bdff5685-rcbhv 1/1 Running 0 7s
my-nginx-86bdff5685-vn6g4 0/1 ContainerCreating 0 7s
my-nginx-86bdff5685-vv7d6 1/1 Running 0 4m6s
[root@master conller]# kubectl get pod
NAME READY STATUS RESTARTS AGE
my-nginx-86bdff5685-7fkmq 1/1 Running 0 4m9s
my-nginx-86bdff5685-c5t44 1/1 Running 0 10s
my-nginx-86bdff5685-h7qfh 1/1 Running 0 10s
my-nginx-86bdff5685-hj7rb 1/1 Running 0 10s
my-nginx-86bdff5685-k4zht 1/1 Running 0 10s
my-nginx-86bdff5685-npwvs 1/1 Running 0 4m9s
my-nginx-86bdff5685-q6jbn 1/1 Running 0 10s
my-nginx-86bdff5685-rcbhv 1/1 Running 0 10s
my-nginx-86bdff5685-vn6g4 1/1 Running 0 10s
my-nginx-86bdff5685-vv7d6 1/1 Running 0 4m9s
[root@master conller]#

如果集群支持 horizontal pod autoscaling 的话,还可以为Deployment设置自动扩展

1
kubectl autoscale deployment my-nginx --min=2 --max=5 --cpu-percent=80

根据资源调整容器数量

1
2
3
4
5
6
7
8
9
10
11
12
13
14
15
16
17
18
19
20
21
22
23
24
25
26
27
28
29
30
31
32
33
34
35
36
37
38
39
40
41
42
43
44
45
46
47
48
49
50
51
52
53
54
55
56
57
58
59
60
61
[root@master conller]# kubectl autoscale deployment my-nginx --min=2 --max=5 --cpu-percent=80
horizontalpodautoscaler.autoscaling/my-nginx autoscaled
[root@master configMap]# kubectl get hpa
NAME REFERENCE TARGETS MINPODS MAXPODS REPLICAS AGE
my-nginx Deployment/my-nginx <unknown>/80% 2 5 2 3d20h
[root@master configMap]#
[root@master configMap]# kubectl describe hpa my-nginx
Name: my-nginx
Namespace: default
Labels: <none>
Annotations: <none>
CreationTimestamp: Sat, 21 Dec 2024 00:31:01 +0800
Reference: Deployment/my-nginx
Metrics: ( current / target )
resource cpu on pods (as a percentage of request): <unknown> / 80%
Min replicas: 2
Max replicas: 5
Deployment pods: 2 current / 2 desired
Conditions:
Type Status Reason Message
---- ------ ------ -------
AbleToScale False FailedGetScale the HPA controller was unable to get the target's current scale: deployments/scale.apps "my-nginx" not found
ScalingActive False FailedGetResourceMetric the HPA was unable to compute the replica count: failed to get cpu utilization: unable to get metrics for resource cpu: unable to fetch metrics from resource metrics API: the server could not find the requested resource (get pods.metrics.k8s.io)
Events:
Type Reason Age From Message
---- ------ ---- ---- -------
Warning FailedGetScale 18m (x281 over 88m) horizontal-pod-autoscaler deployments/scale.apps "my-nginx" not found
Warning FailedGetResourceMetric 3m14s (x43 over 14m) horizontal-pod-autoscaler failed to get cpu utilization: unable to get metrics for resource cpu: unable to fetch metrics from resource metrics API: the server could not find the requested resource (get pods.metrics.k8s.io)
[root@master configMap]#
[root@master conller]# kubectl get pod
NAME READY STATUS RESTARTS AGE
my-nginx-86bdff5685-7fkmq 1/1 Running 0 5m25s
my-nginx-86bdff5685-c5t44 1/1 Running 0 86s
my-nginx-86bdff5685-h7qfh 1/1 Running 0 86s
my-nginx-86bdff5685-hj7rb 1/1 Running 0 86s
my-nginx-86bdff5685-k4zht 1/1 Running 0 86s
my-nginx-86bdff5685-npwvs 1/1 Running 0 5m25s
my-nginx-86bdff5685-q6jbn 1/1 Running 0 86s
my-nginx-86bdff5685-rcbhv 1/1 Running 0 86s
my-nginx-86bdff5685-vn6g4 1/1 Running 0 86s
my-nginx-86bdff5685-vv7d6 1/1 Running 0 5m25s
[root@master conller]# kubectl get pod
NAME READY STATUS RESTARTS AGE
my-nginx-86bdff5685-7fkmq 1/1 Running 0 5m31s
my-nginx-86bdff5685-c5t44 1/1 Running 0 92s
my-nginx-86bdff5685-h7qfh 1/1 Running 0 92s
my-nginx-86bdff5685-hj7rb 1/1 Running 0 92s
my-nginx-86bdff5685-k4zht 1/1 Running 0 92s
my-nginx-86bdff5685-npwvs 1/1 Running 0 5m31s
my-nginx-86bdff5685-q6jbn 1/1 Running 0 92s
my-nginx-86bdff5685-rcbhv 1/1 Running 0 92s
my-nginx-86bdff5685-vn6g4 1/1 Running 0 92s
my-nginx-86bdff5685-vv7d6 1/1 Running 0 5m31s
[root@master conller]# kubectl get pod
NAME READY STATUS RESTARTS AGE
my-nginx-86bdff5685-7fkmq 1/1 Running 0 5m50s
my-nginx-86bdff5685-hj7rb 1/1 Running 0 111s
my-nginx-86bdff5685-k4zht 1/1 Running 0 111s
my-nginx-86bdff5685-npwvs 1/1 Running 0 5m50s
my-nginx-86bdff5685-vv7d6 1/1 Running 0 5m50s
[root@master conller]#
1
2
3
4
5
6
7
8
9
10
11
12
13
14
15
16
17
18
19
20
21
22
23
24
25
26
27
28
29
30
31
32
33
34
35
36
[root@master conller]# kubectl describe deployment my-nginx
Name: my-nginx
Namespace: default
CreationTimestamp: Sat, 21 Dec 2024 00:25:39 +0800
Labels: <none>
Annotations: deployment.kubernetes.io/revision: 1
Selector: app=my-nginx
Replicas: 5 desired | 5 updated | 5 total | 5 available | 0 unavailable
StrategyType: RollingUpdate
MinReadySeconds: 0
RollingUpdateStrategy: 25% max unavailable, 25% max surge
Pod Template:
Labels: app=my-nginx
Containers:
my-nginx:
Image: 192.168.16.110:20080/stady/myapp:v1
Port: 80/TCP
Host Port: 0/TCP
Environment: <none>
Mounts: <none>
Volumes: <none>
Conditions:
Type Status Reason
---- ------ ------
Progressing True NewReplicaSetAvailable
Available True MinimumReplicasAvailable
OldReplicaSets: <none>
NewReplicaSet: my-nginx-86bdff5685 (5/5 replicas created)
Events:
Type Reason Age From Message
---- ------ ---- ---- -------
Normal ScalingReplicaSet 6m57s deployment-controller Scaled up replica set my-nginx-86bdff5685 to 3
Normal ScalingReplicaSet 2m58s deployment-controller Scaled up replica set my-nginx-86bdff5685 to 10 from 3
Normal ScalingReplicaSet 80s deployment-controller Scaled down replica set my-nginx-86bdff5685 to 5 from 10
[root@master conller]#
[root@master conller]#

更新镜像也比较简单

1
kubectl set image deployment/my-nginx my-nginx=192.168.16.110:20080/stady/myapp:v2
1
2
3
4
5
6
7
8
9
10
11
12
13
14
15
16
17
18
19
20
21
22
23
24
25
26
27
28
29
30
31
32
33
34
35
36
37
38
39
40
41
42
43
44
45
46
47
48
49
50
51
52
53
54
[root@master conller]# kubectl set image deployment/my-nginx my-nginx=192.168.16.110:20080/stady/myapp:v2
deployment.apps/my-nginx image updated
[root@master conller]# kubectl get pod -o wide
NAME READY STATUS RESTARTS AGE IP NODE NOMINATED NODE READINESS GATES
my-nginx-5d7f954ff4-92f76 1/1 Running 0 22s 10.244.2.31 node2 <none> <none>
my-nginx-5d7f954ff4-dxxwb 1/1 Running 0 22s 10.244.1.29 node1 <none> <none>
my-nginx-5d7f954ff4-fhlxp 1/1 Running 0 24s 10.244.2.30 node2 <none> <none>
my-nginx-5d7f954ff4-hqnvb 1/1 Running 0 24s 10.244.1.28 node1 <none> <none>
my-nginx-5d7f954ff4-n44r7 1/1 Running 0 24s 10.244.1.27 node1 <none> <none>
[root@master conller]# curl 10.244.2.31:80
Hello MyApp | Version: v2 | <a href="hostname.html">Pod Name</a>
[root@master conller]#
[root@master conller]# kubectl describe deployment my-nginx
Name: my-nginx
Namespace: default
CreationTimestamp: Sat, 21 Dec 2024 00:25:39 +0800
Labels: <none>
Annotations: deployment.kubernetes.io/revision: 2
Selector: app=my-nginx
Replicas: 5 desired | 5 updated | 5 total | 5 available | 0 unavailable
StrategyType: RollingUpdate
MinReadySeconds: 0
RollingUpdateStrategy: 25% max unavailable, 25% max surge
Pod Template:
Labels: app=my-nginx
Containers:
my-nginx:
Image: 192.168.16.110:20080/stady/myapp:v2
Port: 80/TCP
Host Port: 0/TCP
Environment: <none>
Mounts: <none>
Volumes: <none>
Conditions:
Type Status Reason
---- ------ ------
Available True MinimumReplicasAvailable
Progressing True NewReplicaSetAvailable
OldReplicaSets: my-nginx-86bdff5685 (0/0 replicas created)
NewReplicaSet: my-nginx-5d7f954ff4 (5/5 replicas created)
Events:
Type Reason Age From Message
---- ------ ---- ---- -------
Normal ScalingReplicaSet 11m deployment-controller Scaled up replica set my-nginx-86bdff5685 to 3
Normal ScalingReplicaSet 7m15s deployment-controller Scaled up replica set my-nginx-86bdff5685 to 10 from 3
Normal ScalingReplicaSet 5m37s deployment-controller Scaled down replica set my-nginx-86bdff5685 to 5 from 10
Normal ScalingReplicaSet 75s deployment-controller Scaled up replica set my-nginx-5d7f954ff4 to 2
Normal ScalingReplicaSet 75s deployment-controller Scaled down replica set my-nginx-86bdff5685 to 4 from 5
Normal ScalingReplicaSet 75s deployment-controller Scaled up replica set my-nginx-5d7f954ff4 to 3 from 2
Normal ScalingReplicaSet 73s deployment-controller Scaled down replica set my-nginx-86bdff5685 to 3 from 4
Normal ScalingReplicaSet 73s deployment-controller Scaled up replica set my-nginx-5d7f954ff4 to 4 from 3
Normal ScalingReplicaSet 73s deployment-controller Scaled down replica set my-nginx-86bdff5685 to 2 from 3
Normal ScalingReplicaSet 72s (x3 over 73s) deployment-controller (combined from similar events): Scaled down replica set my-nginx-86bdff5685 to 0 from 1
[root@master conller]#

回滚

1
kubectl rollout undo deployment/my-nginx
1
2
3
4
5
6
7
8
9
10
11
12
13
14
15
16
17
18
19
20
21
22
23
24
25
26
27
28
29
30
31
32
33
34
35
36
37
38
39
40
41
42
43
44
45
46
47
48
49
50
51
52
53
[root@master conller]# kubectl rollout undo deployment/my-nginx
deployment.apps/my-nginx rolled back
[root@master conller]# kubectl get pod -o wide
NAME READY STATUS RESTARTS AGE IP NODE NOMINATED NODE READINESS GATES
my-nginx-86bdff5685-7czmv 1/1 Running 0 4s 10.244.1.30 node1 <none> <none>
my-nginx-86bdff5685-fg72r 1/1 Running 0 4s 10.244.2.32 node2 <none> <none>
my-nginx-86bdff5685-grmbr 1/1 Running 0 3s 10.244.2.33 node2 <none> <none>
my-nginx-86bdff5685-nfff9 1/1 Running 0 3s 10.244.1.32 node1 <none> <none>
my-nginx-86bdff5685-smm4w 1/1 Running 0 4s 10.244.1.31 node1 <none> <none>
[root@master conller]# curl 10.244.1.30
Hello MyApp | Version: v1 | <a href="hostname.html">Pod Name</a>
[root@master conller]# kubectl describe deployment my-nginx
Name: my-nginx
Namespace: default
CreationTimestamp: Sat, 21 Dec 2024 00:25:39 +0800
Labels: <none>
Annotations: deployment.kubernetes.io/revision: 3
Selector: app=my-nginx
Replicas: 5 desired | 5 updated | 5 total | 5 available | 0 unavailable
StrategyType: RollingUpdate
MinReadySeconds: 0
RollingUpdateStrategy: 25% max unavailable, 25% max surge
Pod Template:
Labels: app=my-nginx
Containers:
my-nginx:
Image: 192.168.16.110:20080/stady/myapp:v1
Port: 80/TCP
Host Port: 0/TCP
Environment: <none>
Mounts: <none>
Volumes: <none>
Conditions:
Type Status Reason
---- ------ ------
Available True MinimumReplicasAvailable
Progressing True NewReplicaSetAvailable
OldReplicaSets: my-nginx-5d7f954ff4 (0/0 replicas created)
NewReplicaSet: my-nginx-86bdff5685 (5/5 replicas created)
Events:
Type Reason Age From Message
---- ------ ---- ---- -------
Normal ScalingReplicaSet 12m deployment-controller Scaled up replica set my-nginx-86bdff5685 to 3
Normal ScalingReplicaSet 8m3s deployment-controller Scaled up replica set my-nginx-86bdff5685 to 10 from 3
Normal ScalingReplicaSet 6m25s deployment-controller Scaled down replica set my-nginx-86bdff5685 to 5 from 10
Normal ScalingReplicaSet 2m3s deployment-controller Scaled up replica set my-nginx-5d7f954ff4 to 2
Normal ScalingReplicaSet 2m3s deployment-controller Scaled down replica set my-nginx-86bdff5685 to 4 from 5
Normal ScalingReplicaSet 2m3s deployment-controller Scaled up replica set my-nginx-5d7f954ff4 to 3 from 2
Normal ScalingReplicaSet 2m1s deployment-controller Scaled down replica set my-nginx-86bdff5685 to 3 from 4
Normal ScalingReplicaSet 2m1s deployment-controller Scaled up replica set my-nginx-5d7f954ff4 to 4 from 3
Normal ScalingReplicaSet 2m1s deployment-controller Scaled down replica set my-nginx-86bdff5685 to 2 from 3
Normal ScalingReplicaSet 13s (x12 over 2m1s) deployment-controller (combined from similar events): Scaled down replica set my-nginx-5d7f954ff4 to 0 from 1
[root@master conller]#

Deamonset

DaemonSet 确保全部(或者一些)Node 上运行一个 Pod 的副本。当有 Node 加入集群时,也会为他们新增一个Pod 。当有 Node 从集群移除时,这些 Pod 也会被回收。删除 DaemonSet 将会删除它创建的所有 Pod

1
2
3
4
5
6
7
8
9
10
11
12
13
14
15
16
17
18
apiVersion: apps/v1
kind: DaemonSet
metadata:
name: deamonset-example
labels:
app: daemonset
spec:
selector:
matchLabels:
name: deamonset-example
template:
metadata:
labels:
name: deamonset-example
spec:
containers:
- name: daemonset-example
image: 192.168.16.110:20080/stady/myapp:v1

可以看到每个node节点有一个对应容器

1
2
3
4
5
6
7
[root@master conller]# kubectl apply -f deamonset.yml 
daemonset.apps/deamonset-example created
[root@master conller]# kubectl get pod -o wide
NAME READY STATUS RESTARTS AGE IP NODE NOMINATED NODE READINESS GATES
deamonset-example-dq67b 1/1 Running 0 28s 10.244.2.38 node2 <none> <none>
deamonset-example-rk55z 1/1 Running 0 28s 10.244.1.36 node1 <none> <none>
[root@master conller]#

Job

Job 负责批处理任务,即仅执行一次的任务,它保证批处理任务的一个或多个 Pod 成功结束

1
2
3
4
5
6
7
8
9
10
11
12
13
14
apiVersion: batch/v1
kind: Job
metadata:
name: pi
spec:
template:
metadata:
name: pi
spec:
containers:
- name: pi
image: 192.168.16.110:20080/stady/perl
command: ["perl", "-Mbignum=bpi", "-wle", "print bpi(2000)"]
restartPolicy: Never
1
2
3
4
5
6
7
8
9
10
11
12
13
14
15
[root@master conller]# kubectl apply -f job.yml 
job.batch/pi created
[root@master conller]# kubectl get pod
NAME READY STATUS RESTARTS AGE
deamonset-example-dq67b 1/1 Running 0 24m
deamonset-example-rk55z 1/1 Running 0 24m
pi-5f64n 0/1 ContainerCreating 0 14s
[root@master conller]# kubectl get pod
NAME READY STATUS RESTARTS AGE
deamonset-example-dq67b 1/1 Running 0 26m
deamonset-example-rk55z 1/1 Running 0 26m
pi-5f64n 0/1 Completed 0 97s
[root@master conller]# kubectl logs pi-5f64n
3.1415926535897932384626433832795028841971693993751058209749445923078164062862089986280348253421170679821480865132823066470938446095505822317253594081284811174502841027019385211055596446229489549303819644288109756659334461284756482337867831652712019091456485669234603486104543266482133936072602491412737245870066063155881748815209209628292540917153643678925903600113305305488204665213841469519415116094330572703657595919530921861173819326117931051185480744623799627495673518857527248912279381830119491298336733624406566430860213949463952247371907021798609437027705392171762931767523846748184676694051320005681271452635608277857713427577896091736371787214684409012249534301465495853710507922796892589235420199561121290219608640344181598136297747713099605187072113499999983729780499510597317328160963185950244594553469083026425223082533446850352619311881710100031378387528865875332083814206171776691473035982534904287554687311595628638823537875937519577818577805321712268066130019278766111959092164201989380952572010654858632788659361533818279682303019520353018529689957736225994138912497217752834791315155748572424541506959508295331168617278558890750983817546374649393192550604009277016711390098488240128583616035637076601047101819429555961989467678374494482553797747268471040475346462080466842590694912933136770289891521047521620569660240580381501935112533824300355876402474964732639141992726042699227967823547816360093417216412199245863150302861829745557067498385054945885869269956909272107975093029553211653449872027559602364806654991198818347977535663698074265425278625518184175746728909777727938000816470600161452491921732172147723501414419735685481613611573525521334757418494684385233239073941433345477624168625189835694855620992192221842725502542568876717904946016534668049886272327917860857843838279679766814541009538837863609506800642251252051173929848960841284886269456042419652850222106611863067442786220391949450471237137869609563643719172874677646575739624138908658326459958133904780275901
[root@master conller]#

Cronjob

Cron Job 管理基于时间的 Job,即:

  • 在给定时间点只运行一次
  • 周期性地在给定时间点运行

CronJob Spec

  • spec.template格式同Pod

  • RestartPolicy仅支持Never或OnFailure

  • 单个Pod时,默认Pod成功运行后Job即结束

  • .spec.completions 标志Job结束需要成功运行的Pod个数,默认为1

  • .spec.parallelism 标志并行运行的Pod的个数,默认为1

  • spec.activeDeadlineSeconds 标志失败Pod的重试最大时间,超过这个时间不会继续重试

  • .spec.schedule :调度,必需字段,指定任务运行周期,格式同 Cron

  • .spec.jobTemplate :Job 模板,必需字段,指定需要运行的任务,格式同 Job

  • .spec.startingDeadlineSeconds :启动 Job 的期限(秒级别),该字段是可选的。如果因为任何原因而错过了被调度的时间,那么错过执行时间的 Job 将被认为是失败的。如果没有指定,则没有期限

  • .spec.concurrencyPolicy :并发策略,该字段也是可选的。它指定了如何处理被 Cron Job 创建的 Job 的并发执行。只允许指定下面策略中的一种:

    • Allow (默认):允许并发运行 Job
    • Forbid :禁止并发运行,如果前一个还没有完成,则直接跳过下一个
    • Replace :取消当前正在运行的 Job,用一个新的来替换

注意,当前策略只能应用于同一个 Cron Job 创建的 Job。如果存在多个 Cron Job,它们创建的 Job 之间总 是允许并发运行。

  • .spec.suspend :挂起,该字段也是可选的。如果设置为true ,后续所有执行都会被挂起。它对已经开始 执行的 Job 不起作用。默认值为 false 。

  • .spec.successfulJobsHistoryLimit 和 .spec.failedJobsHistoryLimit :历史限制,是可选的字段。它们指定了可以保留多少完成和失败的 Job。默认情况下,它们分别设置为 3 和 1。设置限制的值为 0,相关类型的 Job 完成后将不会被保留。

创建配置文件

1
2
3
4
5
6
7
8
9
10
11
12
13
14
15
16
17
18
apiVersion: batch/v1beta1
kind: CronJob
metadata:
name: hello
spec:
schedule: "*/1 * * * *"
jobTemplate:
spec:
template:
spec:
containers:
- name: hello
image: 192.168.16.110:20080/stady/busybox:1.28.3
args:
- /bin/sh
- -c
- date; echo Hello from the Kubernetes cluster
restartPolicy: OnFailure

查看

会看到创建了一个cronjob任务 ,并且每隔一分钟会启动一个pod

1
2
3
4
5
6
7
8
9
10
11
12
13
14
15
16
17
18
19
20
21
22
23
24
25
26
27
[root@master conller]# kubectl apply -f cronJob.yml 
cronjob.batch/hello created
[root@master conller]# kubectl get cronjob
NAME SCHEDULE SUSPEND ACTIVE LAST SCHEDULE AGE
hello */1 * * * * False 0 5s 47s
[root@master conller]# kubectl get pod
NAME READY STATUS RESTARTS AGE
hello-28914570-6zxb2 0/1 Completed 0 36s
[root@master conller]# kubectl get pod
NAME READY STATUS RESTARTS AGE
hello-28914570-6zxb2 0/1 Completed 0 70s
hello-28914571-2czh5 0/1 Completed 0 10s
[root@master conller]#
[root@master conller]# kubectl get pod
NAME READY STATUS RESTARTS AGE
hello-28914570-6zxb2 0/1 Completed 0 2m2s
hello-28914571-2czh5 0/1 Completed 0 62s
hello-28914572-z8fqc 0/1 Completed 0 2s
[root@master conller]#
[root@master conller]# kubectl logs hello-28914570-6zxb2
Sun Dec 22 13:30:01 UTC 2024
Hello from the Kubernetes cluster
[root@master conller]#
[root@master conller]# kubectl logs hello-28914571-2czh5
Sun Dec 22 13:31:00 UTC 2024
Hello from the Kubernetes cluster
[root@master conller]#

StatefulSet

StatefulSet 作为 Controller 为 Pod 提供唯一的标识。它可以保证部署和 scale 的顺序
在 存储–>PVC 章节会 有实验案例 以及特性描述

Horizontal Pod Autoscaling

应用的资源使用率通常都有高峰和低谷的时候,如何削峰填谷,提高集群的整体资源利用率,让service中的Pod个数自动调整呢?这就有赖于Horizontal Pod Autoscaling了,顾名思义,使Pod水平自动缩放

Service

Kubernetes Service 定义了这样一种抽象:一个Pod 的逻辑分组,一种可以访问它们的策略 —— 通常称为微服务。 这一组 Pod 能够被Service 访问到,通常是通过Label Selector

Service能够提供负载均衡的能力,但是在使用上有以下限制:
只提供 4 层负载均衡能力,而没有 7 层功能,但有时我们可能需要更多的匹配规则来转发请求,这点上4层负载均衡是不支持的.

VIP 和 Service 代理

在 Kubernetes 集群中,每个 Node 运行一个kube-proxy 进程。 kube-proxy 负责为 VIP(虚拟 IP)的形式,而不是 Service 实现了一种 ExternalName 的形式。 在 Kubernetes v1.0 版本,代理完全在 userspace。在 Kubernetes v1.1 版本,新增了 iptables 代理,但并不是默认的运行模式。 从 Kubernetes v1.2 起,默认就是 iptables 代理。 在 Kubernetes v1.8.0-beta.0 中,添加了 ipvs 代理
在 Kubernetes 1.14 版本开始默认使用 ipvs 代理
在 Kubernetes v1.0 版本,Service 是 “4层”(TCP/UDP over IP)概念。 在 Kubernetes v1.1 版本,新增了Ingress API(beta 版),用来表示 “7层”(HTTP)服务

代理模式的分类

userspace 代理模式

iptables 代理模式

ipvs 代理模式

这种模式,kube-proxy 会监视 Kubernetes ipvs 规则并定期与 KubernetesService 对象和Endpoints ,调用netlink 接口以相应地创建Service 对象和Endpoints 对象同步 ipvs 规则,以确保 ipvs 状态与期望一致。访问服务时,流量将被重定向到其中一个后端 Pod

与 iptables 类似,ipvs 于 netfilter 的 hook 功能,但使用哈希表作为底层数据结构并在内核空间中工作。这意味着 ipvs 可以更快地重定向流量,并且在同步代理规则时具有更好的性能。此外,ipvs 为负载均衡算法提供了更多选项,例如:

  • rr :轮询调度
  • lc :最小连接数
  • dh :目标哈希
  • sh :源哈希
  • sed :最短期望延迟
  • nq : 不排队调度

ClusterIp

默认类型,自动分配一个仅 Cluster 内部可以访问的虚拟 IP
clusterIP 主要在每个 node 节点使用 iptables,将发向 clusterIP 对应端口的数据,转发到 kube-proxy 中。然后 kube-proxy 自己内部实现有负载均衡的方法,并可以查询到这个 service 下对应 pod 的地址和端口,进而把数据转发给对应的 pod 的地址和端口

为了实现图上的功能,主要需要以下几个组件的协同工作:

  • apiserver 用户通过kubectl命令向apiserver发送创建service的命令,apiserver接收到请求后将数据存储到etcd中
  • kube-proxy kubernetes的每个节点中都有一个叫做kube-porxy的进程,这个进程负责感知service,pod的变化,并将变化的信息写入本地的iptables规则中
  • iptables 使用NAT等技术将virtualIP的流量转至endpoint中

创建Deployment配置文件

创建 Deployment : myapp-deploy.yaml

1
2
3
4
5
6
7
8
9
10
11
12
13
14
15
16
17
18
19
20
21
22
23
24
25
apiVersion: apps/v1
kind: Deployment
metadata:
name: myapp-deploy
namespace: default
spec:
replicas: 3
selector:
matchLabels:
app: myapp
release: stabel
template:
metadata:
labels:
app: myapp
release: stabel
env: test
spec:
containers:
- name: myapp
image: 192.168.16.110:20080/stady/myapp:v2
imagePullPolicy: IfNotPresent
ports:
- name: http
containerPort: 80

查询pod状态 并可以访问请求打印对应机器的pod名称

1
2
3
4
5
6
7
8
9
10
11
[root@master service]# kubectl apply -f myapp-deploy.yaml 
deployment.apps/myapp-deploy created
[root@master service]#
[root@master service]# kubectl get pod -o wide
NAME READY STATUS RESTARTS AGE IP NODE NOMINATED NODE READINESS GATES
myapp-deploy-bdcd5b58f-glwb5 1/1 Running 0 3m45s 10.244.1.43 node1 <none> <none>
myapp-deploy-bdcd5b58f-szjgr 1/1 Running 0 3m45s 10.244.2.42 node2 <none> <none>
myapp-deploy-bdcd5b58f-wjm7v 1/1 Running 0 3m45s 10.244.1.44 node1 <none> <none>
[root@master service]# curl 10.244.1.43/hostname.html
myapp-deploy-bdcd5b58f-glwb5
[root@master service]#

创建Service 配置文件

创建 Service : myapp-service.yaml

1
2
3
4
5
6
7
8
9
10
11
12
13
14
apiVersion: v1
kind: Service
metadata:
name: myapp
namespace: default
spec:
type: ClusterIP
selector:
app: myapp
release: stabel
ports:
- name: http
port: 80
targetPort: 80

查询svc的ClusterIP地址

尝试访问该服务的hostname页面.看到会负载均衡到不同的pod

1
2
3
4
5
6
7
8
9
10
11
12
13
14
15
16
17
18
19
20
21
22
23
[root@master service]# kubectl apply -f myapp-service.yaml 
service/myapp created
[root@master service]#
[root@master service]# kubectl get svc
NAME TYPE CLUSTER-IP EXTERNAL-IP PORT(S) AGE
kubernetes ClusterIP 10.96.0.1 <none> 443/TCP 43d
myapp ClusterIP 10.97.220.149 <none> 80/TCP 6s
[root@master service]# curl 10.97.220.149/hostname.html
myapp-deploy-bdcd5b58f-glwb5
[root@master service]#
[root@master service]# curl 10.97.220.149/hostname.html
myapp-deploy-bdcd5b58f-wjm7v
[root@master service]# curl 10.97.220.149/hostname.html
myapp-deploy-bdcd5b58f-glwb5
[root@master service]# curl 10.97.220.149/hostname.html
myapp-deploy-bdcd5b58f-szjgr
[root@master service]# curl 10.97.220.149/hostname.html
myapp-deploy-bdcd5b58f-szjgr
[root@master service]# curl 10.97.220.149/hostname.html
myapp-deploy-bdcd5b58f-glwb5
[root@master service]# curl 10.97.220.149/hostname.html
myapp-deploy-bdcd5b58f-wjm7v
[root@master service]#

Headless Service

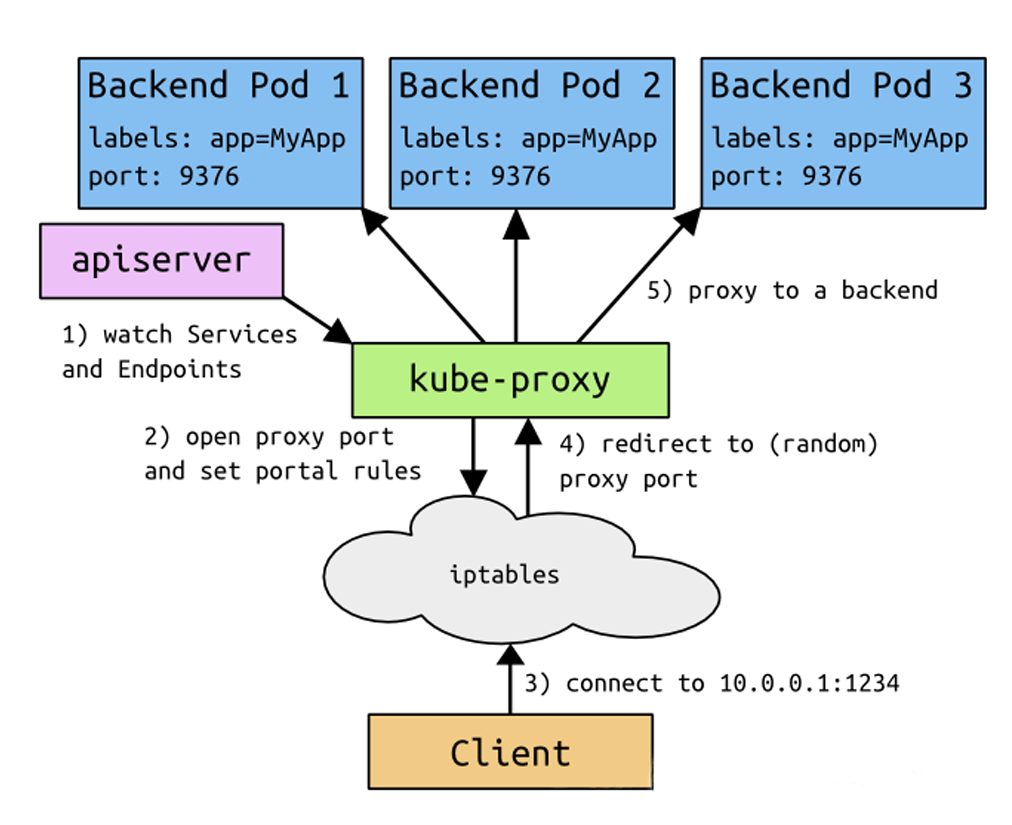
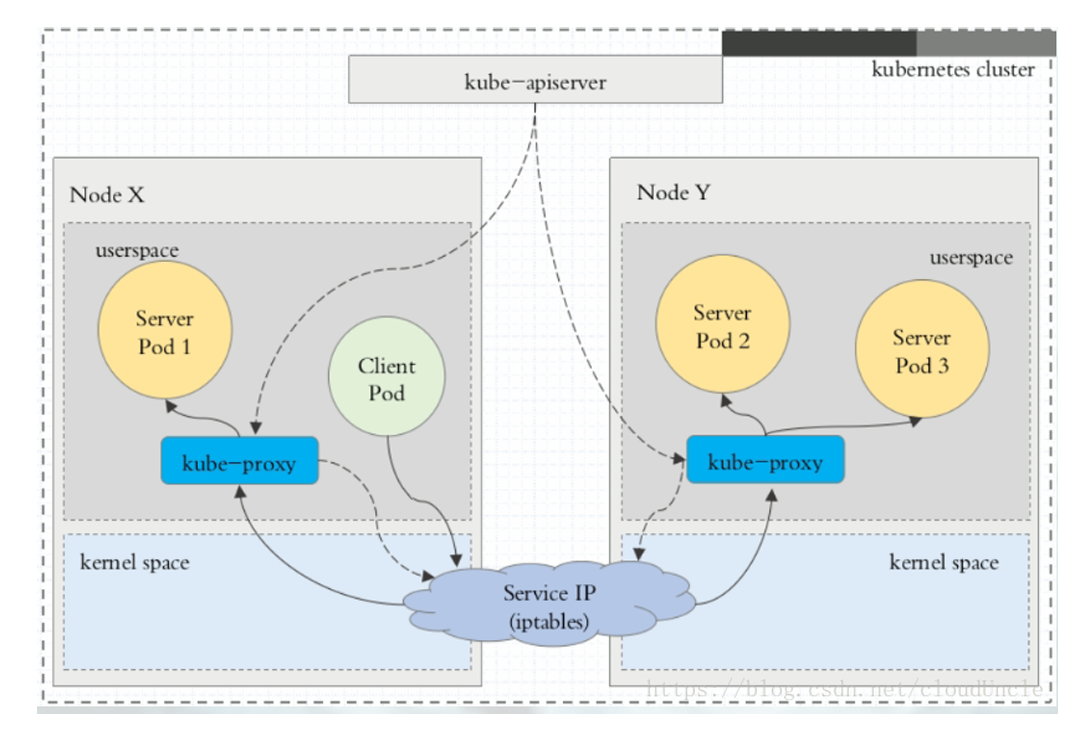
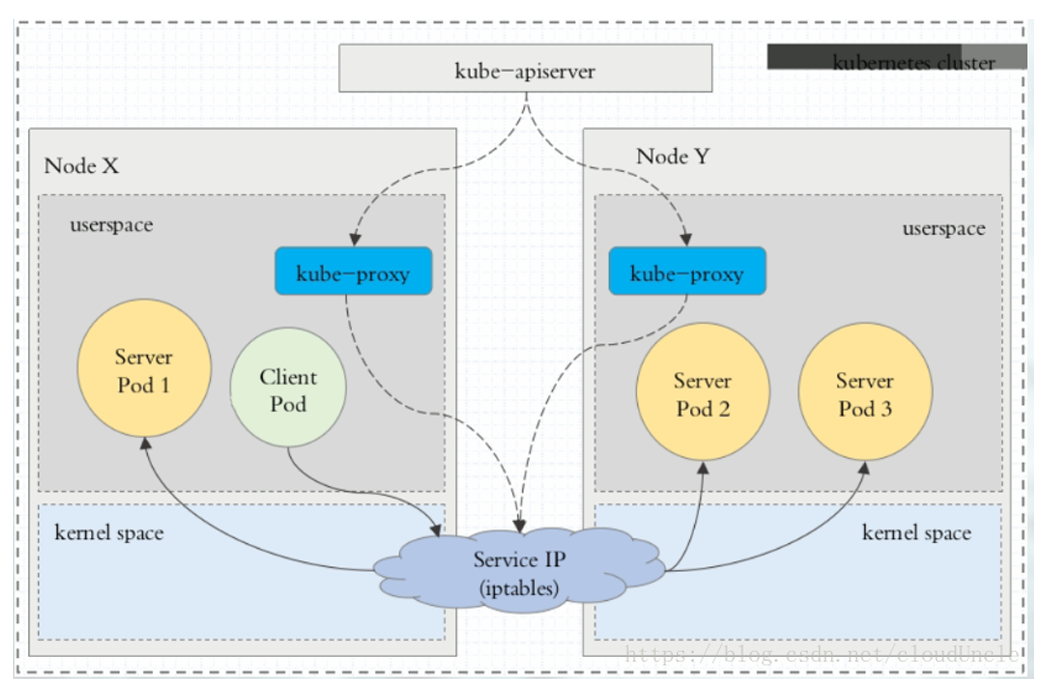
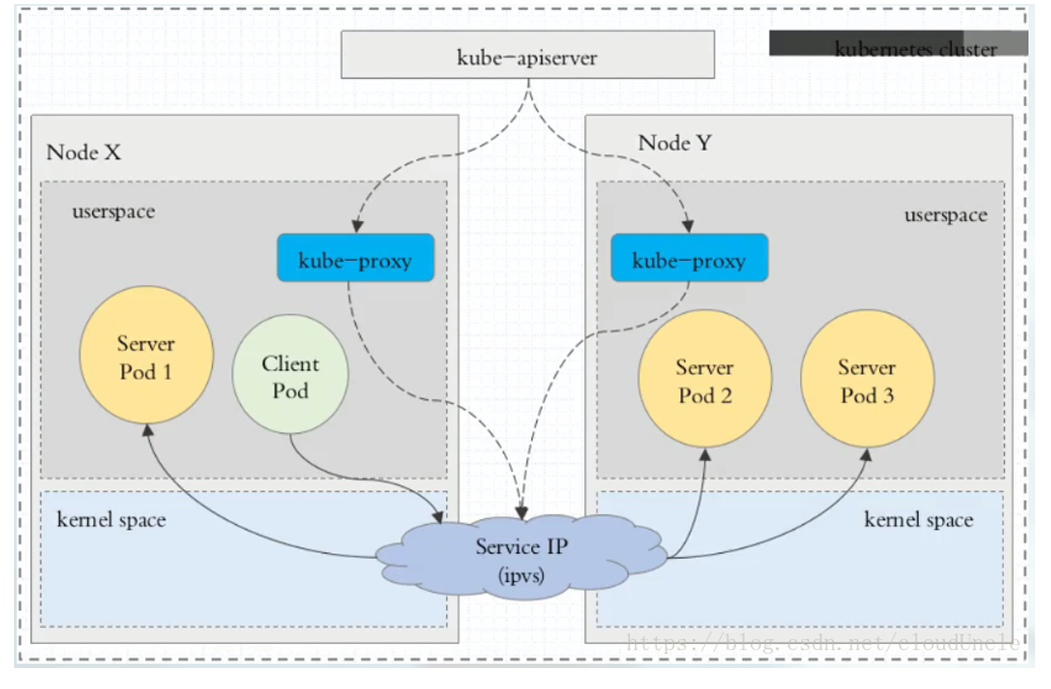
有时不需要或不想要负载均衡,以及单独的 Service IP 。遇到这种情况,可以通过指定 Cluster IP(spec.clusterIP) 的值为 “None” 来创建 Headless Service 。这类 Service 并不会分配 Cluster IP, kube-proxy 不会处理它们,而且平台也不会为它们进行负载均衡和路由

创建配置 myapp-svc-headless.yaml

1
2
3
4
5
6
7
8
9
10
11
12
apiVersion: v1
kind: Service
metadata:
name: myapp-headless
namespace: default
spec:
selector:
app: myapp
clusterIP: "None"
ports:
- port: 80
targetPort: 80

可以看到 该服务使用集群内的DNS可以正常解析, 并且解析的IP可以指向到启动的三个POD

1
2
3
4
5
6
7
8
9
10
11
12
13
14
15
16
17
18
19
20
21
22
23
24
25
26
27
28
29
30
31
32
33
34
35
36
37
38
39
40
41
42
43
44
45
46
47
48
49
50
51
52
53
54
55
56
57
58
59
60
61
62
63
64
65
66
67
[root@master service]# kubectl apply -f myapp-svc-headless.yaml 
service/myapp-headless created
[root@master service]# kubectl get svc
NAME TYPE CLUSTER-IP EXTERNAL-IP PORT(S) AGE
...
myapp-headless ClusterIP None <none> 80/TCP 5s
[root@master service]#
[root@master service]# kubectl get pod -A -o wide
NAMESPACE NAME READY STATUS RESTARTS AGE IP NODE NOMINATED NODE READINESS GATES
...
kube-system coredns-66f779496c-mgdkr 1/1 Running 10 (23h ago) 43d 10.244.2.41 node2 <none> <none>
kube-system coredns-66f779496c-rp7c8 1/1 Running 10 (23h ago) 43d 10.244.2.39 node2 <none> <none>
...
[root@master service]#
[root@master service]# dig -t A myapp-headless.default.svc.cluster.local. @10.244.2.41

; <<>> DiG 9.11.4-P2-RedHat-9.11.4-26.P2.el7_9.16 <<>> -t A myapp-headless.default.svc.cluster.local. @10.244.2.41
;; global options: +cmd
;; Got answer:
;; WARNING: .local is reserved for Multicast DNS
;; You are currently testing what happens when an mDNS query is leaked to DNS
;; ->>HEADER<<- opcode: QUERY, status: NOERROR, id: 64086
;; flags: qr aa rd; QUERY: 1, ANSWER: 3, AUTHORITY: 0, ADDITIONAL: 1
;; WARNING: recursion requested but not available

;; OPT PSEUDOSECTION:
; EDNS: version: 0, flags:; udp: 4096
;; QUESTION SECTION:
;myapp-headless.default.svc.cluster.local. IN A

;; ANSWER SECTION:
myapp-headless.default.svc.cluster.local. 30 IN A 10.244.1.43
myapp-headless.default.svc.cluster.local. 30 IN A 10.244.1.44
myapp-headless.default.svc.cluster.local. 30 IN A 10.244.2.42

;; Query time: 0 msec
;; SERVER: 10.244.2.41#53(10.244.2.41)
;; WHEN: 日 12月 22 22:16:58 CST 2024
;; MSG SIZE rcvd: 237

[root@master service]# dig -t A myapp-headless.default.svc.cluster.local. @10.244.2.41

; <<>> DiG 9.11.4-P2-RedHat-9.11.4-26.P2.el7_9.16 <<>> -t A myapp-headless.default.svc.cluster.local. @10.244.2.41
;; global options: +cmd
;; Got answer:
;; WARNING: .local is reserved for Multicast DNS
;; You are currently testing what happens when an mDNS query is leaked to DNS
;; ->>HEADER<<- opcode: QUERY, status: NOERROR, id: 45162
;; flags: qr aa rd; QUERY: 1, ANSWER: 3, AUTHORITY: 0, ADDITIONAL: 1
;; WARNING: recursion requested but not available

;; OPT PSEUDOSECTION:
; EDNS: version: 0, flags:; udp: 4096
;; QUESTION SECTION:
;myapp-headless.default.svc.cluster.local. IN A

;; ANSWER SECTION:
myapp-headless.default.svc.cluster.local. 28 IN A 10.244.1.44
myapp-headless.default.svc.cluster.local. 28 IN A 10.244.2.42
myapp-headless.default.svc.cluster.local. 28 IN A 10.244.1.43

;; Query time: 0 msec
;; SERVER: 10.244.2.41#53(10.244.2.41)
;; WHEN: 日 12月 22 22:17:00 CST 2024
;; MSG SIZE rcvd: 237

[root@master service]#
  • 需要提前安装好 dig 应用 (安装命令: yum -y install bind-utils)

NodePort

NodePort:在 ClusterIP 基础上为 Service 在每台机器上绑定一个端口,这样就可以通过 : NodePort 来访问该服务

  • nodePort 的原理在于在 node 上开了一个端口,将向该端口的流量导入到 kube-proxy,然后由 kube-proxy 进一步到给对应的 pod

创建配置文件 myapp-service-nodeport.yaml

1
2
3
4
5
6
7
8
9
10
11
12
13
14
apiVersion: v1
kind: Service
metadata:
name: myapp-nodeport
namespace: default
spec:
type: NodePort
selector:
app: myapp
release: stabel
ports:
- name: http
port: 80
targetPort: 80

同样可以测试接口,将请求轮询发送到提供服务的pod

1
2
3
4
5
6
7
8
9
10
11
12
13
14
15
16
17
18
19
[root@master service]# kubectl apply -f myapp-service-nodeport.yaml 
service/myapp-nodeport created
[root@master service]# kubectl get svc
NAME TYPE CLUSTER-IP EXTERNAL-IP PORT(S) AGE
kubernetes ClusterIP 10.96.0.1 <none> 443/TCP 43d
myapp ClusterIP 10.97.220.149 <none> 80/TCP 23m
myapp-headless ClusterIP None <none> 80/TCP 16m
myapp-nodeport NodePort 10.99.67.70 <none> 80:31635/TCP 8s
[root@master service]# curl 192.168.16.200:31635/hostname.html
myapp-deploy-bdcd5b58f-szjgr
[root@master service]# curl 192.168.16.200:31635/hostname.html
myapp-deploy-bdcd5b58f-wjm7v
[root@master service]# curl 192.168.16.200:31635/hostname.html
myapp-deploy-bdcd5b58f-wjm7v
[root@master service]# curl 192.168.16.200:31635/hostname.html
myapp-deploy-bdcd5b58f-glwb5
[root@master service]# curl 192.168.16.200:31635/hostname.html
myapp-deploy-bdcd5b58f-wjm7v
[root@master service]#

LoadBalancer

LoadBalancer:在 NodePort 的基础上,借助 cloud provider 创建一个外部负载均衡器,并将请求转发到: NodePort

  • loadBalancer 和 nodePort 其实是同一种方式。区别在于 loadBalancer 比 nodePort 多了一步,就是可以调用cloud provider 去创建 LB 来向节点导流

ExternalName

ExternalName:把集群外部的服务引入到集群内部来,在集群内部直接使用。没有任何类型代理被创建,这只有 kubernetes 1.7 或更高版本的 kube-dns 才支持
这种类型的 Service 通过返回 CNAME 和它的值,可以将服务映射到 externalName 字段的内容( 例如:www.baidu.com )。ExternalName Service 是 Service 的特例,它没有 selector,也没有定义任何的端口和Endpoint。相反的,对于运行在集群外部的服务,它通过返回该外部服务的别名这种方式来提供服务

1
2
3
4
5
6
7
8
kind: Service
apiVersion: v1
metadata:
name: my-service-1
namespace: default
spec:
type: ExternalName
externalName: www.baidu.com

当查询主机 my-service.defalut.svc.cluster.local ( SVC_NAME.NAMESPACE.svc.cluster.local )时,集群的DNS 服务将返回一个值 www.baidu.com 的 CNAME 记录。访问这个服务的工作方式和其他的相同,唯一不同的是重定向发生在 DNS 层,而且不会进行代理或转发

可以简单理解为再集群内部 创建了一个指向 www.baidu.com 的软连接, 软链接名称是 my-service-1.default.svc.cluster.local

1
2
3
4
5
6
7
8
9
10
11
12
13
14
15
16
17
18
19
20
21
22
23
24
25
26
27
28
29
30
31
32
33
34
35
36
37
[root@master service]# kubectl apply -f ExternalName.yaml 
service/my-service-1 created
[root@master service]# kubectl get svc
NAME TYPE CLUSTER-IP EXTERNAL-IP PORT(S) AGE
kubernetes ClusterIP 10.96.0.1 <none> 443/TCP 43d
my-service-1 ExternalName <none> www.baidu.com <none> 4s
myapp ClusterIP 10.97.220.149 <none> 80/TCP 33m
myapp-headless ClusterIP None <none> 80/TCP 26m
myapp-nodeport NodePort 10.99.67.70 <none> 80:31635/TCP 10m
[root@master service]# dig -t A my-service-1.default.svc.cluster.local. @10.244.2.41

; <<>> DiG 9.11.4-P2-RedHat-9.11.4-26.P2.el7_9.16 <<>> -t A my-service-1.default.svc.cluster.local. @10.244.2.41
;; global options: +cmd
;; Got answer:
;; WARNING: .local is reserved for Multicast DNS
;; You are currently testing what happens when an mDNS query is leaked to DNS
;; ->>HEADER<<- opcode: QUERY, status: NOERROR, id: 16965
;; flags: qr aa rd; QUERY: 1, ANSWER: 4, AUTHORITY: 0, ADDITIONAL: 1
;; WARNING: recursion requested but not available

;; OPT PSEUDOSECTION:
; EDNS: version: 0, flags:; udp: 4096
;; QUESTION SECTION:
;my-service-1.default.svc.cluster.local. IN A

;; ANSWER SECTION:
my-service-1.default.svc.cluster.local. 30 IN CNAME www.baidu.com.
www.baidu.com. 30 IN CNAME www.a.shifen.com.
www.a.shifen.com. 30 IN A 220.181.38.149
www.a.shifen.com. 30 IN A 220.181.38.150

;; Query time: 36 msec
;; SERVER: 10.244.2.41#53(10.244.2.41)
;; WHEN: 日 12月 22 22:33:15 CST 2024
;; MSG SIZE rcvd: 239

[root@master service]#

Ingress

部署 Ingress-Nginx

可以自行在github下载
云平台可以选
wget https://raw.githubusercontent.com/kubernetes/ingress-nginx/controller-v1.9.6/deploy/static/provider/cloud/deploy.yaml

裸金属设备 使用NodePort的方案
wget https://raw.githubusercontent.com/kubernetes/ingress-nginx/controller-v1.9.6/deploy/static/provider/baremetal/deploy.yaml

我们实验使用vm虚拟机,选用裸金属设备的方案
内网http服务下载
http://192.168.16.110:9080/k8s/deployment/baremetal-ingress-deployment.yml

1
kubectl apply -f http://192.168.16.110:9080/k8s/deployment/baremetal-ingress-deployment.yml
1
2
3
4
5
6
7
8
9
10
11
12
13
14
15
16
17
18
19
20
21
22
23
24
25
26
27
28
29
30
31
32
33
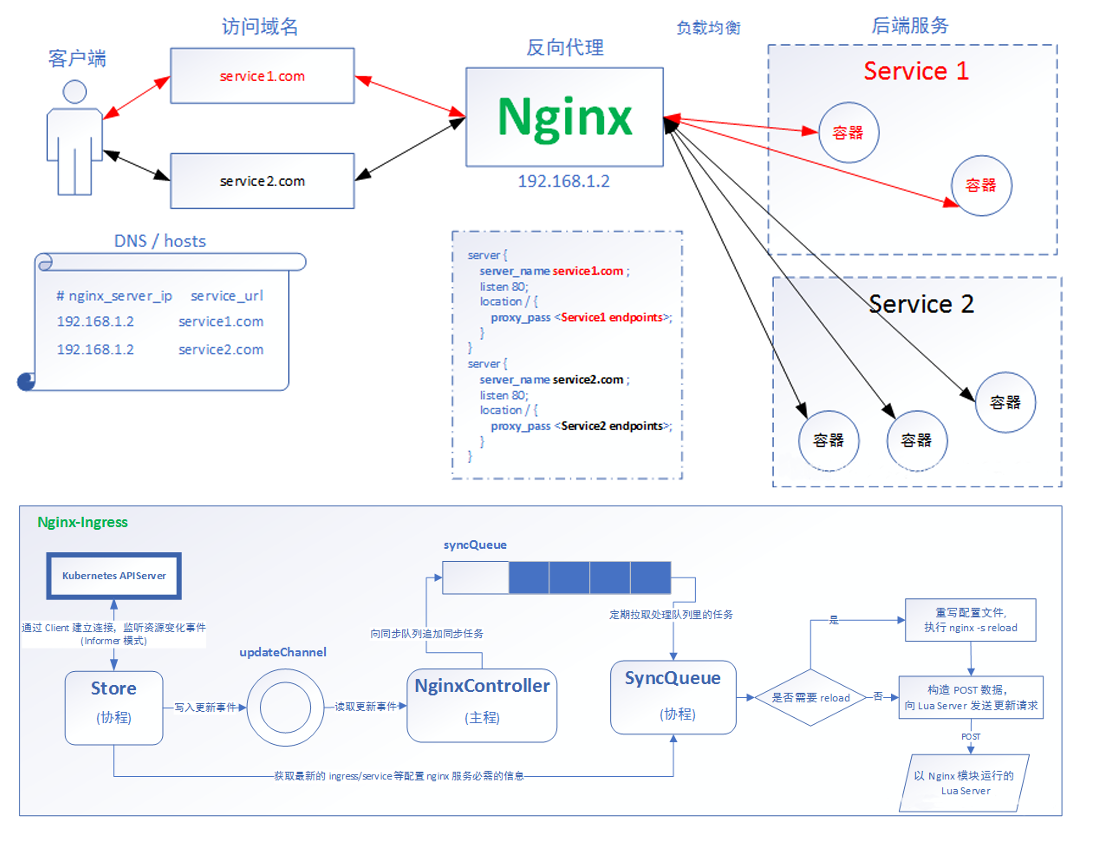
[root@master ingress]# kubectl apply -f http://192.168.16.110:9080/k8s/deployment/baremetal-ingress-deployment.yml
namespace/ingress-nginx created
serviceaccount/ingress-nginx created
serviceaccount/ingress-nginx-admission created
role.rbac.authorization.k8s.io/ingress-nginx created
role.rbac.authorization.k8s.io/ingress-nginx-admission created
clusterrole.rbac.authorization.k8s.io/ingress-nginx created
clusterrole.rbac.authorization.k8s.io/ingress-nginx-admission created
rolebinding.rbac.authorization.k8s.io/ingress-nginx created
rolebinding.rbac.authorization.k8s.io/ingress-nginx-admission created
clusterrolebinding.rbac.authorization.k8s.io/ingress-nginx created
clusterrolebinding.rbac.authorization.k8s.io/ingress-nginx-admission created
configmap/ingress-nginx-controller created
service/ingress-nginx-controller created
service/ingress-nginx-controller-admission created
deployment.apps/ingress-nginx-controller created
job.batch/ingress-nginx-admission-create created
job.batch/ingress-nginx-admission-patch created
ingressclass.networking.k8s.io/nginx created
validatingwebhookconfiguration.admissionregistration.k8s.io/ingress-nginx-admission created
[root@master ingress]#
[root@master ingress]# kubectl get pod -n ingress-nginx -o wide
NAME READY STATUS RESTARTS AGE IP NODE NOMINATED NODE READINESS GATES
ingress-nginx-admission-create-64szf 0/1 Completed 0 30s 10.244.1.54 node1 <none> <none>
ingress-nginx-admission-patch-9v4z5 0/1 Completed 1 30s 10.244.2.49 node2 <none> <none>
ingress-nginx-controller-749f794b9-h8ht5 1/1 Running 0 30s 10.244.1.55 node1 <none> <none>
[root@master ingress]#
[root@master ingress]# kubectl get svc -n ingress-nginx
NAME TYPE CLUSTER-IP EXTERNAL-IP PORT(S) AGE
ingress-nginx-controller NodePort 10.110.234.117 <none> 80:32454/TCP,443:31862/TCP 3m42s
ingress-nginx-controller-admission ClusterIP 10.97.39.200 <none> 443/TCP 3m42s
[root@master ingress]#

如果想要访问ingress的80端口 则使用的是 32454端口
如果想要访问ingress的443端口 则使用的是 31862端口

ingress HTTP代理访问

创建配置文件 deply-svc-ig.yaml

1
2
3
4
5
6
7
8
9
10
11
12
13
14
15
16
17
18
19
20
21
22
23
24
25
26
27
28
29
30
31
32
33
34
35
36
37
38
39
40
41
42
43
44
45
46
47
48
49
50
apiVersion: apps/v1
kind: Deployment
metadata:
name: nginx-dm
spec:
replicas: 2
selector:
matchLabels:
name: nginx
template:
metadata:
labels:
name: nginx
spec:
containers:
- name: nginx
image: 192.168.16.110:20080/stady/myapp:v1
imagePullPolicy: IfNotPresent
ports:
- containerPort: 80
---
apiVersion: v1
kind: Service
metadata:
name: nginx-svc
spec:
ports:
- port: 80
targetPort: 80
protocol: TCP
selector:
name: nginx
---
apiVersion: networking.k8s.io/v1
kind: Ingress
metadata:
name: nginx-test
spec:
ingressClassName: nginx
rules:
- host: www1.my-test-ingress.com
http:
paths:
- path: /
pathType: Prefix
backend:
service:
name: nginx-svc
port:
number: 80

创建样例 deploy + svc + ingress

1
2
3
4
5
6
7
8
9
10
11
12
13
14
15
16
17
18
19
20
21
22
23
24
25
26
27
28
29
30
31
32
33
34
35
36
37
38
39
40
41
42
43
[root@master ingress]# kubectl apply -f deply-svc-ig.yaml 
deployment.apps/nginx-dm unchanged
service/nginx-svc unchanged
ingress.networking.k8s.io/nginx-test unchanged
[root@master ingress]#
[root@master ingress]# kubectl get pods
NAME READY STATUS RESTARTS AGE
nginx-dm-56996c5fdc-574dp 1/1 Running 0 29s
nginx-dm-56996c5fdc-x4kbc 1/1 Running 0 29s
[root@master ingress]#
[root@master ingress]# kubectl get svc
NAME TYPE CLUSTER-IP EXTERNAL-IP PORT(S) AGE
...
nginx-svc ClusterIP 10.104.90.73 <none> 80/TCP 3m6s
[root@master ingress]#
[root@master ingress]# kubectl get ingress
NAME CLASS HOSTS ADDRESS PORTS AGE
nginx-test nginx www1.my-test-ingress.com 192.168.16.201 80 82s
[root@master ingress]#
[root@master ingress]#
[root@master ingress]# kubectl describe ingress nginx-test
Name: nginx-test
Labels: <none>
Namespace: default
Address: 192.168.16.201
Ingress Class: nginx
Default backend: <default>
Rules:
Host Path Backends
---- ---- --------
www1.my-test-ingress.com
/ nginx-svc:80 (10.244.1.62:80,10.244.2.55:80)
Annotations: <none>
Events:
Type Reason Age From Message
---- ------ ---- ---- -------
Normal Sync 83s (x2 over 98s) nginx-ingress-controller Scheduled for sync
[root@master ingress]#

[root@master ingress]# kubectl get svc -n ingress-nginx
NAME TYPE CLUSTER-IP EXTERNAL-IP PORT(S) AGE
ingress-nginx-controller NodePort 10.111.134.230 <none> 80:30497/TCP,443:30880/TCP 11m
ingress-nginx-controller-admission ClusterIP 10.109.54.41 <none> 443/TCP 11m

配置windows主机

配置地址 C:\Windows\System32\drivers\etc\hosts
在文件中增加DNS解析

1
192.168.16.200 www1.my-test-ingress.com

使用浏览器访问 http://www1.my-test-ingress.com:30497/

Ingress HTTPS 代理访问

创建证书

1
2
openssl req -x509 -sha256 -nodes -days 365 -newkey rsa:2048 -keyout tls.key -out tls.crt -subj "/CN=nginxsvc/O=nginxsvc"
kubectl create secret tls tls-secret --key tls.key --cert tls.crt
1
2
3
4
5
6
7
8
9
10
11
12
13
14
[root@master ingress]# openssl req -x509 -sha256 -nodes -days 365 -newkey rsa:2048 -keyout tls.key -out tls.crt -subj "/CN=nginxsvc/O=nginxsvc"
Generating a 2048 bit RSA private key
........................................................................+++
...............+++
writing new private key to 'tls.key'
-----
[root@master ingress]# ls -l
总用量 12
-rw-r--r-- 1 root root 852 12月 23 22:48 deply-svc-ig.yaml
-rw-r--r-- 1 root root 1143 12月 23 23:00 tls.crt
-rw-r--r-- 1 root root 1704 12月 23 23:00 tls.key
[root@master ingress]# kubectl create secret tls tls-secret --key tls.key --cert tls.crt
secret/tls-secret created
[root@master ingress]#

创建Ingress Yaml 文件

构造配置文件 ig-https.yaml ,将 nginx-test 更新成https的协议

1
2
3
4
5
6
7
8
9
10
11
12
13
14
15
16
17
18
19
20
21
apiVersion: networking.k8s.io/v1
kind: Ingress
metadata:
name: nginx-test
spec:
ingressClassName: nginx
tls:
- hosts:
- www1.my-test-ingress-https.com
secretName: tls-secret
rules:
- host: www1.my-test-ingress-https.com
http:
paths:
- path: /
pathType: Prefix
backend:
service:
name: nginx-svc
port:
number: 80
1
2
3
4
5
6
7
8
9
10
11
12
13
14
15
16
17
18
19
20
21
22
[root@master ingress]# kubectl apply -f ig-https.yaml 
ingress.networking.k8s.io/nginx-test configured
[root@master ingress]# kubectl describe ingress nginx-test
Name: nginx-test
Labels: <none>
Namespace: default
Address: 192.168.16.201
Ingress Class: nginx
Default backend: <default>
TLS:
tls-secret terminates www1.my-test-ingress-https.com
Rules:
Host Path Backends
---- ---- --------
www1.my-test-ingress-https.com
/ nginx-svc:80 (10.244.1.62:80,10.244.2.55:80)
Annotations: <none>
Events:
Type Reason Age From Message
---- ------ ---- ---- -------
Normal Sync 9s (x5 over 29m) nginx-ingress-controller Scheduled for sync
[root@master ingress]#

同样配置https的域名
配置地址 C:\Windows\System32\drivers\etc\hosts
在文件中增加DNS解析

1
192.168.16.200 www1.my-test-ingress-https.com

使用浏览器请求地址 https://www1.my-test-ingress-https.com:30880/
证书不安全

选择信任之后可以查看页面

  • 如果执行不成功可以查看ingress日志,查询报错信息
    1
    2
    3
    4
    5
    6
    7
    [root@master ingress]# kubectl get pod -n ingress-nginx
    NAME READY STATUS RESTARTS AGE
    ingress-nginx-admission-create-t6hbr 0/1 Completed 0 36m
    ingress-nginx-admission-patch-d9ghq 0/1 Completed 0 36m
    ingress-nginx-controller-749f794b9-sksbw 1/1 Running 0 36m
    [root@master ingress]#
    [root@master ingress]# kubectl pod logs -n ingress-nginx ingress-nginx-controller-749f794b9-sksbw

Nginx 进行 BasicAuth

安装htpasswd

1
yum install httpd

创建密文文件

创建auth文件 用户名user
输入两次密码

  • 请自行输入我这里测试用的123456
    1
    2
    3
    4
    5
    [root@master ingress]# htpasswd -c auth user
    New password:
    Re-type new password:
    Adding password for user user
    [root@master ingress]#

创建配置

1
kubectl create secret generic basic-auth --from-file=auth
1
2
3
4
5
6
7
8
9
10
11
12
13
14
15
16
17
18
19
20
apiVersion: networking.k8s.io/v1
kind: Ingress
metadata:
name: ingress-with-auth
annotations:
nginx.ingress.kubernetes.io/auth-type: basic
nginx.ingress.kubernetes.io/auth-secret: basic-auth
spec:
ingressClassName: nginx
rules:
- host: www1.my-test-ingress.com
http:
paths:
- path: /
pathType: Prefix
backend:
service:
name: nginx-svc
port:
number: 80

登录网址 http://www1.my-test-ingress.com:30497/

并输入 用户名 user 密码 123456 (或者你自己配置的密码)
才可以登录成功

Nginx 进行重写

如果是重写前后相同的域名则需要省略

1
2
3
4
5
6
7
8
9
10
11
12
13
14
15
16
17
18
19
apiVersion: networking.k8s.io/v1
kind: Ingress
metadata:
name: nginx-test-rewrite
annotations:
nginx.ingress.kubernetes.io/rewrite-target: /hostname.html
spec:
ingressClassName: nginx
rules:
- host: www1.my-test-ingress-rewrite.com
http:
paths:
- path: /
pathType: Prefix
backend:
service:
name: nginx-svc
port:
number: 80

如果是不同的域名还可以使用变量
比如

1
$scheme://www1.my-test-ingress.com$request_uri

举例如下

1
2
3
4
5
6
7
8
9
10
11
12
13
14
15
16
17
18
19
apiVersion: networking.k8s.io/v1
kind: Ingress
metadata:
name: nginx-test-rewrite
annotations:
nginx.ingress.kubernetes.io/rewrite-target: $scheme://www1.my-test-ingress.com:30497/hostname.html
spec:
ingressClassName: nginx
rules:
- host: www1.my-test-ingress-rewrite.com
http:
paths:
- path: /
pathType: Prefix
backend:
service:
name: nginx-svc
port:
number: 80
1
2
3
4
5
6
7
8
9
10
11
12
13
14
15
16
17
18
19
20
21
22
23
24
25
[root@master ingress]# kubectl apply -f ig-rewrite.yaml 
ingress.networking.k8s.io/nginx-test-rewrite created
[root@master ingress]# kubectl get ingress
NAME CLASS HOSTS ADDRESS PORTS AGE
ingress-with-auth nginx www1.my-test-ingress.com 192.168.16.201 80 10m
nginx-test nginx www1.my-test-ingress-https.com 192.168.16.201 80, 443 53m
nginx-test-rewrite nginx www1.my-test-ingress-rewrite.com 192.168.16.201 80 11s
[root@master ingress]# kubectl describe ingress nginx-test-rewrite
Name: nginx-test-rewrite
Labels: <none>
Namespace: default
Address: 192.168.16.201
Ingress Class: nginx
Default backend: <default>
Rules:
Host Path Backends
---- ---- --------
www1.my-test-ingress-rewrite.com
/ nginx-svc:80 (10.244.1.62:80,10.244.2.55:80)
Annotations: nginx.ingress.kubernetes.io/rewrite-target: http://www1.my-test-ingress-rewrite.com:30497/hostname.html
Events:
Type Reason Age From Message
---- ------ ---- ---- -------
Normal Sync 33s (x2 over 34s) nginx-ingress-controller Scheduled for sync
[root@master ingress]#

使用浏览器测试 http://www1.my-test-ingress.com-rewrite:30497/ 会自动跳转至 hostname.html 页面