openstack环境搭建v2

环境架构

虚拟机配置规划

虚拟机 控制节点 计算节点
主机名 controller compute
cpu 2C 2C
硬盘 100GB 100GB
内存 4GB 4GB
网卡1 192.168.10.10/24(仅主机模式) 192.168.10.20/24(仅主机模式)
网卡2 192.168.16.10/24(NAT模式) 192.168.16.20/24(NAT模式)

主机安装完系统之后统一做配置(两台主机都要操作)

设置主机IP

controller

1
2
3
4
5
6
7
8
9
10
11
12
13
14
15
16
17
18
19
20
[root@localhost ~]# ip a
1: lo: <LOOPBACK,UP,LOWER_UP> mtu 65536 qdisc noqueue state UNKNOWN group default qlen 1000
link/loopback 00:00:00:00:00:00 brd 00:00:00:00:00:00
inet 127.0.0.1/8 scope host lo
valid_lft forever preferred_lft forever
inet6 ::1/128 scope host
valid_lft forever preferred_lft forever
2: ens33: <BROADCAST,MULTICAST,UP,LOWER_UP> mtu 1500 qdisc pfifo_fast state UP group default qlen 1000
link/ether 00:0c:29:a5:01:47 brd ff:ff:ff:ff:ff:ff
inet 192.168.10.10/24 brd 192.168.10.255 scope global noprefixroute ens33
valid_lft forever preferred_lft forever
inet6 fe80::649c:df6e:6cf2:1076/64 scope link noprefixroute
valid_lft forever preferred_lft forever
3: ens34: <BROADCAST,MULTICAST,UP,LOWER_UP> mtu 1500 qdisc pfifo_fast state UP group default qlen 1000
link/ether 00:0c:29:a5:01:51 brd ff:ff:ff:ff:ff:ff
inet 192.168.16.10/24 brd 192.168.16.255 scope global noprefixroute ens34
valid_lft forever preferred_lft forever
inet6 fe80::db2f:7966:4fdc:f02a/64 scope link noprefixroute
valid_lft forever preferred_lft forever
[root@localhost ~]#

compute

1
2
3
4
5
6
7
8
9
10
11
12
13
14
15
16
17
18
19
1: lo: <LOOPBACK,UP,LOWER_UP> mtu 65536 qdisc noqueue state UNKNOWN group default qlen 1000
link/loopback 00:00:00:00:00:00 brd 00:00:00:00:00:00
inet 127.0.0.1/8 scope host lo
valid_lft forever preferred_lft forever
inet6 ::1/128 scope host
valid_lft forever preferred_lft forever
2: ens33: <BROADCAST,MULTICAST,UP,LOWER_UP> mtu 1500 qdisc pfifo_fast state UP group default qlen 1000
link/ether 00:0c:29:64:06:80 brd ff:ff:ff:ff:ff:ff
inet 192.168.10.20/24 brd 192.168.10.255 scope global noprefixroute ens33
valid_lft forever preferred_lft forever
inet6 fe80::3d4a:41df:c556:585c/64 scope link noprefixroute
valid_lft forever preferred_lft forever
3: ens34: <BROADCAST,MULTICAST,UP,LOWER_UP> mtu 1500 qdisc pfifo_fast state UP group default qlen 1000
link/ether 00:0c:29:64:06:8a brd ff:ff:ff:ff:ff:ff
inet 192.168.16.20/24 brd 192.168.16.255 scope global noprefixroute ens34
valid_lft forever preferred_lft forever
inet6 fe80::c1bf:7878:47ed:1109/64 scope link noprefixroute
valid_lft forever preferred_lft forever
[root@localhost ~]#

主机名更改与域名解析

修改主机名

1
2
hostnamectl set-hostname controller
hostnamectl set-hostname computer

hosts解析

1
2
3
4
cat >> /etc/hosts <<EOF
192.168.10.10 controller
192.168.10.20 computer
EOF

关闭防火墙

关闭firewall

1
2
systemctl stop firewalld
systemctl disable firewalld

关闭selinux

1
2
3
4
5
6
7
8
9
10
11
12
13
14
15
[root@localhost ~]# setenforce 0
[root@localhost ~]# cat /etc/selinux/config

# This file controls the state of SELinux on the system.
# SELINUX= can take one of these three values:
# enforcing - SELinux security policy is enforced.
# permissive - SELinux prints warnings instead of enforcing.
# disabled - No SELinux policy is loaded.
SELINUX=disabled
# SELINUXTYPE= can take one of these two values:
# targeted - Targeted processes are protected,
# minimum - Modification of targeted policy. Only selected processes are protected.
# mls - Multi Level Security protection.
SELINUXTYPE=targeted

修改yum源

1
2
3
4
5
6
7
8
9
10
11
12
13
14
15
16
17
18
19
20
21
22
23
24
25
26
27
28
29
30
31
32
33
34
35
mkdir /etc/yum.repos.d/bak 
mv /etc/yum.repos.d/*repo /etc/yum.repos.d/bak/
cat > /etc/yum.repos.d/OpenStack.repo <<EOF
[base]
name=base
baseurl=http://repo.huaweicloud.com/centos/7/os/x86_64/
gpgcheck=0
enable=1

[extras]
name=extras
baseurl=http://repo.huaweicloud.com/centos/7/extras/x86_64/
gpgcheck=0
enable=1

[updates]
name=updates
baseurl=http://repo.huaweicloud.com/centos/7/updates/x86_64/
gpgcheck=0
enable=1

[train]
name=train
baseurl=http://repo.huaweicloud.com/centos/7/cloud/x86_64/openstack-train/
gpgcheck=0
enable=1

[virt]
name=virt
baseurl=http://repo.huaweicloud.com/centos/7/virt/x86_64/kvm-common/
gpgcheck=0
enable=1

EOF

安装必要软件

必要软件

1
2
3
yum clean all
yum makecache
yum repolist
1
yum install  yum-utils  yum-plugin-priorities net-tools -y

拍摄虚拟机器快照

  • (存储快照1)

时间同步服务(两个主机分开操作)

controller主机操作

1
yum install  ntp

时间同步主服务器

1
2
3
4
5
6
7
8
9
10
11
12
13
14
15
16
17
18
19
20
21
22
23
24
25
26
27
28
29
30
31
32
33
34
35
36
37
38
39
40
41
42
43
44
45
46
47
48
49
50
51
52
53
54
55
56
57
58
59
60
61
62
63
64
[root@controller yum.repos.d]# cat  /etc/ntp.conf
# For more information about this file, see the man pages
# ntp.conf(5), ntp_acc(5), ntp_auth(5), ntp_clock(5), ntp_misc(5), ntp_mon(5).

driftfile /var/lib/ntp/drift

# Permit time synchronization with our time source, but do not
# permit the source to query or modify the service on this system.
restrict default nomodify notrap nopeer noquery

# Permit all access over the loopback interface. This could
# be tightened as well, but to do so would effect some of
# the administrative functions.
restrict 127.0.0.1
restrict ::1

# Hosts on local network are less restricted.
#restrict 192.168.1.0 mask 255.255.255.0 nomodify notrap
restrict 192.168.10.0 mask 255.255.255.0 nomodify notrap

# Use public servers from the pool.ntp.org project.
# Please consider joining the pool (http://www.pool.ntp.org/join.html).
#server 0.centos.pool.ntp.org iburst
#server 1.centos.pool.ntp.org iburst
#server 2.centos.pool.ntp.org iburst
#server 3.centos.pool.ntp.org iburst

server 127.127.1.0
fudge 127.127.1.0 stratum 10

#broadcast 192.168.1.255 autokey # broadcast server
#broadcastclient # broadcast client
#broadcast 224.0.1.1 autokey # multicast server
#multicastclient 224.0.1.1 # multicast client
#manycastserver 239.255.254.254 # manycast server
#manycastclient 239.255.254.254 autokey # manycast client

# Enable public key cryptography.
#crypto

includefile /etc/ntp/crypto/pw

# Key file containing the keys and key identifiers used when operating
# with symmetric key cryptography.
keys /etc/ntp/keys

# Specify the key identifiers which are trusted.
#trustedkey 4 8 42

# Specify the key identifier to use with the ntpdc utility.
#requestkey 8

# Specify the key identifier to use with the ntpq utility.
#controlkey 8

# Enable writing of statistics records.
#statistics clockstats cryptostats loopstats peerstats

# Disable the monitoring facility to prevent amplification attacks using ntpdc
# monlist command when default restrict does not include the noquery flag. See
# CVE-2013-5211 for more details.
# Note: Monitoring will not be disabled with the limited restriction flag.
disable monitor

开启时间同步服务

1
2
systemctl start ntpd
systemctl enable ntpd

compute主机操作

1
yum install  ntp

配置cron任务

1
2
3
[root@computer ~]# crontab -l
*/2 * * * * /sbin/ntpdate -u controller &>/dev/null
[root@computer ~]#

安装openstack软件框架

安装

1
yum install centos-release-openstack-train

删除多余的repo

1
rm /etc/yum.repos.d/C*.repo

升级软件版本

1
yum -y upgrade

删除多余的repo

1
rm /etc/yum.repos.d/C*.repo

安装云平台管理客户端

1
yum install python-openstackclient

基础服务安装 - controller节点操纵

安装Mariadb数据库

安装

1
yum install mariadb-server python2-PyMySQL -y

配置

/etc/my.cnf.d/openstack.cnf

1
2
3
4
5
6
7
[mysqld]
bind-address = 192.168.222.5
default-storage-engine = innodb
innodb_file_per_table
collation-server = utf8_general_ci
init-connect = 'SET NAMES utf8'
character-set-server = utf8

启动并初始化

1
2
systemctl enable mariadb
systemctl start mariadb
1
2
3
4
5
6
7
8
9
10
11
12
13
14
15
16
17
18
19
20
21
22
23
24
25
26
27
28
29
30
31
32
33
34
35
36
37
38
39
40
41
42
43
44
45
46
47
48
49
50
51
52
53
54
55
56
57
58
59
60
61
62
[root@controller ~]# mysql_secure_installation

NOTE: RUNNING ALL PARTS OF THIS SCRIPT IS RECOMMENDED FOR ALL MariaDB
SERVERS IN PRODUCTION USE! PLEASE READ EACH STEP CAREFULLY!

In order to log into MariaDB to secure it, we'll need the current
password for the root user. If you've just installed MariaDB, and
you haven't set the root password yet, the password will be blank,
so you should just press enter here.

Enter current password for root (enter for none):
OK, successfully used password, moving on...

Setting the root password ensures that nobody can log into the MariaDB
root user without the proper authorisation.

Set root password? [Y/n] y
New password:
Re-enter new password:
Password updated successfully!
Reloading privilege tables..
... Success!


By default, a MariaDB installation has an anonymous user, allowing anyone
to log into MariaDB without having to have a user account created for
them. This is intended only for testing, and to make the installation
go a bit smoother. You should remove them before moving into a
production environment.

Remove anonymous users? [Y/n] y
... Success!

Normally, root should only be allowed to connect from 'localhost'. This
ensures that someone cannot guess at the root password from the network.

Disallow root login remotely? [Y/n] y
... Success!

By default, MariaDB comes with a database named 'test' that anyone can
access. This is also intended only for testing, and should be removed
before moving into a production environment.

Remove test database and access to it? [Y/n] y
- Dropping test database...
... Success!
- Removing privileges on test database...
... Success!

Reloading the privilege tables will ensure that all changes made so far
will take effect immediately.

Reload privilege tables now? [Y/n] y
... Success!

Cleaning up...

All done! If you've completed all of the above steps, your MariaDB
installation should now be secure.

Thanks for using MariaDB!
[root@controller ~]#

测试连接

1
2
3
4
5
6
7
8
9
10
11
12
13
[root@controller ~]# mysql -uroot -p
Enter password:
Welcome to the MariaDB monitor. Commands end with ; or \g.
Your MariaDB connection id is 16
Server version: 10.3.20-MariaDB MariaDB Server

Copyright (c) 2000, 2018, Oracle, MariaDB Corporation Ab and others.

Type 'help;' or '\h' for help. Type '\c' to clear the current input statement.

MariaDB [(none)]> exit;
Bye
[root@controller ~]#

安装rabbitMQ消息队列

安装

1
yum install -y rabbitmq-server

启动并配置密码

1
2
3
systemctl enable rabbitmq-server
systemctl start rabbitmq-server
rabbitmqctl change_password guest guest
1
2
3
4
5
6
[root@controller ~]# systemctl enable rabbitmq-server
Created symlink from /etc/systemd/system/multi-user.target.wants/rabbitmq-server.service to /usr/lib/systemd/system/rabbitmq-server.service.
[root@controller ~]# systemctl start rabbitmq-server
[root@controller ~]# rabbitmqctl change_password guest guest
Changing password for user "guest"
[root@controller ~]#

安装Memcached缓存服务器

安装

1
yum install -y memcached python-memcached

配置

/etc/sysconfig/memcached

1
2
3
4
5
6
7
8
[root@controller ~]# cat /etc/sysconfig/memcached 
PORT="11211"
USER="memcached"
MAXCONN="1024"
CACHESIZE="64"
OPTIONS="-l 127.0.0.1,::1,controller"
[root@controller ~]#

启动

1
2
systemctl enable memcached
systemctl start memcached

安装etcd

安装

1
yum install -y etcd

配置

/etc/etcd/etcd.conf

1
2
3
4
5
6
7
8
9
ETCD_DATA_DIR="/var/lib/etcd/default.etcd"
ETCD_LISTEN_PEER_URLS="http://192.168.10.10:2380"
ETCD_LISTEN_CLIENT_URLS="http://192.168.10.10:2379,http://localhost:2379"
ETCD_NAME="controller"
ETCD_INITIAL_ADVERTISE_PEER_URLS="http://192.168.10.10:2380"
ETCD_ADVERTISE_CLIENT_URLS="http://192.168.10.10:2379"
ETCD_INITIAL_CLUSTER="controller=http://192.168.10.10:2380"
ETCD_INITIAL_CLUSTER_TOKEN="etcd-cluster-01"
ETCD_INITIAL_CLUSTER_STATE="new"

启动

1
2
systemctl enable etcd
systemctl start etcd

验证

1
2
3
4
5
[root@controller ~]# netstat -tnlup | grep etcd
tcp 0 0 127.0.0.1:2379 0.0.0.0:* LISTEN 3220/etcd
tcp 0 0 192.168.10.10:2379 0.0.0.0:* LISTEN 3220/etcd
tcp 0 0 192.168.10.10:2380 0.0.0.0:* LISTEN 3220/etcd
[root@controller ~]#

认证服务 keystone 安装

安装与配置keystone

数据库创建用户

mysql -uroot -p

1
2
3
CREATE DATABASE keystone ;
grant all privileges on keystone.* to`keystone`@`localhost` identified by 'keystone' ;
grant all privileges on keystone.* to`keystone`@`%` identified by 'keystone' ;

安装keystone软件包

1
yum install openstack-keystone python-keystoneclient httpd mod_wsgi

配置keystone配置文件 /etc/keystone/keystone.conf

vi /etc/keystone/keystone.conf

1
2
3
4
5
6
7
8
9
[database]
...
connection=mysql+pymysql://keystone:keystone@controller/keystone
...
[token]
....
provider=fernet
...

  • connection配置的是连接数据库含义如下 ={数据库类型}://{数据库用户}/{密码}@{主机}/{数据库名}

初始化数据库

1
su keystone -s /bin/sh -c "keystone-manage db_sync" 

keystone组件初始化

初始化Fernet密钥库

1
keystone-manage fernet_setup --keystone-user keystone --keystone-group keystone
1
keystone-manage credential_setup --keystone-user keystone --keystone-group keystone

初始化用户身份认证信息

已知openstack有一个默认的用户为 admin ,但是还没有对应的密码等登录所必须的信息.使用如下命令给admin用户初始化登录凭证
以后登录时使用

1
2
3
4
5
keystone-manage bootstrap --bootstrap-password admin \
--bootstrap-admin-url http://controller:5000/v3 \
--bootstrap-internal-url http://controller:5000/v3 \
--bootstrap-public-url http://controller:5000/v3 \
--bootstrap-region-id RegionOne

配置web服务

为 apache 服务其增加WSGI支持

1
ln -s  /usr/share/keystone/wsgi-keystone.conf  /etc/httpd/conf.d/

修改apache 服务配置并启动apache

1
vi /etc/httpd/conf/httpd.conf

修改服务域名为 controller

1
ServerName controller

启动 apache

1
2
systemctl enable httpd
systemctl start httpd

模拟登录验证

创建初始化环境的文件

1
2
3
4
5
6
7
8
9
10
cat > ~/admin-login <<EOF
export OS_USERNAME=admin
export OS_PASSWORD=admin
export OS_PROJECT_NAME=admin
export OS_USER_DOMAIN_NAME=Default
export OS_PROJECT_DOMAIN_NAME=Default
export OS_AUTH_URL=http://controller:5000/v3
export OS_IDENTITY_API_VERSION=3
export OS_IMAGE_API_VERSION=2
EOF

导入初始化环境变量

1
source ~/admin-login

检测keysone服务

创建与查阅项目列表

创建项目 project

1
openstack project create --domain default  project
1
2
3
4
5
6
7
8
9
10
11
12
13
14
[root@controller ~]# openstack project create --domain default  project
+-------------+----------------------------------+
| Field | Value |
+-------------+----------------------------------+
| description | |
| domain_id | default |
| enabled | True |
| id | 651d9bdcaa5a43fdbd8e1ec4d6f2ad72 |
| is_domain | False |
| name | project |
| options | {} |
| parent_id | default |
| tags | [] |
+-------------+----------------------------------+

查看项目列表

1
2
3
4
5
6
7
8
[root@controller ~]# openstack project list
+----------------------------------+---------+
| ID | Name |
+----------------------------------+---------+
| 651d9bdcaa5a43fdbd8e1ec4d6f2ad72 | project |
| bf3b21acb3c84e0eb98bcc48482fa97b | admin |
+----------------------------------+---------+
[root@controller ~]#

创建角色与查阅角色列表

创建角色

1
openstack role create user
1
2
3
4
5
6
7
8
9
10
11
[root@controller ~]# openstack role create user
+-------------+----------------------------------+
| Field | Value |
+-------------+----------------------------------+
| description | None |
| domain_id | None |
| id | 18f6de3d3a764e129ba470a6dfa81580 |
| name | user |
| options | {} |
+-------------+----------------------------------+
[root@controller ~]#

查看角色

1
2
3
4
5
6
7
8
9
[root@controller ~]# openstack role list
+----------------------------------+--------+
| ID | Name |
+----------------------------------+--------+
| 1684f6f551c54e998ae4b5b65a43b31b | member |
| 18f6de3d3a764e129ba470a6dfa81580 | user |
| 67a8ca9b683d47b28b6489f3a9a55444 | reader |
| eec344646434440394a984fb13da12e3 | admin |
+----------------------------------+--------+

查看阅域列表,用户列表

1
2
3
4
5
6
7
8
9
10
11
12
13
14
15
[root@controller ~]# openstack domain list
+---------+---------+---------+--------------------+
| ID | Name | Enabled | Description |
+---------+---------+---------+--------------------+
| default | Default | True | The default domain |
+---------+---------+---------+--------------------+
[root@controller ~]#
[root@controller ~]#
[root@controller ~]# openstack user list
+----------------------------------+-------+
| ID | Name |
+----------------------------------+-------+
| 6980aba2962c40529e666791f406b6a5 | admin |
+----------------------------------+-------+
[root@controller ~]#

镜像服务 Glance 安装

安装与配置Glance镜像服务

安装软件包

1
yum install openstack-glance

创建glance数据库 并授权

mysql -uroot -p

1
2
3
CREATE DATABASE glance ;
grant all privileges on glance.* to`glance`@`localhost` identified by 'glance' ;
grant all privileges on glance.* to`glance`@`%` identified by 'glance' ;

修改glance配置文件

备份

1
cp /etc/glance/glance-api.conf  /etc/glance/glance-api.conf_bak

去掉所有注释与空行

1
grep -Ev '^$|#' /etc/glance/glance-api.conf_bak > /etc/glance/glance-api.conf

修改[database]部分,实现与数据库连接

1
2
[database]
connection=mysql+pymysql://glance:glance@controller/glance

修改[keystone_authtoken] 和 [paste_deploy] 部分实现与keystone交互

1
2
3
4
5
6
7
8
9
10
11
[keystone_authtoken]
auth_url=http://controller:5000
memcached_servers=controller:11211
auth_type=password
username=glance
password=glance
project_name=project
user_domain_name=Default
project_domain_name=Default
[paste_deploy]
flavor=keystone

修改 [glance_store]部分,指定后端存储系统

1
2
3
4
[glance_store]
stores=file
default_store=file
filesystem_store_datadir=/var/lib/glance/images/

初始化glance数据库

1
su  glance -s /bin/sh -c "glance-manage db_sync" 

检查

1
2
3
4
5
6
7
8
9
10
11
12
13
14
15
16
17
18
19
20
21
22
23
24
25
26
27
28
29
30
31
32
33
34
35
36
37
[root@controller ~]# mysql -uroot -p111111
Welcome to the MariaDB monitor. Commands end with ; or \g.
Your MariaDB connection id is 16
Server version: 10.3.20-MariaDB MariaDB Server

Copyright (c) 2000, 2018, Oracle, MariaDB Corporation Ab and others.

Type 'help;' or '\h' for help. Type '\c' to clear the current input statement.

MariaDB [(none)]> use glance
Reading table information for completion of table and column names
You can turn off this feature to get a quicker startup with -A

Database changed
MariaDB [glance]> show tables ;
+----------------------------------+
| Tables_in_glance |
+----------------------------------+
| alembic_version |
| image_locations |
| image_members |
| image_properties |
| image_tags |
| images |
| metadef_namespace_resource_types |
| metadef_namespaces |
| metadef_objects |
| metadef_properties |
| metadef_resource_types |
| metadef_tags |
| migrate_version |
| task_info |
| tasks |
+----------------------------------+
15 rows in set (0.000 sec)

MariaDB [glance]>

Glance组件初始化

加载admin环境变量

1
source admin-login

创建glance用户并分配角色

创建用户

1
openstack user create --domain default --password glance  glance 
1
2
3
4
5
6
7
8
9
10
11
12
[root@controller ~]# openstack user create --domain default --password glance  glance 
+---------------------+----------------------------------+
| Field | Value |
+---------------------+----------------------------------+
| domain_id | default |
| enabled | True |
| id | ecf4a066052c408daf2f4b1087fe7a7a |
| name | glance |
| options | {} |
| password_expires_at | None |
+---------------------+----------------------------------+
[root@controller ~]#

glance分配admin角色

1
openstack role add --project project --user glance  admin

创建glance服务及服务端点

创建服务

1
openstack service create --name glance image 
1
2
3
4
5
6
7
8
9
10
[root@controller ~]# openstack service create --name glance image 
+---------+----------------------------------+
| Field | Value |
+---------+----------------------------------+
| enabled | True |
| id | f1c58a3d75084ddf994591c2c56bb2d2 |
| name | glance |
| type | image |
+---------+----------------------------------+
[root@controller ~]#

创建glance服务端点

1
2
3
openstack endpoint create --region RegionOne glance public http://controller:9292
openstack endpoint create --region RegionOne glance internal http://controller:9292
openstack endpoint create --region RegionOne glance admin http://controller:9292
1
2
3
4
5
6
7
8
9
10
11
12
13
14
15
16
17
18
19
20
21
22
23
24
25
26
27
28
29
30
31
32
33
34
35
36
37
38
39
40
41
42
43
[root@controller ~]# openstack endpoint create --region RegionOne glance public http://controller:9292
+--------------+----------------------------------+
| Field | Value |
+--------------+----------------------------------+
| enabled | True |
| id | 07c95d1f01324f8383c89b5905fb8742 |
| interface | public |
| region | RegionOne |
| region_id | RegionOne |
| service_id | f1c58a3d75084ddf994591c2c56bb2d2 |
| service_name | glance |
| service_type | image |
| url | http://controller:9292 |
+--------------+----------------------------------+
[root@controller ~]# openstack endpoint create --region RegionOne glance internal http://controller:9292
+--------------+----------------------------------+
| Field | Value |
+--------------+----------------------------------+
| enabled | True |
| id | 31217103fa2343d4b0c3d52b61f909e4 |
| interface | internal |
| region | RegionOne |
| region_id | RegionOne |
| service_id | f1c58a3d75084ddf994591c2c56bb2d2 |
| service_name | glance |
| service_type | image |
| url | http://controller:9292 |
+--------------+----------------------------------+
[root@controller ~]# openstack endpoint create --region RegionOne glance admin http://controller:9292
+--------------+----------------------------------+
| Field | Value |
+--------------+----------------------------------+
| enabled | True |
| id | 95f71b0bef5b4e648febfacd560907b8 |
| interface | admin |
| region | RegionOne |
| region_id | RegionOne |
| service_id | f1c58a3d75084ddf994591c2c56bb2d2 |
| service_name | glance |
| service_type | image |
| url | http://controller:9292 |
+--------------+----------------------------------+
[root@controller ~]#

启动glance服务

1
2
systemctl enable openstack-glance-api
systemctl start openstack-glance-api

验证Glance服务

查看端口

1
2
[root@controller ~]# netstat -tnlup|grep 9292
tcp 0 0 0.0.0.0:9292 0.0.0.0:* LISTEN 10781/python2

查看运行状态

1
2
3
4
5
6
7
8
9
10
11
12
13
14
15
16
17
[root@controller ~]# systemctl status openstack-glance-api
● openstack-glance-api.service - OpenStack Image Service (code-named Glance) API server
Loaded: loaded (/usr/lib/systemd/system/openstack-glance-api.service; enabled; vendor preset: disabled)
Active: active (running) since 二 2024-11-19 22:18:26 CST; 48s ago
Main PID: 10781 (glance-api)
CGroup: /system.slice/openstack-glance-api.service
├─10781 /usr/bin/python2 /usr/bin/glance-api
├─10793 /usr/bin/python2 /usr/bin/glance-api
├─10794 /usr/bin/python2 /usr/bin/glance-api
├─10795 /usr/bin/python2 /usr/bin/glance-api
└─10796 /usr/bin/python2 /usr/bin/glance-api

11月 19 22:18:26 controller systemd[1]: Started OpenStack Image Service (code-named Glance) API server.
11月 19 22:18:27 controller glance-api[10781]: /usr/lib/python2.7/site-packages/paste/deploy/loadwsgi.py:22: PkgResourcesDeprecationWarning: Parameters to load are de...separately.
11月 19 22:18:27 controller glance-api[10781]: return pkg_resources.EntryPoint.parse("x=" + s).load(False)
Hint: Some lines were ellipsized, use -l to show in full.
[root@controller ~]#

用glance制作镜像

制作镜像

镜像下载地址

1
openstack image create --file cirros-0.5.1-x86_64-disk.img  --disk-format qcow2 --container-format bare --public cirros5.1
1
2
3
4
5
6
7
8
9
10
11
12
13
14
15
16
17
18
19
20
21
22
23
24
25
[root@controller ~]# openstack image create --file cirros-0.5.1-x86_64-disk.img  --disk-format qcow2 --container-format bare --public cirros5.1
+------------------+--------------------------------------------------------------------------------------------------------------------------------------------------------------------------------------------+
| Field | Value |
+------------------+--------------------------------------------------------------------------------------------------------------------------------------------------------------------------------------------+
| checksum | 1d3062cd89af34e419f7100277f38b2b |
| container_format | bare |
| created_at | 2024-11-22T13:57:29Z |
| disk_format | qcow2 |
| file | /v2/images/d68df76e-f6fd-4095-871f-5c67342d11b5/file |
| id | d68df76e-f6fd-4095-871f-5c67342d11b5 |
| min_disk | 0 |
| min_ram | 0 |
| name | cirros5.1 |
| owner | bf3b21acb3c84e0eb98bcc48482fa97b |
| properties | os_hash_algo='sha512', os_hash_value='553d220ed58cfee7dafe003c446a9f197ab5edf8ffc09396c74187cf83873c877e7ae041cb80f3b91489acf687183adcd689b53b38e3ddd22e627e7f98a09c46', os_hidden='False' |
| protected | False |
| schema | /v2/schemas/image |
| size | 16338944 |
| status | active |
| tags | |
| updated_at | 2024-11-22T13:57:30Z |
| virtual_size | None |
| visibility | public |
+------------------+--------------------------------------------------------------------------------------------------------------------------------------------------------------------------------------------+
[root@controller ~]#

查看镜像

1
openstack image list
1
2
3
4
5
6
7
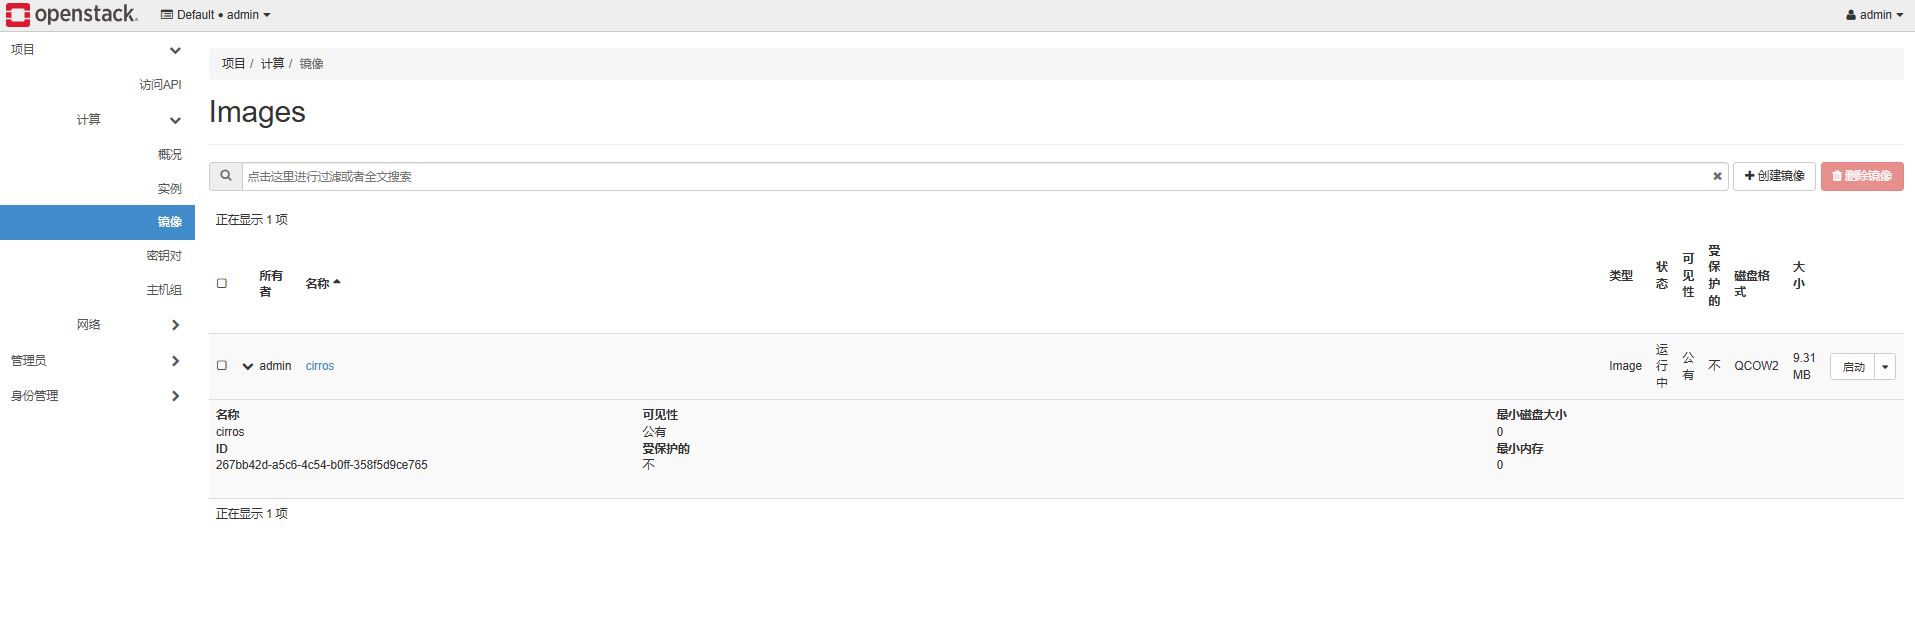
[root@controller ~]# openstack image list
+--------------------------------------+--------+--------+
| ID | Name | Status |
+--------------------------------------+--------+--------+
| 267bb42d-a5c6-4c54-b0ff-358f5d9ce765 | cirros | active |
+--------------------------------------+--------+--------+
[root@controller ~]#

放置服务 Placenment 安装

安装与配置Placement放置服务

安装placement

1
yum -y install openstack-placement-api

创建placement数据库并授权

mysql -uroot -p

1
2
3
CREATE DATABASE placement ;
grant all privileges on placement.* to`placement`@`localhost` identified by 'placement' ;
grant all privileges on placement.* to`placement`@`%` identified by 'placement' ;

修改placement配置文件

/etc/placement/placement.conf

备份

1
cp /etc/placement/placement.conf /etc/placement/placement.conf_bak

清空空行与注释

1
2

grep -Ev '^$|#' /etc/placement/placement.conf_bak > /etc/placement/placement.conf

修改数据库连接[placement_database]

1
2
[placement_database]
connection=mysql+pymysql://placement:placement@controller/placement

修改[api] 与 [keystone_authtoken]

1
2
3
4
5
6
7
8
9
10
11
12
[api]
auth_strategy=keystone

[keystone_authtoken]
auth_url=http://controller:5000
memcached_servers=controller:11211
auth_type=password
project_domain_name=Default
user_domain_name=Default
project_name=project
username=placement
password=placement

修改aoache配置文件

编辑 /etc/httpd/conf.d/00-placement-api.conf

在VirtualHost节点增加以下代码

1
2
3
4
5
<Directory /usr/bin>
<ifVersion >= 2.4 >
Require all granted
</ifVersion>
</Directory>

结果如下

1
2
3
4
5
6
7
8
9
10
11
12
13
14
15
16
17
18
19
20
21
22
23
24
25
26
27
28
29
30
31
32
33
34
[root@controller ~]# cat /etc/httpd/conf.d/00-placement-api.conf
Listen 8778

<VirtualHost *:8778>
WSGIProcessGroup placement-api
WSGIApplicationGroup %{GLOBAL}
WSGIPassAuthorization On
WSGIDaemonProcess placement-api processes=3 threads=1 user=placement group=placement
WSGIScriptAlias / /usr/bin/placement-api

<Directory /usr/bin>
<ifVersion >= 2.4 >
Require all granted
</ifVersion>
</Directory>

<IfVersion >= 2.4>
ErrorLogFormat "%M"
</IfVersion>
ErrorLog /var/log/placement/placement-api.log
#SSLEngine On
#SSLCertificateFile ...
#SSLCertificateKeyFile ...
</VirtualHost>

Alias /placement-api /usr/bin/placement-api
<Location /placement-api>
SetHandler wsgi-script
Options +ExecCGI
WSGIProcessGroup placement-api
WSGIApplicationGroup %{GLOBAL}
WSGIPassAuthorization On
</Location>

初始化placement数据库

1
su placement -s /bin/sh -c "placement-manage db sync"
1
2
3
4
5
6
7
8
9
10
11
12
13
14
15
16
17
18
19
20
21
22
23
24
25
26
27
28
29
30
31
32
33
34
35
36
37
38
39
40
[root@controller ~]# su placement -s /bin/sh -c "placement-manage db sync"
/usr/lib/python2.7/site-packages/pymysql/cursors.py:170: Warning: (1280, u"Name 'alembic_version_pkc' ignored for PRIMARY key.")
result = self._query(query)
[root@controller ~]# mysql -uplacement -pplacement
Welcome to the MariaDB monitor. Commands end with ; or \g.
Your MariaDB connection id is 10
Server version: 10.3.20-MariaDB MariaDB Server

Copyright (c) 2000, 2018, Oracle, MariaDB Corporation Ab and others.

Type 'help;' or '\h' for help. Type '\c' to clear the current input statement.

MariaDB [(none)]> use placement
Reading table information for completion of table and column names
You can turn off this feature to get a quicker startup with -A

Database changed
MariaDB [placement]> show tables ;
+------------------------------+
| Tables_in_placement |
+------------------------------+
| alembic_version |
| allocations |
| consumers |
| inventories |
| placement_aggregates |
| projects |
| resource_classes |
| resource_provider_aggregates |
| resource_provider_traits |
| resource_providers |
| traits |
| users |
+------------------------------+
12 rows in set (0.000 sec)

MariaDB [placement]> exit;
Bye
[root@controller ~]#

  • 同步是报的警告可以忽略

placement组件初始化

加载管理员环境变量

1
source admin-login

创建placement用户并分配角色

创建 placement 用户

1
openstack user create --domain default --password placement placement
1
2
3
4
5
6
7
8
9
10
11
[root@controller ~]# openstack user create --domain default --password placement placement
+---------------------+----------------------------------+
| Field | Value |
+---------------------+----------------------------------+
| domain_id | default |
| enabled | True |
| id | abeabbe1fe154deaa94aed31e9fcaeea |
| name | placement |
| options | {} |
| password_expires_at | None |
+---------------------+----------------------------------+

为用户 placement 分配admin角色

1
openstack role add --project project --user placement admin

创建placement服务及服务端点

创建 placement 服务

1
openstack service create --name placement placement
1
2
3
4
5
6
7
8
9
[root@controller ~]# openstack service create --name placement placement
+---------+----------------------------------+
| Field | Value |
+---------+----------------------------------+
| enabled | True |
| id | 3038c7076b6342fc838befafa440be46 |
| name | placement |
| type | placement |
+---------+----------------------------------+

创建 placement 服务端点

1
2
3
openstack endpoint create --region RegionOne placement public http://controller:8778
openstack endpoint create --region RegionOne placement internal http://controller:8778
openstack endpoint create --region RegionOne placement admin http://controller:8778
1
2
3
4
5
6
7
8
9
10
11
12
13
14
15
16
17
18
19
20
21
22
23
24
25
26
27
28
29
30
31
32
33
34
35
36
37
38
39
40
41
42
43
[root@controller ~]# openstack endpoint create --region RegionOne placement public http://controller:8778
+--------------+----------------------------------+
| Field | Value |
+--------------+----------------------------------+
| enabled | True |
| id | ea4651b457924958840425735ba5efdd |
| interface | public |
| region | RegionOne |
| region_id | RegionOne |
| service_id | 3038c7076b6342fc838befafa440be46 |
| service_name | placement |
| service_type | placement |
| url | http://controller:8778 |
+--------------+----------------------------------+
[root@controller ~]# openstack endpoint create --region RegionOne placement internal http://controller:8778
+--------------+----------------------------------+
| Field | Value |
+--------------+----------------------------------+
| enabled | True |
| id | d65d5ae5cdd4439c8a6b066236981a0a |
| interface | internal |
| region | RegionOne |
| region_id | RegionOne |
| service_id | 3038c7076b6342fc838befafa440be46 |
| service_name | placement |
| service_type | placement |
| url | http://controller:8778 |
+--------------+----------------------------------+
[root@controller ~]# openstack endpoint create --region RegionOne placement admin http://controller:8778
+--------------+----------------------------------+
| Field | Value |
+--------------+----------------------------------+
| enabled | True |
| id | c1f27c81c5ee445f97a850159bd68619 |
| interface | admin |
| region | RegionOne |
| region_id | RegionOne |
| service_id | 3038c7076b6342fc838befafa440be46 |
| service_name | placement |
| service_type | placement |
| url | http://controller:8778 |
+--------------+----------------------------------+
[root@controller ~]#

启动 placement 服务

1
systemctl restart httpd 

检测placement服务

查看端口

1
2
3
4
[root@controller ~]# netstat -lntup|grep 8778
tcp6 0 0 :::8778 :::* LISTEN 10061/httpd
[root@controller ~]#

检查服务端点

1
2
[root@controller ~]# curl http://controller:8778
{"versions": [{"status": "CURRENT", "min_version": "1.0", "max_version": "1.36", "id": "v1.0", "links": [{"href": "", "rel": "self"}]}]}

计算服务 nova 安装

安装与配置控制节点上的nova

安装nova软件包

1
yum install -y openstack-nova-api openstack-nova-conductor openstack-nova-scheduler openstack-nova-novncproxy

创建nova数据库并授权

需要创建三个数据库 nova nova_api nova_cell0
并且都要给nova用户赋权.

mysql -uroot -p

1
2
3
4
5
6
7
8
9
10
11
CREATE DATABASE nova ;
grant all privileges on nova.* to`nova`@`localhost` identified by 'nova' ;
grant all privileges on nova.* to`nova`@`%` identified by 'nova' ;

CREATE DATABASE nova_api ;
grant all privileges on nova_api.* to`nova`@`localhost` identified by 'nova' ;
grant all privileges on nova_api.* to`nova`@`%` identified by 'nova' ;

CREATE DATABASE nova_cell0 ;
grant all privileges on nova_cell0.* to`nova`@`localhost` identified by 'nova' ;
grant all privileges on nova_cell0.* to`nova`@`%` identified by 'nova' ;

修改nova配置文件

备份

1
cp  /etc/nova/nova.conf  /etc/nova/nova.conf_bak

去掉注释与空行

1
grep -Ev '^$|#' /etc/nova/nova.conf_bak > /etc/nova/nova.conf

编辑/etc/nova/nova.conf

修改 [api_database] 与 [database] 连接数据库
1
2
3
4
[api_database]
connection=mysql+pymysql://nova:nova@controller/nova_api
[database]
connection=mysql+pymysql://nova:nova@controller/nova
修改 [api] 与 [keystone_authtoken] 实现与keystone交互
1
2
3
4
5
6
7
8
9
10
11
12
[api]
auth_strategy=keystone

[keystone_authtoken]
auth_url=http://controller:5000
memcached_servers=controller:11211
auth_type=password
project_domain_name=Default
user_domain_name=Default
project_name=project
username=nova
password=nova
修改[placement] 实现与 placement 的交互
1
2
3
4
5
6
7
8
9
[placement]
auth_url=http://controller:5000
auth_type=password
project_domain_name=Default
user_domain_name=Default
project_name=project
username=placement
password=placement
region_name=RegionOne
修改[glance]部分 实现与glance交互
1
2
[glance]
api_servers=http://controller:9292
修改[oslo_concurrency]部分, 配置锁路径
1
2
[oslo_concurrency]
lock_path=/var/lib/nova/tmp
修改[DEFAULT] 配置使用消息队列及防火墙等信息
1
2
3
4
5
6
[DEFAULT]
enabled_apis=osapi_compute,metadata
transport_url=rabbit://guest:guest@controller:5672
my_ip=192.168.10.10
use_neutron=true
firewall_driver=nova.virt.firewall.NoopFirewallDriver
修改[vnc],配置vnc的连接模式
1
2
3
4
[vnc]
enabled=true
server_listen=$my_ip
server_proxyclient_address=$my_ip

初始化 nova 数据库

初始化nova_api数据库

1
su nova -s /bin/sh -c "nova-manage api_db sync"

创建cell1 单元 该单元将使用nova数据库

1
su nova -s /bin/sh -c "nova-manage cell_v2 create_cell --name=cell1"

映射nova 到 cell0 数据库 ,使cell0的表结构与nova的表结构保持一致

1
su nova -s /bin/sh -c "nova-manage cell_v2 map_cell0"

初始化nova数据库, 由于映射的存在 cell0中同时会创建相同的数据表

1
su nova -s /bin/sh -c "nova-manage db sync"

验证单元是否都已正确注册

1
nova-manage cell_v2 list_cells
1
2
3
4
5
6
7
8
[root@controller ~]# nova-manage cell_v2 list_cells
+-------+--------------------------------------+-------------------------------------+-------------------------------------------------+----------+
| 名称 | UUID | Transport URL | 数据库连接 | Disabled |
+-------+--------------------------------------+-------------------------------------+-------------------------------------------------+----------+
| cell0 | 00000000-0000-0000-0000-000000000000 | none:/ | mysql+pymysql://nova:****@controller/nova_cell0 | False |
| cell1 | baf6cbee-8e4f-4d7e-b090-10283b7c84eb | rabbit://guest:****@controller:5672 | mysql+pymysql://nova:****@controller/nova | False |
+-------+--------------------------------------+-------------------------------------+-------------------------------------------------+----------+
[root@controller ~]#

nova组件初始化

创建nova用户并分配角色

创建用户

1
openstack user create --domain default --password nova nova 
1
2
3
4
5
6
7
8
9
10
11
12
[root@controller ~]# openstack user create --domain default --password nova nova 
+---------------------+----------------------------------+
| Field | Value |
+---------------------+----------------------------------+
| domain_id | default |
| enabled | True |
| id | 72c22357fd6a409ba071cfbf4242550d |
| name | nova |
| options | {} |
| password_expires_at | None |
+---------------------+----------------------------------+
[root@controller ~]#
  • 注意 这里的密码要与nova.conf中[keystone_authtoken]中的密码一致

授予nova用户 操作poject项目的admin权限

1
openstack role add --project project  --user nova admin

创建nova服务及服务端点

创建服务 名称为 nova 类型为 compute

1
openstack service create --name nova compute 
1
2
3
4
5
6
7
8
9
10
[root@controller ~]# openstack service create --name nova compute
+---------+----------------------------------+
| Field | Value |
+---------+----------------------------------+
| enabled | True |
| id | 404a7df0d3f04c2e84cc64d9d7d6c4d3 |
| name | nova |
| type | compute |
+---------+----------------------------------+
[root@controller ~]#

创建服务端点

1
2
3
openstack endpoint create --region RegionOne nova public http://controller:8774/v2.1
openstack endpoint create --region RegionOne nova internal http://controller:8774/v2.1
openstack endpoint create --region RegionOne nova admin http://controller:8774/v2.1
1
2
3
4
5
6
7
8
9
10
11
12
13
14
15
16
17
18
19
20
21
22
23
24
25
26
27
28
29
30
31
32
33
34
35
36
37
38
39
40
41
42
43
44
[root@controller ~]# openstack endpoint create --region RegionOne nova public http://controller:8774/v2.1
+--------------+----------------------------------+
| Field | Value |
+--------------+----------------------------------+
| enabled | True |
| id | 799df4a0d53d4752b175d5fbff4b99db |
| interface | public |
| region | RegionOne |
| region_id | RegionOne |
| service_id | 404a7df0d3f04c2e84cc64d9d7d6c4d3 |
| service_name | nova |
| service_type | compute |
| url | http://controller:8774/v2.1 |
+--------------+----------------------------------+
[root@controller ~]# openstack endpoint create --region RegionOne nova internal http://controller:8774/v2.1
+--------------+----------------------------------+
| Field | Value |
+--------------+----------------------------------+
| enabled | True |
| id | 9e46e764f8564eb48b2a653efb4bcf14 |
| interface | internal |
| region | RegionOne |
| region_id | RegionOne |
| service_id | 404a7df0d3f04c2e84cc64d9d7d6c4d3 |
| service_name | nova |
| service_type | compute |
| url | http://controller:8774/v2.1 |
+--------------+----------------------------------+
[root@controller ~]# openstack endpoint create --region RegionOne nova admin http://controller:8774/v2.1
+--------------+----------------------------------+
| Field | Value |
+--------------+----------------------------------+
| enabled | True |
| id | 49eb40cdd6564c679fdd0264b9a51b33 |
| interface | admin |
| region | RegionOne |
| region_id | RegionOne |
| service_id | 404a7df0d3f04c2e84cc64d9d7d6c4d3 |
| service_name | nova |
| service_type | compute |
| url | http://controller:8774/v2.1 |
+--------------+----------------------------------+
[root@controller ~]#

启动控制节点的nova服务

1
2
systemctl  enable  openstack-nova-api  openstack-nova-scheduler  openstack-nova-conductor openstack-nova-novncproxy
systemctl start openstack-nova-api openstack-nova-scheduler openstack-nova-conductor openstack-nova-novncproxy

检测控制节点的nova服务

检查端口

1
netstat -nutpl | grep 877
1
2
3
4
5
[root@controller ~]# netstat -nutpl | grep 877
tcp 0 0 0.0.0.0:8774 0.0.0.0:* LISTEN 9937/python2
tcp 0 0 0.0.0.0:8775 0.0.0.0:* LISTEN 9937/python2
tcp6 0 0 :::8778 :::* LISTEN 1190/httpd
[root@controller ~]#

查看计算服务列表

1
openstack compute service list 
1
2
3
4
5
6
7
[root@controller ~]# openstack compute service list 
+----+----------------+------------+----------+---------+-------+----------------------------+
| ID | Binary | Host | Zone | Status | State | Updated At |
+----+----------------+------------+----------+---------+-------+----------------------------+
| 5 | nova-conductor | controller | internal | enabled | up | 2024-11-20T11:35:02.000000 |
| 6 | nova-scheduler | controller | internal | enabled | up | 2024-11-20T11:34:54.000000 |
+----+----------------+------------+----------+---------+-------+----------------------------+

安装与配置计算节点上的nova服务

计算节点只需要安装nova的计算模块 nova-compute

安装nova软件包

1
yum install openstack-nova-compute

修改nova配置文件

备份

1
cp  /etc/nova/nova.conf  /etc/nova/nova.conf_bak

去掉注释与空行

1
grep -Ev '^$|#' /etc/nova/nova.conf_bak > /etc/nova/nova.conf

编辑/etc/nova/nova.conf

修改[api] 与 [keystone_authtoken] 部分,实现与keystone通信
1
2
3
4
5
6
7
8
9
10
11
12
[api]
auth_strategy=keystone

[keystone_authtoken]
auth_url=http://controller:5000
memcached_servers=controller:11211
auth_type=password
project_domain_name=Default
user_domain_name=Default
project_name=project
username=nova
password=nova
修改[placement] 部分,实现与placement 交互
1
2
3
4
5
6
7
8
9
[placement]
auth_url=http://controller:5000
auth_type=password
project_domain_name=Default
user_domain_name=Default
project_name=project
username=placement
password=placement
region_name=RegionOne
修改[glance]部分, 实现与glance交互
1
2
[glance]
api_servers=http://controller:9292
修改[oslo_concurrency] 部分,配置锁路径
1
2
[oslo_concurrency]
lock_path=/var/lib/nova/tmp
修改 [DEFAULT]部分, 配置使用消息队列及防火墙等信息
1
2
3
4
5
6
[DEFAULT]
enabled_apis=osapi_compute,metadata
transport_url=rabbit://guest:guest@controller:5672
my_ip=192.168.10.20
use_neutron=true
firewall_driver=nova.virt.firewall.NoopFirewallDriver
修改[vnc]部分, 配置VNC连接模式
1
2
3
4
5
[vnc]
enabled=true
server_listen=0.0.0.0
server_proxyclient_address=$my_ip
novncproxy_base_url=http://192.168.10.10:6080/vnc_auto.html
配置[libvirt] ,设置虚拟化类型为qemu
1
2
[libvirt]
virt_type=qemu

启动计算节点的nova服务

1
2
systemctl enable libvirtd openstack-nova-compute
systemctl start libvirtd openstack-nova-compute

发现计算节点的nova服务

每个计算节点要加入系统,都需要在控制节点上执行一次发现计算节点的操作, 只有被控制节点发现的计算节点才能被映射成一个单元

发现节点

加载admin环境变量

1
source admin-login

发现计算节点

1
su nova -s /bin/sh -c "nova-manage cell_v2 discover_hosts --verbose"
1
2
3
4
5
6
7
8
[root@controller ~]# su nova -s /bin/sh -c "nova-manage cell_v2 discover_hosts --verbose"
Found 2 cell mappings.
Getting computes from cell 'cell1': baf6cbee-8e4f-4d7e-b090-10283b7c84eb
Checking host mapping for compute host 'computer': be6af44e-6b09-40ab-a94a-a4aeed309562
Creating host mapping for compute host 'computer': be6af44e-6b09-40ab-a94a-a4aeed309562
Found 1 unmapped computes in cell: baf6cbee-8e4f-4d7e-b090-10283b7c84eb
Skipping cell0 since it does not contain hosts.
[root@controller ~]#

发现节点后,计算节点将自动与cell1单元形成关联,以后即可通过cell1对该计算节点进行管理

设置自动发现

openstack可以有多个计算节点,每增加一个新节点就需要执行以上命令进行发现,为例减少工作量,
可以修改配置文件,设置每隔一段时间就自动执行一次发现命令

修改配置文件

1
2
3
vi /etc/nova/nova.conf
[scheduler]
discover_hosts_in_cells_interval=60

重启nova服务

1
systemctl restart openstack-nova-api

验证nova服务

查看计算服务列表

1
openstack compute service list 
1
2
3
4
5
6
7
8
9
[root@controller ~]# openstack compute service list 
+----+----------------+------------+----------+---------+-------+----------------------------+
| ID | Binary | Host | Zone | Status | State | Updated At |
+----+----------------+------------+----------+---------+-------+----------------------------+
| 5 | nova-conductor | controller | internal | enabled | up | 2024-11-20T12:21:22.000000 |
| 6 | nova-scheduler | controller | internal | enabled | up | 2024-11-20T12:21:25.000000 |
| 9 | nova-compute | computer | nova | enabled | up | 2024-11-20T12:21:29.000000 |
+----+----------------+------------+----------+---------+-------+----------------------------+
[root@controller ~]#

查看所有openstack服务及端点列表

1
openstack catalog list 
1
2
3
4
5
6
7
8
9
10
11
12
13
14
15
16
17
18
19
20
21
22
23
24
25
26
27
28
29
30
31
32
33
34
[root@controller ~]# openstack catalog list 
+-----------+-----------+-----------------------------------------+
| Name | Type | Endpoints |
+-----------+-----------+-----------------------------------------+
| placement | placement | RegionOne |
| | | admin: http://controller:8778 |
| | | RegionOne |
| | | internal: http://controller:8778 |
| | | RegionOne |
| | | public: http://controller:8778 |
| | | |
| nova | compute | RegionOne |
| | | admin: http://controller:8774/v2.1 |
| | | RegionOne |
| | | public: http://controller:8774/v2.1 |
| | | RegionOne |
| | | internal: http://controller:8774/v2.1 |
| | | |
| keystone | identity | RegionOne |
| | | public: http://controller:5000/v3 |
| | | RegionOne |
| | | internal: http://controller:5000/v3 |
| | | RegionOne |
| | | admin: http://controller:5000/v3 |
| | | |
| glance | image | RegionOne |
| | | public: http://controller:9292 |
| | | RegionOne |
| | | internal: http://controller:9292 |
| | | RegionOne |
| | | admin: http://controller:9292 |
| | | |
+-----------+-----------+-----------------------------------------+
[root@controller ~]#

使用nova 状态检测工具检查

1
nova-status upgrade check
1
2
3
4
5
6
7
8
9
10
11
12
13
14
15
16
17
18
19
20
21
[root@controller ~]# nova-status upgrade check
+--------------------------------+
| Upgrade Check Results |
+--------------------------------+
| Check: Cells v2 |
| Result: Success |
| Details: None |
+--------------------------------+
| Check: Placement API |
| Result: Success |
| Details: None |
+--------------------------------+
| Check: Ironic Flavor Migration |
| Result: Success |
| Details: None |
+--------------------------------+
| Check: Cinder API |
| Result: Success |
| Details: None |
+--------------------------------+
[root@controller ~]#

网络服务Neutron 安装

网络初始环境准备

该部分需要在控制节点与计算节点上操作

将网卡设置为混杂模式

将外网网卡ens34 设置为混杂模式

1
ifconfig ens34 promisc

检查混在模式是否生效

1
2
3
4
5
6
7
8
9
10
11
12
13
14
15
16
17
18
19
20
21
22
23
24
25
26
27
28
29
[root@computer ~]# ifconfig
ens33: flags=4163<UP,BROADCAST,RUNNING,MULTICAST> mtu 1500
inet 192.168.10.20 netmask 255.255.255.0 broadcast 192.168.10.255
inet6 fe80::3d4a:41df:c556:585c prefixlen 64 scopeid 0x20<link>
ether 00:0c:29:64:06:80 txqueuelen 1000 (Ethernet)
RX packets 1865 bytes 497121 (485.4 KiB)
RX errors 0 dropped 0 overruns 0 frame 0
TX packets 1813 bytes 1335334 (1.2 MiB)
TX errors 0 dropped 0 overruns 0 carrier 0 collisions 0

ens34: flags=4419<UP,BROADCAST,RUNNING,PROMISC,MULTICAST> mtu 1500
inet 192.168.16.20 netmask 255.255.255.0 broadcast 192.168.16.255
inet6 fe80::c1bf:7878:47ed:1109 prefixlen 64 scopeid 0x20<link>
ether 00:0c:29:64:06:8a txqueuelen 1000 (Ethernet)
RX packets 113 bytes 9564 (9.3 KiB)
RX errors 0 dropped 0 overruns 0 frame 0
TX packets 148 bytes 12110 (11.8 KiB)
TX errors 0 dropped 0 overruns 0 carrier 0 collisions 0

lo: flags=73<UP,LOOPBACK,RUNNING> mtu 65536
inet 127.0.0.1 netmask 255.0.0.0
inet6 ::1 prefixlen 128 scopeid 0x10<host>
loop txqueuelen 1000 (Local Loopback)
RX packets 9175 bytes 482614 (471.3 KiB)
RX errors 0 dropped 0 overruns 0 frame 0
TX packets 9175 bytes 482614 (471.3 KiB)
TX errors 0 dropped 0 overruns 0 carrier 0 collisions 0

[root@computer ~]#
  • 网卡信息中出现 PROMISC 字样

设置开机后混杂模式自动生效

1
2
3
cat >> /etc/profile <<EOF
ifconfig ens34 promisc
EOF

加载桥接模式防火墙模块

网络过滤器(Netfilter) 是linux n内核中的一个软件框架,用于管理网络数据包不仅具有网络地址转换的功能,还具有数据包内容修改以及数据包过滤等防火墙功能,
它与Linux网桥的功能联动,可以实现桥接模式防火墙(br_netfilter)的功能,centos默认没有加载桥接模式防火墙模块,需要手动加载

编辑配置文件

1
vi /etc/sysctl.conf

在文件最下方增加

1
2
net.bridge.bridge-nf-call-iptables=1
net.bridge.bridge-nf-call-ip6tables=1

加载br_netfilter

1
modprobe br_netfilter

检查模块加载情况

1
sysctl -p
1
2
3
4
5
[root@computer ~]# modprobe br_netfilter
[root@computer ~]# sysctl -p
net.bridge.bridge-nf-call-iptables = 1
net.bridge.bridge-nf-call-ip6tables = 1
[root@computer ~]#

安装与配置控制节点上的 neutron 服务

安装Neutron 软件包

1
yum install -y openstack-neutron openstack-neutron-ml2 openstack-neutron-linuxbridge

创建Neutron 数据库

1
2
3
CREATE DATABASE neutron ;
grant all privileges on neutron.* to`neutron`@`localhost` identified by 'neutron' ;
grant all privileges on neutron.* to`neutron`@`%` identified by 'neutron' ;

修改Neutron服务相关配置文件

Neutron是一个比较复杂的组件,需要配置Neutron组件,各个插件,各种代理的相关信息

nuetron 配置文件

备份
1
cp /etc/neutron/neutron.conf /etc/neutron/neutron.conf_bak
清楚注释与空行
1
grep -Ev '^$|#'  /etc/neutron/neutron.conf_bak > /etc/neutron/neutron.conf
编辑配置文件 /etc/neutron/neutron.conf
1
2
3
4
5
6
7
8
9
10
11
12
13
14
15
16
17
18
19
20
21
22
23
24
25
26
27
28
29
30
31
32
33
34
35
[DEFAULT]
core_plugin=ml2
service_plugins=
transport_url=rabbit://guest:guest@controller:5672
auth_strategy=keystone
notify_nova_on_port_status_changes=true
notify_nova_on_port_data_changes=true

[databnase]
connection=mysql+pymysql://neutron:neutron@controller/neutron

[keystone_authtoken]
auth_url=http://controller:5000
memcached_servers=controller:11211
auth_type=password
project_domain_name=Default
user_domain_name=Default
project_name=project
username=neutron
password=neutron

[oslo_concurrency]
lock_path=/var/lib/neutron/tmp

[nova]
auth_url=http://controller:5000
auth_type=password
project_domain_name=Default
user_domain_name=Default
project_name=project
username=nova
password=nova
region_name=RegionOne
server_proxyclient_address=192.168.10.10

  • [nova] 节点需要自行添加

修改二层模块插件 (ML2 PLUGIN) 的配置文件

备份
1
cp /etc/neutron/plugins/ml2/ml2_conf.ini  /etc/neutron/plugins/ml2/ml2_conf.ini_bak
去掉注释与空行
1
grep -Ev '^$|#'  /etc/neutron/plugins/ml2/ml2_conf.ini_bak > /etc/neutron/plugins/ml2/ml2_conf.ini
编辑配置文件 /etc/neutron/plugins/ml2/ml2_conf.ini
1
2
3
4
5
6
7
8
9
10
11
[ml2]
type_drivers=flat
tenant_network_types=
mechanism_drivers=linuxbridge
extension_drivers=port_security

[ml2_type_flat]
flat_networks=provider

[securitygroup]
enable_ipset=true
启动ML2插件

只有在/etc/neutron/ 下的插件才能生效, 因此需要将ml2_conf.ini 映射为/etc/neutron/下的plugin.ini 文件

1
ln -s /etc/neutron/plugins/ml2/ml2_conf.ini  /etc/neutron/plugin.ini

修改网桥代理的配置文件

备份
1
cp /etc/neutron/plugins/ml2/linuxbridge_agent.ini /etc/neutron/plugins/ml2/linuxbridge_agent.ini_bak
去掉空行与注释
1
grep -Ev '^$|#'  /etc/neutron/plugins/ml2/linuxbridge_agent.ini_bak > /etc/neutron/plugins/ml2/linuxbridge_agent.ini
编辑/etc/neutron/plugins/ml2/linuxbridge_agent.ini
1
2
3
4
5
6
7
8
9
10
[linux_bridge]
physical_interface_mappings=provider:ens34

[vxlan]
enable_vxlan=false

[securitygroup]
enable_security_group=true
firewall_driver=neutron.agent.linux.iptables_firewall.IptablesFirewallDriver

  • 这里的 provider 就是ML2中的 flat_networks 的值. provider对应的是外网网卡

修改DHCP代理配置文件

dhcp-agent 为云主机提供了自动分配IP地址的服务. dhcp_agent的配置文件为 /etc/neutron/dhcp_agent.ini

备份
1
cp /etc/neutron/dhcp_agent.ini /etc/neutron/dhcp_agent.ini_bak
去掉空行与注释
1
grep -Ev '^$|#'  /etc/neutron/dhcp_agent.ini_bak >/etc/neutron/dhcp_agent.ini
编辑配置文件/etc/neutron/dhcp_agent.ini
1
2
3
4
5
[DEFAULT]
interface_driver=linuxbridge
dhcp_driver=neutron.agent.linux.dhcp.Dnsmasq
enable_isolated_metadata=true

修改元数据代理配置文件

修改配置文件 /etc/neutron/metadata_agent.ini
1
2
3
[DEFAULT]
nova_metadata_host=controller
metadata_proxy_shared_secret=METADATA_SECRET

修改nova配置文件

修改/etc/nova/nova.conf
1
2
3
4
5
6
7
8
9
10
11
[neutron]
auth_url=http://controller:5000
auth_type=password
project_domain_name=default
user_domain_name=default
region_name=RegionOne
project_name=project
username=neutron
password=neutron
service_metadata_proxy=true
metadata_proxy_shared_secret=METADATA_SECRET

初始化数据库

1
su neutron -s /bin/sh -c "neutron-db-manage --config-file=/etc/neutron/neutron.conf --config-file /etc/neutron/plugins/ml2/ml2_conf.ini upgrade head "

检查数据库

1
2
3
4
5
6
7
8
9
10
11
12
13
14
15
16
17
18
19
20
21
22
23
24
25
26
27
28
29
30
31
32
33
34
35
36
37
38
39
40
41
42
43
44
45
46
47
48
49
50
51
52
53
54
55
56
57
58
59
60
61
62
63
64
65
66
67
68
69
70
71
72
73
74
75
76
77
78
79
80
81
82
83
84
85
86
87
88
89
90
91
92
93
94
95
96
97
98
99
100
101
102
103
104
105
106
107
108
109
110
111
112
113
114
115
116
117
118
119
120
121
122
123
124
125
126
127
128
129
130
131
132
133
134
135
136
137
138
139
140
141
142
143
144
145
146
147
148
149
150
151
152
153
154
155
156
157
158
159
160
161
162
163
164
165
166
167
168
169
170
171
172
173
174
175
176
177
178
179
180
181
MariaDB [neutron]> show tables ;
+-----------------------------------------+
| Tables_in_neutron |
+-----------------------------------------+
| address_scopes |
| agents |
| alembic_version |
| allowedaddresspairs |
| arista_provisioned_nets |
| arista_provisioned_tenants |
| arista_provisioned_vms |
| auto_allocated_topologies |
| bgp_peers |
| bgp_speaker_dragent_bindings |
| bgp_speaker_network_bindings |
| bgp_speaker_peer_bindings |
| bgp_speakers |
| brocadenetworks |
| brocadeports |
| cisco_csr_identifier_map |
| cisco_hosting_devices |
| cisco_ml2_apic_contracts |
| cisco_ml2_apic_host_links |
| cisco_ml2_apic_names |
| cisco_ml2_n1kv_network_bindings |
| cisco_ml2_n1kv_network_profiles |
| cisco_ml2_n1kv_policy_profiles |
| cisco_ml2_n1kv_port_bindings |
| cisco_ml2_n1kv_profile_bindings |
| cisco_ml2_n1kv_vlan_allocations |
| cisco_ml2_n1kv_vxlan_allocations |
| cisco_ml2_nexus_nve |
| cisco_ml2_nexusport_bindings |
| cisco_port_mappings |
| cisco_router_mappings |
| conntrack_helpers |
| consistencyhashes |
| default_security_group |
| dnsnameservers |
| dvr_host_macs |
| externalnetworks |
| extradhcpopts |
| firewall_policies |
| firewall_rules |
| firewalls |
| flavors |
| flavorserviceprofilebindings |
| floatingipdnses |
| floatingips |
| ha_router_agent_port_bindings |
| ha_router_networks |
| ha_router_vrid_allocations |
| healthmonitors |
| ikepolicies |
| ipallocationpools |
| ipallocations |
| ipamallocationpools |
| ipamallocations |
| ipamsubnets |
| ipsec_site_connections |
| ipsecpeercidrs |
| ipsecpolicies |
| logs |
| lsn |
| lsn_port |
| maclearningstates |
| members |
| meteringlabelrules |
| meteringlabels |
| ml2_brocadenetworks |
| ml2_brocadeports |
| ml2_distributed_port_bindings |
| ml2_flat_allocations |
| ml2_geneve_allocations |
| ml2_geneve_endpoints |
| ml2_gre_allocations |
| ml2_gre_endpoints |
| ml2_nexus_vxlan_allocations |
| ml2_nexus_vxlan_mcast_groups |
| ml2_port_binding_levels |
| ml2_port_bindings |
| ml2_ucsm_port_profiles |
| ml2_vlan_allocations |
| ml2_vxlan_allocations |
| ml2_vxlan_endpoints |
| multi_provider_networks |
| network_segment_ranges |
| networkconnections |
| networkdhcpagentbindings |
| networkdnsdomains |
| networkgatewaydevicereferences |
| networkgatewaydevices |
| networkgateways |
| networkqueuemappings |
| networkrbacs |
| networks |
| networksecuritybindings |
| networksegments |
| neutron_nsx_network_mappings |
| neutron_nsx_port_mappings |
| neutron_nsx_router_mappings |
| neutron_nsx_security_group_mappings |
| nexthops |
| nsxv_edge_dhcp_static_bindings |
| nsxv_edge_vnic_bindings |
| nsxv_firewall_rule_bindings |
| nsxv_internal_edges |
| nsxv_internal_networks |
| nsxv_port_index_mappings |
| nsxv_port_vnic_mappings |
| nsxv_router_bindings |
| nsxv_router_ext_attributes |
| nsxv_rule_mappings |
| nsxv_security_group_section_mappings |
| nsxv_spoofguard_policy_network_mappings |
| nsxv_tz_network_bindings |
| nsxv_vdr_dhcp_bindings |
| nuage_net_partition_router_mapping |
| nuage_net_partitions |
| nuage_provider_net_bindings |
| nuage_subnet_l2dom_mapping |
| poolloadbalanceragentbindings |
| poolmonitorassociations |
| pools |
| poolstatisticss |
| portbindingports |
| portdataplanestatuses |
| portdnses |
| portforwardings |
| portqueuemappings |
| ports |
| portsecuritybindings |
| portuplinkstatuspropagation |
| providerresourceassociations |
| provisioningblocks |
| qos_bandwidth_limit_rules |
| qos_dscp_marking_rules |
| qos_fip_policy_bindings |
| qos_minimum_bandwidth_rules |
| qos_network_policy_bindings |
| qos_policies |
| qos_policies_default |
| qos_port_policy_bindings |
| qos_router_gw_policy_bindings |
| qospolicyrbacs |
| qosqueues |
| quotas |
| quotausages |
| reservations |
| resourcedeltas |
| router_extra_attributes |
| routerl3agentbindings |
| routerports |
| routerroutes |
| routerrules |
| routers |
| securitygroupportbindings |
| securitygrouprbacs |
| securitygrouprules |
| securitygroups |
| segmenthostmappings |
| serviceprofiles |
| sessionpersistences |
| standardattributes |
| subnet_service_types |
| subnetpoolprefixes |
| subnetpools |
| subnetroutes |
| subnets |
| subports |
| tags |
| trunks |
| tz_network_bindings |
| vcns_router_bindings |
| vips |
| vpnservices |
+-----------------------------------------+
172 rows in set (0.001 sec)

MariaDB [neutron]>

Neutron 组件初始化

创建neutron 用户并分配角色

加载admin环境变量

1
source admin-login

创建neutron用户

1
openstack user create --domain default --password neutron neutron
1
2
3
4
5
6
7
8
9
10
11
12
[root@controller ~]# openstack user create --domain default --password neutron neutron
+---------------------+----------------------------------+
| Field | Value |
+---------------------+----------------------------------+
| domain_id | default |
| enabled | True |
| id | affd5a3874fb4f15bc7fe974f180a8f2 |
| name | neutron |
| options | {} |
| password_expires_at | None |
+---------------------+----------------------------------+
[root@controller ~]#
  • 这里的用户名密码需要与 neutron.conf 文件中 [keystone_authtoken] 中配置的一致

为neutron用户分配admin角色

1
openstack role add --project project --user neutron admin 

创建neutron服务及服务端点

创建neutron服务

1
openstack service create --name neutron network 
1
2
3
4
5
6
7
8
9
10
[root@controller ~]# openstack service create --name neutron network 
+---------+----------------------------------+
| Field | Value |
+---------+----------------------------------+
| enabled | True |
| id | 4829da377d6b4645a626dcef5fa6fcb3 |
| name | neutron |
| type | network |
+---------+----------------------------------+
[root@controller ~]#

创建服务端点

1
2
3
openstack endpoint create --region RegionOne neutron public http://controller:9696
openstack endpoint create --region RegionOne neutron internal http://controller:9696
openstack endpoint create --region RegionOne neutron admin http://controller:9696
1
2
3
4
5
6
7
8
9
10
11
12
13
14
15
16
17
18
19
20
21
22
23
24
25
26
27
28
29
30
31
32
33
34
35
36
37
38
39
40
41
42
43
[root@controller ~]# openstack endpoint create --region RegionOne neutron public http://controller:9696
+--------------+----------------------------------+
| Field | Value |
+--------------+----------------------------------+
| enabled | True |
| id | 1322d229292842da95468a164b2dcc64 |
| interface | public |
| region | RegionOne |
| region_id | RegionOne |
| service_id | 4829da377d6b4645a626dcef5fa6fcb3 |
| service_name | neutron |
| service_type | network |
| url | http://controller:9696 |
+--------------+----------------------------------+
[root@controller ~]# openstack endpoint create --region RegionOne neutron internal http://controller:9696
+--------------+----------------------------------+
| Field | Value |
+--------------+----------------------------------+
| enabled | True |
| id | 9a528b0305b74356a4591a3797493fc0 |
| interface | internal |
| region | RegionOne |
| region_id | RegionOne |
| service_id | 4829da377d6b4645a626dcef5fa6fcb3 |
| service_name | neutron |
| service_type | network |
| url | http://controller:9696 |
+--------------+----------------------------------+
[root@controller ~]# openstack endpoint create --region RegionOne neutron admin http://controller:9696
+--------------+----------------------------------+
| Field | Value |
+--------------+----------------------------------+
| enabled | True |
| id | 36e3d3582b474798be163097df3bee2d |
| interface | admin |
| region | RegionOne |
| region_id | RegionOne |
| service_id | 4829da377d6b4645a626dcef5fa6fcb3 |
| service_name | neutron |
| service_type | network |
| url | http://controller:9696 |
+--------------+----------------------------------+
[root@controller ~]#

启动控制节点上的neutron服务

由于修改了nova的配置文件因此启用neutron服务钱需要重启nova服务

1
systemctl restart openstack-nova-api

启动neutron

1
2
systemctl enable neutron-server neutron-linuxbridge-agent neutron-dhcp-agent neutron-metadata-agent
systemctl start neutron-server neutron-linuxbridge-agent neutron-dhcp-agent neutron-metadata-agent

检测控制节点上的neutron服务

查看端口占用情况

1
netstat -tnlup|grep 9696 
1
2
3
[root@controller ~]# netstat -tnlup|grep 9696 
tcp 0 0 0.0.0.0:9696 0.0.0.0:* LISTEN 9911/server.log
[root@controller ~]#

查看服务端点

1
curl http://controller:9696
1
2
[root@controller ~]# curl http://controller:9696
{"versions": [{"status": "CURRENT", "id": "v2.0", "links": [{"href": "http://controller:9696/v2.0/", "rel": "self"}]}]}

查看服务运行状态

1
systemctl status neutron-server
1
2
3
4
5
6
7
8
9
10
11
12
13
14
15
16
17
18
[root@controller ~]# systemctl status neutron-server
● neutron-server.service - OpenStack Neutron Server
Loaded: loaded (/usr/lib/systemd/system/neutron-server.service; enabled; vendor preset: disabled)
Active: active (running) since 三 2024-11-20 22:13:02 CST; 2min 35s ago
Main PID: 9911 (/usr/bin/python)
CGroup: /system.slice/neutron-server.service
├─9911 /usr/bin/python2 /usr/bin/neutron-server --config-file /usr/share/neutron/neutron-dist.conf --config-dir /usr/share/neutron/server --config-f...
├─9978 /usr/bin/python2 /usr/bin/neutron-server --config-file /usr/share/neutron/neutron-dist.conf --config-dir /usr/share/neutron/server --config-f...
├─9979 neutron-server: rpc worker (/usr/bin/python2 /usr/bin/neutron-server --config-file /usr/share/neutron/neutron-dist.conf --config-dir /usr/sha...
├─9982 neutron-server: rpc worker (/usr/bin/python2 /usr/bin/neutron-server --config-file /usr/share/neutron/neutron-dist.conf --config-dir /usr/sha...
└─9983 neutron-server: periodic worker (/usr/bin/python2 /usr/bin/neutron-server --config-file /usr/share/neutron/neutron-dist.conf --config-dir /us...

11月 20 22:12:52 controller systemd[1]: Starting OpenStack Neutron Server...
11月 20 22:12:58 controller neutron-server[9911]: /usr/lib/python2.7/site-packages/paste/deploy/loadwsgi.py:22: PkgResourcesDeprecationWarning: Param...parately.
11月 20 22:12:58 controller neutron-server[9911]: return pkg_resources.EntryPoint.parse("x=" + s).load(False)
11月 20 22:13:02 controller systemd[1]: Started OpenStack Neutron Server.
Hint: Some lines were ellipsized, use -l to show in full.
[root@controller ~]#

安装与配置计算节点上的neutron服务

安装neutron软件包

1
yum install -y openstack-neutron-linuxbridge 

修改neutron 配置文件

配置neutron 配置文件

备份
1
cp /etc/neutron/neutron.conf /etc/neutron/neutron.conf_bak
去掉注释与空行
1
grep -Ev '^$|#'  /etc/neutron/neutron.conf_bak > /etc/neutron/neutron.conf
编进配置文件 /etc/neutron/neutron.conf
1
2
3
4
5
6
7
8
9
10
11
12
13
14
15
16
[DEFAULT]
transport_url=rabbit://guest:guest@controller:5672
auth_strategy=keystone

[keystone_authtoken]
auth_url=http://controller:5000
memcached_servers=controller:11211
auth_type=password
project_domain_name=default
user_domain_name=default
project_name=project
username=neutron
password=neutron

[oslo_concurrency]
lock_path=/var/lib/neutron/tmp

修改网桥代理(linuxbridge_agent)配置文件

备份
1
cp /etc/neutron/plugins/ml2/linuxbridge_agent.ini /etc/neutron/plugins/ml2/linuxbridge_agent.ini_bak
去掉注释与空行
1
grep -Ev '^$|#'  /etc/neutron/plugins/ml2/linuxbridge_agent.ini_bak > /etc/neutron/plugins/ml2/linuxbridge_agent.ini
编辑配置文件
1
2
3
4
5
6
7
8
9
10
[linux_bridge]
physical_interface_mappings=provider:ens34

[vxlan]
enable_vxlan=false

[securitygroup]
enable_security_group=true
firewall_driver=neutron.agent.linux.iptables_firewall.IptablesFirewallDriver

修改Nova配置文件

打开配置文件
1
vi /etc/nova/nova.conf 
在[DEFAULT] 中增加
1
2
3
[DEFAULT]
vif_plugging_is_fatal=false
vif_plugging_timeout=0
在[neutron] 部分增加
1
2
3
4
5
6
7
8
9
10
[neutron]
auth_url=http://controller:5000
auth_type=password
project_domain_name=default
user_domain_name=default
region_name=RegionOne
project_name=project
username=neutron
password=neutron

启动计算节点的neutron服务

重启nova服务

1
systemctl restart openstack-nova-compute

启动计算节点的Neutron网桥代理服务

1
2
systemctl enable neutron-linuxbridge-agent
systemctl start neutron-linuxbridge-agent

检测neutron服务

在控制节点执行

加载admin环境变量

1
source admin-login

查看网络代理服务列表

1
openstack network agent list 
1
2
3
4
5
6
7
8
9
10
[root@controller ~]# openstack network agent list 
+--------------------------------------+--------------------+------------+-------------------+-------+-------+---------------------------+
| ID | Agent Type | Host | Availability Zone | Alive | State | Binary |
+--------------------------------------+--------------------+------------+-------------------+-------+-------+---------------------------+
| 71c7da45-5718-4b57-ab91-14908bddc9df | Linux bridge agent | controller | None | :-) | UP | neutron-linuxbridge-agent |
| 86549b40-f8f3-45a0-b7fd-187390de912c | Linux bridge agent | computer | None | :-) | UP | neutron-linuxbridge-agent |
| 8ae36703-9520-4629-a7a2-10dce6180d68 | Metadata agent | controller | None | :-) | UP | neutron-metadata-agent |
| 8c1d336e-9a5f-4b85-aefb-347b1887f404 | DHCP agent | controller | nova | :-) | UP | neutron-dhcp-agent |
+--------------------------------------+--------------------+------------+-------------------+-------+-------+---------------------------+
[root@controller ~]#

用neutron状态检测工具检测

1
neutron-status upgrade check
1
2
3
4
5
6
7
8
9
10
11
12
13
14
15
16
17
18
19
20
21
[root@controller ~]# neutron-status upgrade check
+---------------------------------------------------------------------+
| Upgrade Check Results |
+---------------------------------------------------------------------+
| Check: Gateway external network |
| Result: Success |
| Details: L3 agents can use multiple networks as external gateways. |
+---------------------------------------------------------------------+
| Check: External network bridge |
| Result: Success |
| Details: L3 agents are using integration bridge to connect external |
| gateways |
+---------------------------------------------------------------------+
| Check: Worker counts configured |
| Result: Warning |
| Details: The default number of workers has changed. Please see |
| release notes for the new values, but it is strongly |
| encouraged for deployers to manually set the values for |
| api_workers and rpc_workers. |
+---------------------------------------------------------------------+
[root@controller ~]#
  • 如果前面两栏均为Success 说明Neutron运行正常

仪表盘服务 Dashboard

该组件将安装在计算节点.为了避免操作不当造成需要重装系统的情况出现, 在操作开始之前记得对计算节点拍摄快照

安装与配置DASHBOARD服务

安装 dashboardrd软件包

1
yum -y install openstack-dashboard

配置dashboard服务

打开配置文件

1
vi  /etc/openstack-dashboard/local_settings

配置web服务其的基本信息

1
2
3
4
5
ALLOWED_HOSTS=['*']

OPENSTACK_HOST="controller"

TIME_ZONE="Asia/Shanghai"

配置缓存服务

1
2
3
4
5
6
7
8
SESSION_ENGINE = 'django.contrib.sessions.backends.cache'

CACHES = {
'default': {
'BACKEND': 'django.core.cache.backends.memcached.MemcachedCache',
'LOCATION': 'controller:11211',
},
}

启动对多域的支持

增加一行

1
2
OPENSTACK_KEYSTONE_MULTIDOMAIN_SUPPORT = True

指定OPENSTACK组件的版本

增加如下信息

1
2
3
4
5
OPENSTACK_API_VERSIONS = {
"identity":3,
"image":2,
"volume":3,
}

通过dashboard 创建的用户所属的默认域

1
OPENSTACK_KEYSTONE_DEFAULT_DOMAIN = "Default"

设置通过Dashboard 创建的用户默认角色为 user

1
OPENSTACK_KEYSTONE_DEFAULT_ROLE = "user"

设置如何使用neutron网络

1
2
3
4
5
6
7
8
9
10
11
12
13
14
15
16
17
OPENSTACK_NEUTRON_NETWORK = {
'enable_auto_allocated_network':False ,
'enable_distributed_router':False ,
'enable_fip_topology_check':False ,
'enable_ha_router':False,
'enable_ipv6':False,
'enable_quotas':False,
'enable_rbac_policy':False ,
'enable_router':False ,

'default_dns_nameservers':[],
'supported_provider_types':['*'],
'segmentation_id_range':{},
'extra_provider_types':{},
'supported_vnc_types':['*'],
'physical_networks':[],
}

发布Dashboard服务

创建Dashboard的web应用配置文件

进入DFashboard网站目录

1
cd /usr/share/openstack-dashboard

编译生成Dashboard的web服务配置文件

1
python manage.py make_web_conf --apache > /etc/httpd/openstack-dashboard.conf

生成配置文件

1
2
3
4
5
6
7
8
9
10
11
12
13
14
15
16
17
18
19
20
21
22
23
24
25
26
27
28
29
30
31
32
33
[root@computer openstack-dashboard]# python manage.py make_web_conf --apache > /etc/httpd/conf.d/openstack-dashboard.conf
[root@computer openstack-dashboard]# cat /etc/httpd/conf.d/openstack-dashboard.conf

<VirtualHost *:80>

ServerAdmin webmaster@openstack.org
ServerName openstack_dashboard

DocumentRoot /usr/share/openstack-dashboard/

LogLevel warn
ErrorLog /var/log/httpd/openstack_dashboard-error.log
CustomLog /var/log/httpd/openstack_dashboard-access.log combined

WSGIScriptReloading On
WSGIDaemonProcess openstack_dashboard_website processes=5
WSGIProcessGroup openstack_dashboard_website
WSGIApplicationGroup %{GLOBAL}
WSGIPassAuthorization On

WSGIScriptAlias / /usr/share/openstack-dashboard/openstack_dashboard/wsgi.py

<Location "/">
Require all granted
</Location>

Alias /static /usr/share/openstack-dashboard/static
<Location "/static">
SetHandler None
</Location>
</Virtualhost>
[root@computer openstack-dashboard]#

建立策略文件的软连接

1
ln -s  /etc/openstack-dashboard /usr/share/openstack-dashboard/openstack_dashboard/conf
1
2
3
4
5
6
[root@computer openstack-dashboard]# ln -s  /etc/openstack-dashboard /usr/share/openstack-dashboard/openstack_dashboard/conf
[root@computer openstack-dashboard]#
[root@computer openstack-dashboard]# ll /usr/share/openstack-dashboard/openstack_dashboard
总用量 240
drwxr-xr-x 3 root root 4096 11月 20 22:49 api

启动apache 使配置生效

1
2
systemctl enable httpd
systemctl start httpd

检测dashboard服务

登录系统

浏览器访问 http://192.168.10.20/

default
用户名 admin
密码 admin

查看镜像

块存储服务Cinder安装

安装与配置控制节点上的Cinder服务

安装cinder软件包

1
yum install -y openstack-cinder

创建Cinder数据库并授权

1
2
3
CREATE DATABASE cinder ;
grant all privileges on cinder.* to`cinder`@`localhost` identified by 'cinder' ;
grant all privileges on cinder.* to`cinder`@`%` identified by 'cinder' ;

修改Cinder配置文件

备份

1
cp /etc/cinder/cinder.conf /etc/cinder/cinder.conf_bak
去掉注释与空行
1
grep -Ev '^$|#'  /etc/cinder/cinder.conf_bak  > /etc/cinder/cinder.conf

编辑配置文件 /etc/cinder/cinder.conf

修改[database]部分
1
connection=mysql+pymysql://cinder:cinder@controller/cinder
修改[DEFAULT] 和 [keystone_authtoken]部分
1
2
3
4
5
6
7
8
9
10
11
12
[DEFAULT]
auth_strategy=keystone

[keystone_authtoken]
auth_url=http://controller:5000
memcached_servers=controller:11211
auth_type=password
project_domain_name=default
user_domain_name=default
project_name=project
username=cinder
password=cinder
修改[oslo_concurrency]部分
1
2
[oslo_concurrency]
lock_path=/var/lib/cinder/tmp
修改[DEFAULT] 部分
1
2
[DEFAULT]
transport_url=rabbit://guest:guest@controller:5672

修改 nova 配置文件

vi /etc/nova/nova.conf

1
2
[cinder]
os_region_name=RegionOne

初始化数据库

1
su cinder -s /bin/sh -c "cinder-manage db sync"
1
2
3
4
5
6
7
8
9
10
11
12
13
14
15
16
17
18
19
20
21
22
23
24
25
26
27
28
29
30
31
32
33
34
35
36
37
38
39
40
41
42
43
44
45
46
47
48
49
50
51
52
53
54
55
56
57
58
59
60
[root@controller ~]# su cinder -s /bin/sh -c "cinder-manage db sync"
Deprecated: Option "logdir" from group "DEFAULT" is deprecated. Use option "log-dir" from group "DEFAULT".
[root@controller ~]#
[root@controller ~]# mysql -uroot -p111111
Welcome to the MariaDB monitor. Commands end with ; or \g.
Your MariaDB connection id is 60
Server version: 10.3.20-MariaDB MariaDB Server

Copyright (c) 2000, 2018, Oracle, MariaDB Corporation Ab and others.

Type 'help;' or '\h' for help. Type '\c' to clear the current input statement.

MariaDB [(none)]> use cinder ;
Reading table information for completion of table and column names
You can turn off this feature to get a quicker startup with -A

Database changed
MariaDB [cinder]> show tables ;
+----------------------------+
| Tables_in_cinder |
+----------------------------+
| attachment_specs |
| backup_metadata |
| backups |
| cgsnapshots |
| clusters |
| consistencygroups |
| driver_initiator_data |
| encryption |
| group_snapshots |
| group_type_projects |
| group_type_specs |
| group_types |
| group_volume_type_mapping |
| groups |
| image_volume_cache_entries |
| messages |
| migrate_version |
| quality_of_service_specs |
| quota_classes |
| quota_usages |
| quotas |
| reservations |
| services |
| snapshot_metadata |
| snapshots |
| transfers |
| volume_admin_metadata |
| volume_attachment |
| volume_glance_metadata |
| volume_metadata |
| volume_type_extra_specs |
| volume_type_projects |
| volume_types |
| volumes |
| workers |
+----------------------------+
35 rows in set (0.000 sec)

MariaDB [cinder]>

Cinder组件初始化

创建cinder用户并分配角色

加载admin环境变量

1
source admin-login

创建用户

1
openstack user create --domain default --password cinder cinder 
1
2
3
4
5
6
7
8
9
10
11
12
[root@controller ~]# openstack user create --domain default --password cinder cinder 
+---------------------+----------------------------------+
| Field | Value |
+---------------------+----------------------------------+
| domain_id | default |
| enabled | True |
| id | bb54413c21ad4f9b84b5f1cafb0f1aac |
| name | cinder |
| options | {} |
| password_expires_at | None |
+---------------------+----------------------------------+
[root@controller ~]#

分配admin角色

1
openstack role add --project project --user cinder admin 

创建Cinder服务及服务端点

创建服务

Train版本的Cinder支持的卷是第三个版本,所以使用以下语句创建了一个名为cinderv3 类型是volumeV3 的凡夫无

1
openstack service create --name cinderv3  volumev3
1
2
3
4
5
6
7
8
9
10
11
[root@controller ~]# openstack service create --name cinderv3  volumev3
+---------+----------------------------------+
| Field | Value |
+---------+----------------------------------+
| enabled | True |
| id | 51b8030266b246b1ba0de9027f0b709f |
| name | cinderv3 |
| type | volumev3 |
+---------+----------------------------------+
[root@controller ~]#

创建服务端点

1
2
3
openstack endpoint create --region RegionOne volumev3 public http://controller:8776/v3/%\(project_id\)s
openstack endpoint create --region RegionOne volumev3 internal http://controller:8776/v3/%\(project_id\)s
openstack endpoint create --region RegionOne volumev3 admin http://controller:8776/v3/%\(project_id\)s
1
2
3
4
5
6
7
8
9
10
11
12
13
14
15
16
17
18
19
20
21
22
23
24
25
26
27
28
29
30
31
32
33
34
35
36
37
38
39
40
41
42
43
44
[root@controller ~]# openstack endpoint create --region RegionOne volumev3 public http://controller:8776/v3/%\(project_id\)s
olumev3 admin http://controller:8776/v3/%\(project_id\)s
+--------------+------------------------------------------+
| Field | Value |
+--------------+------------------------------------------+
| enabled | True |
| id | a90539d5c48f4f9a907fe28fae4ee5fb |
| interface | public |
| region | RegionOne |
| region_id | RegionOne |
| service_id | 51b8030266b246b1ba0de9027f0b709f |
| service_name | cinderv3 |
| service_type | volumev3 |
| url | http://controller:8776/v3/%(project_id)s |
+--------------+------------------------------------------+
[root@controller ~]# openstack endpoint create --region RegionOne volumev3 internal http://controller:8776/v3/%\(project_id\)s
+--------------+------------------------------------------+
| Field | Value |
+--------------+------------------------------------------+
| enabled | True |
| id | a512d12df0e64711888fc19a1c418e66 |
| interface | internal |
| region | RegionOne |
| region_id | RegionOne |
| service_id | 51b8030266b246b1ba0de9027f0b709f |
| service_name | cinderv3 |
| service_type | volumev3 |
| url | http://controller:8776/v3/%(project_id)s |
+--------------+------------------------------------------+
[root@controller ~]# openstack endpoint create --region RegionOne volumev3 admin http://controller:8776/v3/%\(project_id\)s
+--------------+------------------------------------------+
| Field | Value |
+--------------+------------------------------------------+
| enabled | True |
| id | d94f2bf446ef4fa580bdd0abe588c986 |
| interface | admin |
| region | RegionOne |
| region_id | RegionOne |
| service_id | 51b8030266b246b1ba0de9027f0b709f |
| service_name | cinderv3 |
| service_type | volumev3 |
| url | http://controller:8776/v3/%(project_id)s |
+--------------+------------------------------------------+
[root@controller ~]#

启动控制节点的Cinder服务

重启nova服务

1
systemctl restart openstack-nova-api

设置cinder开机启动并启动

1
2
systemctl enable openstack-cinder-api  openstack-cinder-scheduler
systemctl start openstack-cinder-api openstack-cinder-scheduler

检测控制节点上的Cinder服务

查看端口占用情况

1
netstat -nutpl | grep 8776
1
2
3
[root@controller ~]# netstat -nutpl | grep 8776
tcp 0 0 0.0.0.0:8776 0.0.0.0:* LISTEN 6461/python2
[root@controller ~]#

查看存储服务列表

1
openstack  volume service list 
1
2
3
4
5
6
7
[root@controller ~]# openstack  volume service list 
+------------------+------------+------+---------+-------+----------------------------+
| Binary | Host | Zone | Status | State | Updated At |
+------------------+------------+------+---------+-------+----------------------------+
| cinder-scheduler | controller | nova | enabled | down | 2024-11-21T12:04:34.000000 |
+------------------+------------+------+---------+-------+----------------------------+
[root@controller ~]#

搭建存储节点

openstack 本应该搭建独立的存储节点,目前实验环境是双节点,所以我们在计算节点搭建存储节点
操作之前最好对计算节点做好快照

为计算节点增加硬盘

操作vm虚拟机对计算节点额外增加一块硬盘. 容量选择50GB .(注意不要选择立即分配所有磁盘空间)

创建完成之后开机继续下面的操作

创建卷组

查看系统硬盘挂载情况

1
2
3
4
5
6
7
8
9
10
11
[root@computer ~]# lsblk
NAME MAJ:MIN RM SIZE RO TYPE MOUNTPOINT
sda 8:0 0 100G 0 disk
├─sda1 8:1 0 1G 0 part /boot
└─sda2 8:2 0 99G 0 part
├─centos-root 253:0 0 50G 0 lvm /
├─centos-swap 253:1 0 3.9G 0 lvm [SWAP]
└─centos-home 253:2 0 45.1G 0 lvm /home
sdb 8:16 0 50G 0 disk
sr0 11:0 1 9.5G 0 rom
[root@computer ~]#

创建lvm物理卷组

将磁盘初始化为物理卷
1
pvcreate /dev/sdb
1
2
3
[root@computer ~]# pvcreate /dev/sdb
Physical volume "/dev/sdb" successfully created.
[root@computer ~]#
将物理卷归为卷组
1
vgcreate cinder-volumes /dev/sdb
1
2
3
[root@computer ~]# vgcreate cinder-volumes /dev/sdb
Volume group "cinder-volumes" successfully created
[root@computer ~]#
配置LVM卷组扫描的设备

由于系统中的卷组可能有很多,相应的卷会很多, LVM需要扫描全部磁盘系统寻找所有的是卷组,比较花费时间.
直接指定仅对哪些裁判进行扫描是一种高效率的方式

打开配置文件

1
vi /etc/lvm/lvm.conf

配置过滤器

1
2
3
4
devices {
filter = ["a/sdb/","r/.*/"]
....
}

其中a代表接受,r代表拒绝

启用lvm元数据服务

LVM在做磁盘扫描时将查找所有相关物理卷, 并读取卷组元数据, 这个过程非常耗时,如果将卷组元数据一次性读入缓存,则不用每次都做这个耗时的扫描,
lvmetad就是LVM中用于处理元数据缓存的服务
通过以下方式启动

1
2
3
systemctl enable  lvm2-lvmetad
systemctl start lvm2-lvmetad

安装和配置存储节点

安装cinder相关软件包

1
yum install -y openstack-cinder targetcli python-keystone

修改cinder相关配置

备份
1
cp /etc/cinder/cinder.conf /etc/cinder/cinder.conf_bak
去掉注释与空行
1
grep -Ev '^$|#'  /etc/cinder/cinder.conf_bak  > /etc/cinder/cinder.conf
修改文件[database] 部分,连接数据库
1
connection=mysql+pymysql://cinder:cinder@controller/cinder
修改文件[DEFAULT] 与 [keystone_authtoken] 部分 ,实现与keystone交互
1
2
3
4
5
6
7
8
9
10
11
12
[DEFAULT]
auth_strategy=keystone

[keystone_authtoken]
auth_url=http://controller:5000
memcached_servers=controller:11211
auth_type=password
project_domain_name=Default
user_domain_name=Default
project_name=project
username=cinder
password=cinder
修改[oslo_concurrency] 部分 ,配置锁路径
1
2
[oslo_concurrency]
lock_path=/var/lib/cinder/tmp
修改[DEFAULT] 部分 ,实现与消息队列和GLANCE的连接
1
2
3
[DEFAULT]
transport_url=rabbit://guest:guest@controller:5672
glance_api_servers=http://controller:9292
修改 [DEFAULT] 部分, 并增加[lvm] 部分以设置LVM
1
2
3
4
5
6
7
8
[DEFAULT]
enabled_backends=lvm

[lvm]
volume_driver=cinder.volume.drivers.lvm.LVMVolumeDriver
volume_group=cinder-volumes
iscsi_protocol=iscsi
iscsi_helper=lioadm
  • 配置中的 volume_group 的值应和 创建LVM物理卷组 部分创建的卷组名一致

启动计算节点上的Cinder服务

1
2
systemctl enable openstack-cinder-volume target
systemctl start openstack-cinder-volume target

检验Cinder服务

查看存储服务列表

在控制节点上查看

1
openstack volume service list 
1
2
3
4
5
6
7
[root@controller ~]# openstack volume service list 
+------------------+--------------+------+---------+-------+----------------------------+
| Binary | Host | Zone | Status | State | Updated At |
+------------------+--------------+------+---------+-------+----------------------------+
| cinder-scheduler | controller | nova | enabled | up | 2024-11-21T13:19:43.000000 |
| cinder-volume | computer@lvm | nova | enabled | up | 2024-11-21T13:19:45.000000 |
+------------------+--------------+------+---------+-------+----------------------------+

通过dashboard查看卷概况

用Cinder创建卷

使用命令模式创建卷

创建一个8GB的卷

1
openstack volume create --size 8 volume1
1
2
3
4
5
6
7
8
9
10
11
12
13
14
15
16
17
18
19
20
21
22
23
24
25
26
[root@controller ~]# openstack volume create --size 8 volume1
+---------------------+--------------------------------------+
| Field | Value |
+---------------------+--------------------------------------+
| attachments | [] |
| availability_zone | nova |
| bootable | false |
| consistencygroup_id | None |
| created_at | 2024-11-21T13:23:25.000000 |
| description | None |
| encrypted | False |
| id | 202246a6-e35b-428c-8031-7fc3465784bf |
| migration_status | None |
| multiattach | False |
| name | volume1 |
| properties | |
| replication_status | None |
| size | 8 |
| snapshot_id | None |
| source_volid | None |
| status | creating |
| type | __DEFAULT__ |
| updated_at | None |
| user_id | 6980aba2962c40529e666791f406b6a5 |
+---------------------+--------------------------------------+
[root@controller ~]#

查看

1
openstack volume list 
1
2
3
4
5
6
7
[root@controller ~]# openstack volume list 
+--------------------------------------+---------+-----------+------+-------------+
| ID | Name | Status | Size | Attached to |
+--------------------------------------+---------+-----------+------+-------------+
| 202246a6-e35b-428c-8031-7fc3465784bf | volume1 | available | 8 | |
+--------------------------------------+---------+-----------+------+-------------+
[root@controller ~]#

使用dashboard创建卷

虚拟网络管理

操作虚拟机器做好快照

实施适配

卸载系统网络管理软件包

Centos自带的NetworkManager 网络管理软件包和Openstack用到的虚拟网关服务有冲突,因此在操作网络之前需要先将它从所有节点上卸载

在控制节点与计算节点运行以下代码

1
yum -y remove NetworkManager

关闭VMware虚拟网络的DHCP服务

Neutron提供了DHCP服务,且与VMware提供DHCP处于同义网段.需要关闭VMware的DHCP服务,避免冲突.
在VMware的[虚拟网络编辑器]选择 VMnet8选项,取消[使用本地DHCP服务将IP地址分配给虚拟机]复选框

安装网桥管理工具包

在控制节点上使用以下命令,安装linux网桥管理工具包

1
yum install -y bridge-utils

使用Dashboard创建与管理虚拟网络与子网

登录dashboard

登录地址http://192.168.10.20/

创建网络

[概况]–> [管理员] –> [网络] 选项

点击[下一步]

创建子网

输入
[子网名称] – subnet

[网络地址] – 为外网物理段网段”192.168.16.0/24”

[网关ip] –192.168.16.2 在VMware中设置的NAT的网关

点击下一步

[子网详情]中选中[激活DHCP]复选框

在[分配地址池] 输入可以用IP地址的开始与结束地址,二者以逗号分隔

[DNS服务器] 输入中国电信的国内DNS服务器IP 114.114.114.114
点击[创建]

查看虚拟网列表,显示已经创建的网络

用命令模式创建与管理虚拟网络与子网

加载admin 环境变量

查看虚拟网络与子网

查看虚拟网络

1
openstack network list 
1
2
3
4
5
6
7
8
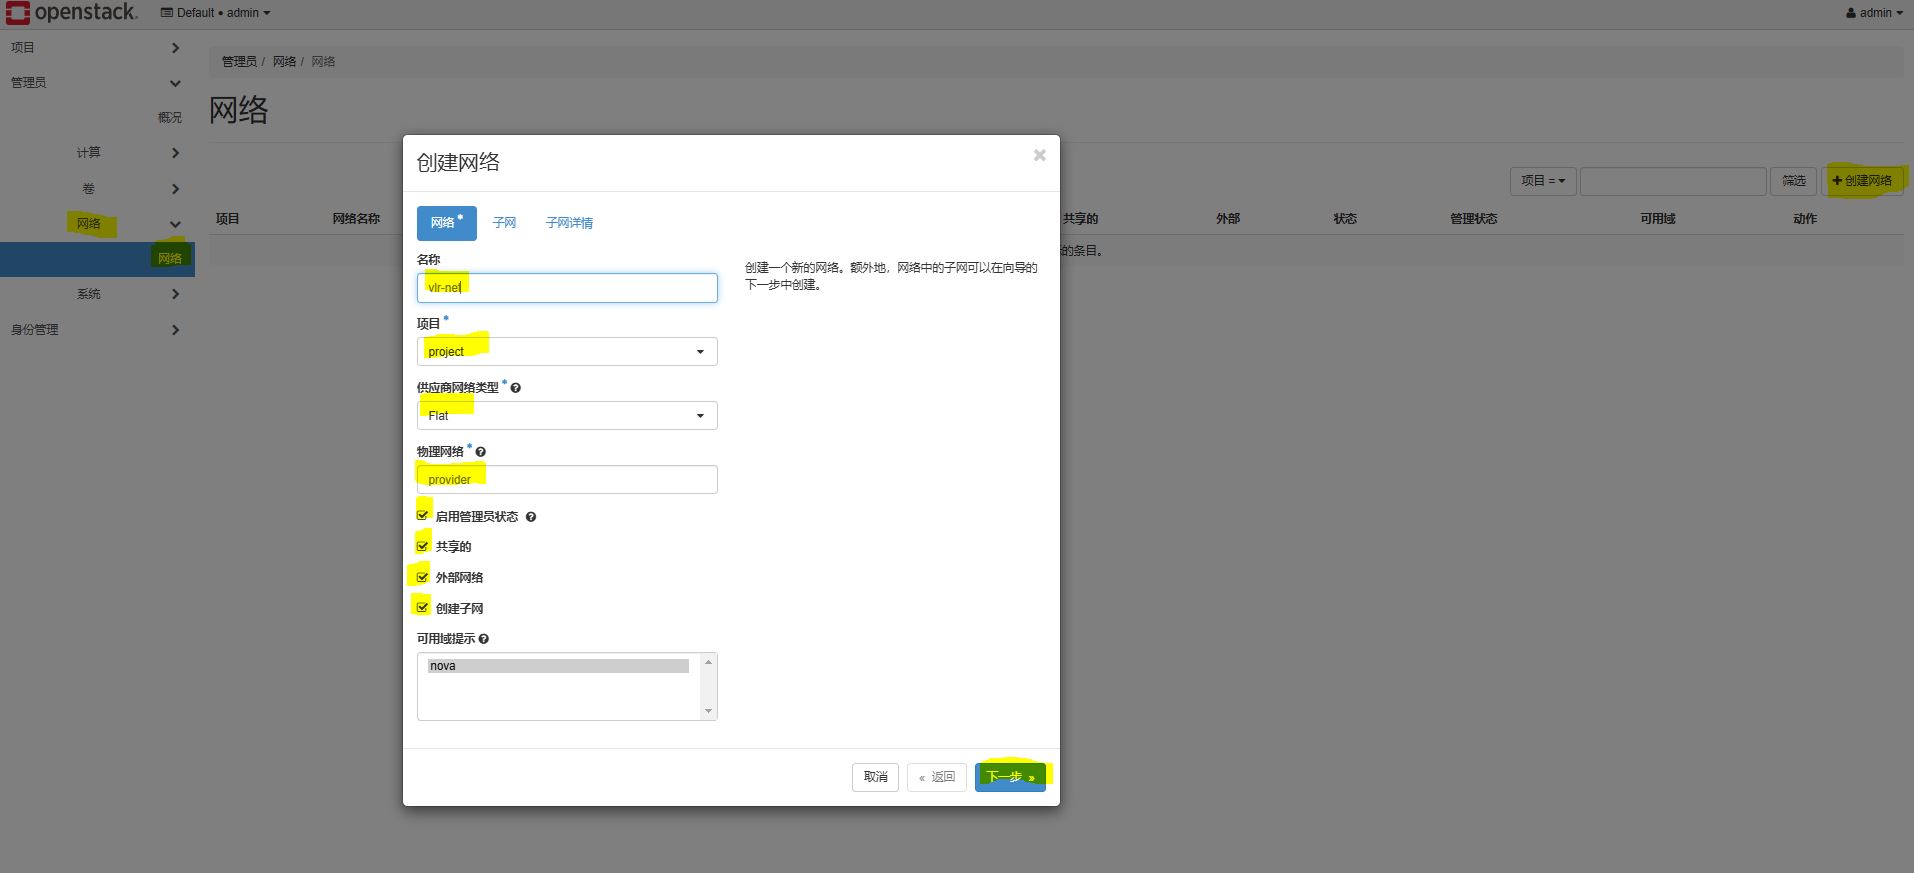
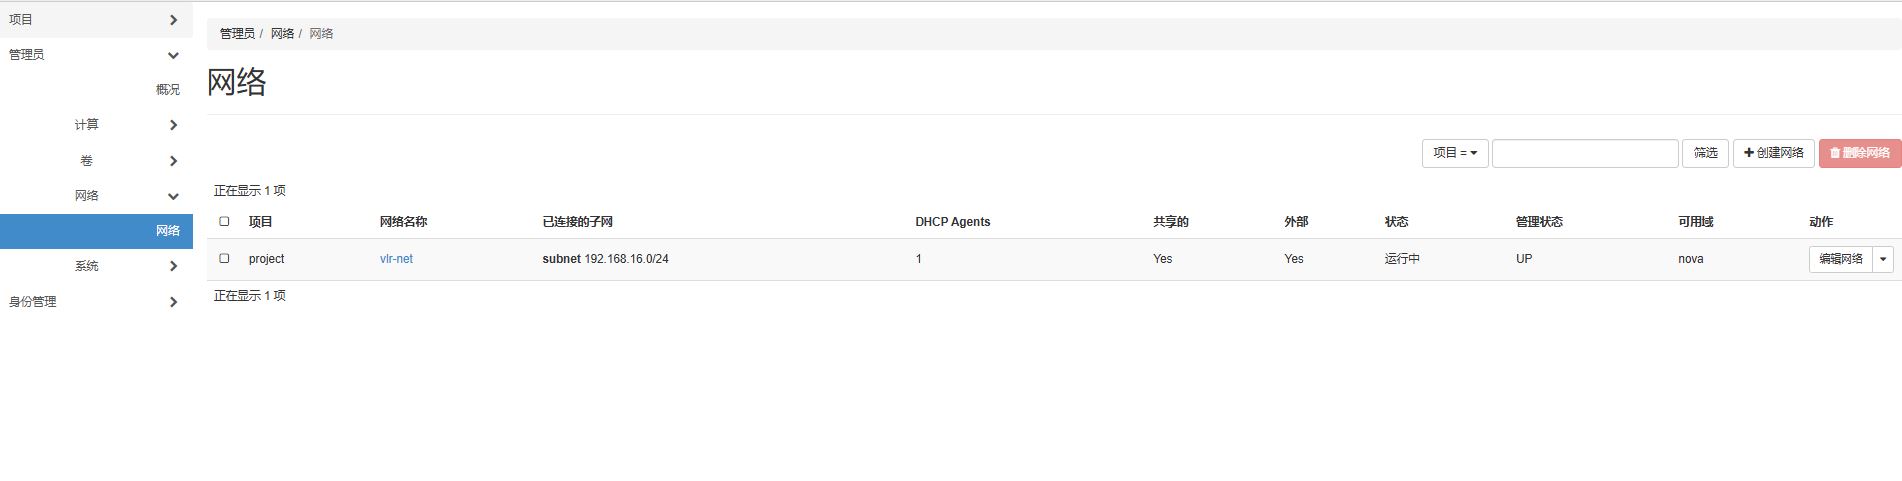
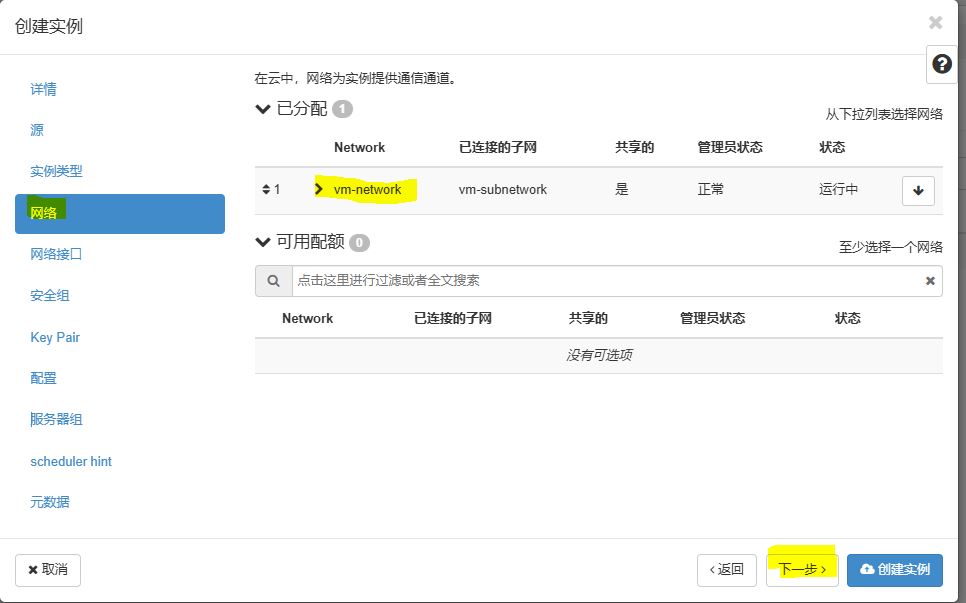
[root@controller ~]# source admin-login 
[root@controller ~]# openstack network list
+--------------------------------------+---------+--------------------------------------+
| ID | Name | Subnets |
+--------------------------------------+---------+--------------------------------------+
| 6da5eae9-60cb-408f-a2f4-788d0720cc1d | vlr-net | 10e7be73-bf6d-487a-b82d-7057d946d119 |
+--------------------------------------+---------+--------------------------------------+
[root@controller ~]#

查看现有子网列表

1
openstack subnet list 
1
2
3
4
5
6
7
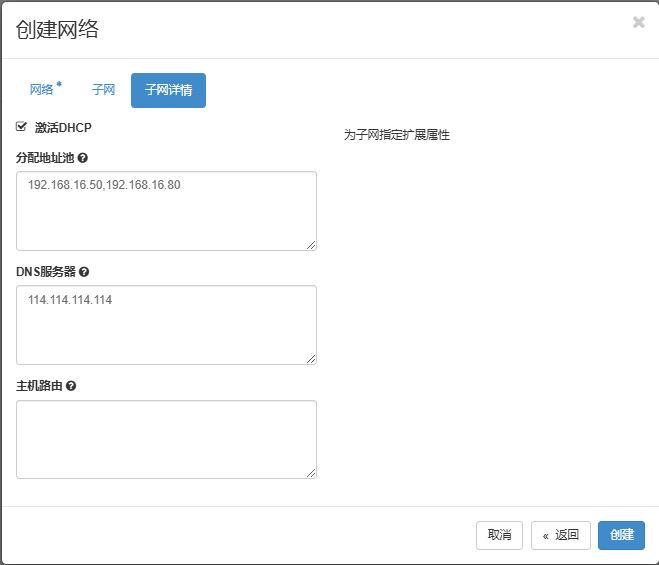
[root@controller ~]# openstack subnet list 
+--------------------------------------+--------+--------------------------------------+-----------------+
| ID | Name | Network | Subnet |
+--------------------------------------+--------+--------------------------------------+-----------------+
| 10e7be73-bf6d-487a-b82d-7057d946d119 | subnet | 6da5eae9-60cb-408f-a2f4-788d0720cc1d | 192.168.16.0/24 |
+--------------------------------------+--------+--------------------------------------+-----------------+
[root@controller ~]

查看现有网络接口列表

1
openstack port list 
1
2
3
4
5
6
7
[root@controller ~]# openstack port list 
+--------------------------------------+------+-------------------+------------------------------------------------------------------------------+--------+
| ID | Name | MAC Address | Fixed IP Addresses | Status |
+--------------------------------------+------+-------------------+------------------------------------------------------------------------------+--------+
| c8ad710f-8b76-4e25-829b-4b7eb7016ae2 | | fa:16:3e:fa:e9:45 | ip_address='192.168.16.50', subnet_id='10e7be73-bf6d-487a-b82d-7057d946d119' | ACTIVE |
+--------------------------------------+------+-------------------+------------------------------------------------------------------------------+--------+
[root@controller ~]#

删除虚拟网

由于已经用dashboard创建了虚拟网,Flatl类型的网络需要独占一块物理网卡,不能直接创建第二个Flat虚拟网络,而应该先删除已经存在flat虚拟网络

删除网络端口

通过前面的查看 已知端口的ID是c8ad710f-8b76-4e25-829b-4b7eb7016ae2

1
openstack port delete c8ad710f-8b76-4e25-829b-4b7eb7016ae2

删除虚拟子网

同样使用刚才查到的子网的id 10e7be73-bf6d-487a-b82d-7057d946d119

1
openstack subnet delete 10e7be73-bf6d-487a-b82d-7057d946d119

删除虚拟网络

网络ID 6da5eae9-60cb-408f-a2f4-788d0720cc1d

1
openstack network delete 6da5eae9-60cb-408f-a2f4-788d0720cc1d 

创建虚拟网络及子网

创建网络

1
openstack network create --share --external  --provider-physical-network provider --provider-network-type flat vm-network
1
2
3
4
5
6
7
8
9
10
11
12
13
14
15
16
17
18
19
20
21
22
23
24
25
26
27
28
29
30
31
32
33
34
[root@controller ~]# openstack network create --share --external  --provider-physical-network provider --provider-network-type flat vm-network
+---------------------------+---------------------------------------------------------------------------------------------------------------------------------------------------------+
| Field | Value |
+---------------------------+---------------------------------------------------------------------------------------------------------------------------------------------------------+
| admin_state_up | UP |
| availability_zone_hints | |
| availability_zones | |
| created_at | 2024-11-21T14:27:39Z |
| description | |
| dns_domain | None |
| id | c80a0e28-daa4-4f65-b470-8fe5162e8c2d |
| ipv4_address_scope | None |
| ipv6_address_scope | None |
| is_default | None |
| is_vlan_transparent | None |
| location | cloud='', project.domain_id=, project.domain_name='Default', project.id='bf3b21acb3c84e0eb98bcc48482fa97b', project.name='admin', region_name='', zone= |
| mtu | 1500 |
| name | vm-network |
| port_security_enabled | True |
| project_id | bf3b21acb3c84e0eb98bcc48482fa97b |
| provider:network_type | flat |
| provider:physical_network | provider |
| provider:segmentation_id | None |
| qos_policy_id | None |
| revision_number | 1 |
| router:external | External |
| segments | None |
| shared | True |
| status | ACTIVE |
| subnets | |
| tags | |
| updated_at | 2024-11-21T14:27:39Z |
+---------------------------+---------------------------------------------------------------------------------------------------------------------------------------------------------+
[root@controller ~]#

查询网络的ID

1
openstack network list
1
2
3
4
5
6
7
[root@controller ~]# openstack network list
+--------------------------------------+------------+---------+
| ID | Name | Subnets |
+--------------------------------------+------------+---------+
| c80a0e28-daa4-4f65-b470-8fe5162e8c2d | vm-network | |
+--------------------------------------+------------+---------+
[root@controller ~]#

创建虚拟子网

1
openstack subnet create --network vm-network --allocation-pool start=192.168.16.60,end=192.168.16.70 --dns-nameserver 114.114.114.114 --gateway 192.168.16.2 --subnet-range 192.168.16.0/24 vm-subnetwork
1
2
3
4
5
6
7
8
9
10
11
12
13
14
15
16
17
18
19
20
21
22
23
24
25
26
27
28
29
[root@controller ~]# openstack subnet create --network vm-network --allocation-pool start=192.168.16.60,end=192.168.16.70 --dns-nameserver 114.114.114.114 --gateway 192.168.16.2 --subnet-range 192.168.16.0/24 vm-subnetwork
+-------------------+---------------------------------------------------------------------------------------------------------------------------------------------------------+
| Field | Value |
+-------------------+---------------------------------------------------------------------------------------------------------------------------------------------------------+
| allocation_pools | 192.168.16.60-192.168.16.70 |
| cidr | 192.168.16.0/24 |
| created_at | 2024-11-21T14:31:41Z |
| description | |
| dns_nameservers | 114.114.114.114 |
| enable_dhcp | True |
| gateway_ip | 192.168.16.2 |
| host_routes | |
| id | cb8129c2-4b99-4ffb-b5bd-e2bbe5a71265 |
| ip_version | 4 |
| ipv6_address_mode | None |
| ipv6_ra_mode | None |
| location | cloud='', project.domain_id=, project.domain_name='Default', project.id='bf3b21acb3c84e0eb98bcc48482fa97b', project.name='admin', region_name='', zone= |
| name | vm-subnetwork |
| network_id | c80a0e28-daa4-4f65-b470-8fe5162e8c2d |
| prefix_length | None |
| project_id | bf3b21acb3c84e0eb98bcc48482fa97b |
| revision_number | 0 |
| segment_id | None |
| service_types | |
| subnetpool_id | None |
| tags | |
| updated_at | 2024-11-21T14:31:41Z |
+-------------------+---------------------------------------------------------------------------------------------------------------------------------------------------------+
[root@controller ~]#

查看虚拟子网

1
openstack subnet list 
1
2
3
4
5
6
7
[root@controller ~]# openstack subnet list 
+--------------------------------------+---------------+--------------------------------------+-----------------+
| ID | Name | Network | Subnet |
+--------------------------------------+---------------+--------------------------------------+-----------------+
| cb8129c2-4b99-4ffb-b5bd-e2bbe5a71265 | vm-subnetwork | c80a0e28-daa4-4f65-b470-8fe5162e8c2d | 192.168.16.0/24 |
+--------------------------------------+---------------+--------------------------------------+-----------------+
[root@controller ~]#

重启网络

1
systemctl restart network 

网桥管理

查看网络情况

1
2
3
4
5
6
7
8
9
10
11
12
13
14
15
16
17
18
19
20
21
22
23
24
25
26
27
28
[root@controller ~]# ip a
1: lo: <LOOPBACK,UP,LOWER_UP> mtu 65536 qdisc noqueue state UNKNOWN group default qlen 1000
link/loopback 00:00:00:00:00:00 brd 00:00:00:00:00:00
inet 127.0.0.1/8 scope host lo
valid_lft forever preferred_lft forever
inet6 ::1/128 scope host
valid_lft forever preferred_lft forever
2: ens33: <BROADCAST,MULTICAST,UP,LOWER_UP> mtu 1500 qdisc pfifo_fast state UP group default qlen 1000
link/ether 00:0c:29:a5:01:47 brd ff:ff:ff:ff:ff:ff
inet 192.168.10.10/24 brd 192.168.10.255 scope global ens33
valid_lft forever preferred_lft forever
inet6 fe80::20c:29ff:fea5:147/64 scope link
valid_lft forever preferred_lft forever
3: ens34: <BROADCAST,MULTICAST,PROMISC,UP,LOWER_UP> mtu 1500 qdisc pfifo_fast master brqc80a0e28-da state UP group default qlen 1000
link/ether 00:0c:29:a5:01:51 brd ff:ff:ff:ff:ff:ff
inet 192.168.16.10/24 brd 192.168.16.255 scope global ens34
valid_lft forever preferred_lft forever
inet6 fe80::20c:29ff:fea5:151/64 scope link
valid_lft forever preferred_lft forever
7: tapb53981a7-e0@if2: <BROADCAST,MULTICAST,UP,LOWER_UP> mtu 1500 qdisc noqueue master brqc80a0e28-da state UP group default qlen 1000
link/ether de:8e:41:5b:a4:0a brd ff:ff:ff:ff:ff:ff link-netnsid 0
8: brqc80a0e28-da: <BROADCAST,MULTICAST,UP,LOWER_UP> mtu 1500 qdisc noqueue state UP group default qlen 1000
link/ether 00:0c:29:a5:01:51 brd ff:ff:ff:ff:ff:ff
inet 192.168.16.10/24 brd 192.168.16.255 scope global brqc80a0e28-da
valid_lft forever preferred_lft forever
inet6 fe80::f81a:deff:feff:e939/64 scope link
valid_lft forever preferred_lft forever
[root@controller ~]#

openstack 中的网桥名是以”brq”开头的一串数值

查看网桥情况

1
2
3
4
5
[root@controller ~]# brctl show
bridge name bridge id STP enabled interfaces
brqc80a0e28-da 8000.000c29a50151 no ens34
tapb53981a7-e0
[root@controller ~]#

可以看到有两个设备(interfaces)连接 一个是网卡ens34 一个是网桥brqc80a0e28-da

  • 只有当云主机创建出来之后,计算节点上才产生网桥

实例类型管理

使用dashboard创建与管理实例类型

创建实例类型

[管理员] –> [计算] –> [实例类型]

点击[创建实例类型]

删除实例类

选择[动作] 中的删除实例类型

弹出确认删除实例类型窗口,点击[删除实例类型]

使用命令模式创建与管理实例类

用命令模式查看实例类型

1
openstack flavor list 
1
2
3
4
5
6
7
8
[root@controller ~]# source  admin-login 
[root@controller ~]# openstack flavor list
+--------------------------------------+------+------+------+-----------+-------+-----------+
| ID | Name | RAM | Disk | Ephemeral | VCPUs | Is Public |
+--------------------------------------+------+------+------+-----------+-------+-----------+
| 2699fc45-d487-41e7-85c6-536b7c4cbe45 | mini | 1024 | 10 | 0 | 1 | True |
+--------------------------------------+------+------+------+-----------+-------+-----------+
[root@controller ~]#
  • 记得加载管理员 admin 环境变量

用命令模式删除实例类型

1
openstack flavor delete 2699fc45-d487-41e7-85c6-536b7c4cbe45

用命令模式创建实例类型

1
openstack flavor create --id auto --vcpus 1 --ram 1024 --disk 10 myflavor
1
2
3
4
5
6
7
8
9
10
11
12
13
14
15
16
17
[root@controller ~]# openstack flavor create --id auto --vcpus 1 --ram 1024 --disk 10 myflavor
+----------------------------+--------------------------------------+
| Field | Value |
+----------------------------+--------------------------------------+
| OS-FLV-DISABLED:disabled | False |
| OS-FLV-EXT-DATA:ephemeral | 0 |
| disk | 10 |
| id | ec6cefcd-f88b-4f5c-9331-01b670718520 |
| name | myflavor |
| os-flavor-access:is_public | True |
| properties | |
| ram | 1024 |
| rxtx_factor | 1.0 |
| swap | |
| vcpus | 1 |
+----------------------------+--------------------------------------+
[root@controller ~]#

用命令模式查看实例类型详情

1
openstack flavor show myflavor
1
2
3
4
5
6
7
8
9
10
11
12
13
14
15
16
17
18
[root@controller ~]# openstack flavor show myflavor
+----------------------------+--------------------------------------+
| Field | Value |
+----------------------------+--------------------------------------+
| OS-FLV-DISABLED:disabled | False |
| OS-FLV-EXT-DATA:ephemeral | 0 |
| access_project_ids | None |
| disk | 10 |
| id | ec6cefcd-f88b-4f5c-9331-01b670718520 |
| name | myflavor |
| os-flavor-access:is_public | True |
| properties | |
| ram | 1024 |
| rxtx_factor | 1.0 |
| swap | |
| vcpus | 1 |
+----------------------------+--------------------------------------+
[root@controller ~]#

云主机管理

用dashboard 创建与管理云主机

用dashboard创建云主机

详情页面

[项目]–>[计算]–>[实例]

点击[创建实例]

选择[镜像]和[卷]设置

在[可配置额度]中点击 [ ↑ ] 可以将[可用配额]移动到[已分配]

实例类型

在[可用配额] 中看到已创建好的实例类型列表,
选择一个实例类型移动到[已分配]选项组

网络

已创建好的网络列表已经自带分配了一个

点击[创建实例]

遇到的问题以及临时解决办法

  • 如此操作我遇到了如下报错.实例创建失败
    1
    2
    3
    4
    5
    6
    7
    8
    9
    10
    11
    12
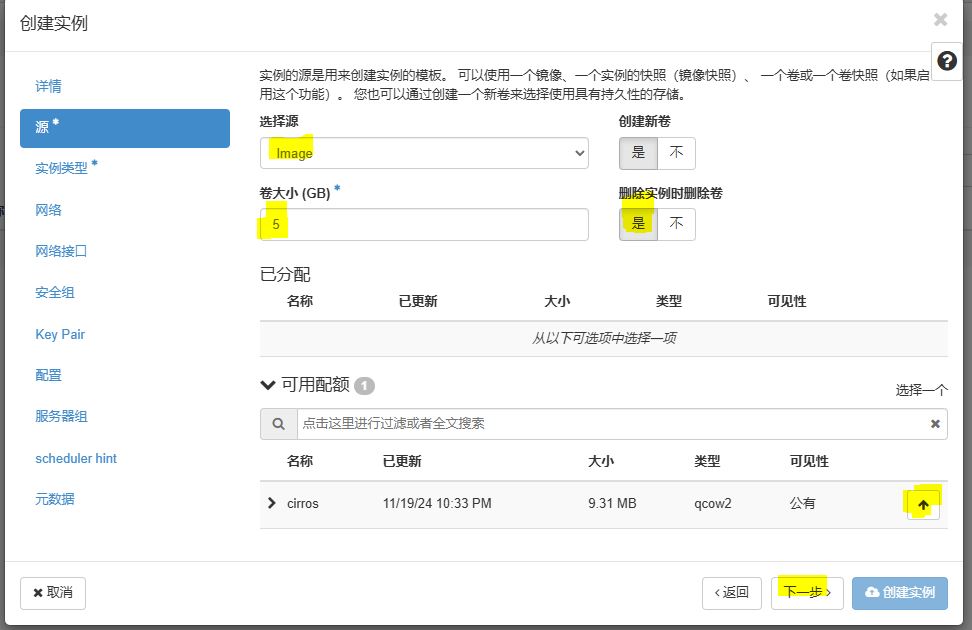
    2024-11-22 21:59:30.410 1555 INFO nova.compute.claims [req-e9cd51ee-a634-49a9-9c4d-dd17a0f78e08 6980aba2962c40529e666791f406b6a5 bf3b21acb3c84e0eb98bcc48482fa97b - default default] [instance: 48839aab-7365-45cb-a7b7-6a282ca51457] Claim successful on node computer
    2024-11-22 21:59:30.559 1555 INFO nova.virt.libvirt.driver [req-e9cd51ee-a634-49a9-9c4d-dd17a0f78e08 6980aba2962c40529e666791f406b6a5 bf3b21acb3c84e0eb98bcc48482fa97b - default default] [instance: 48839aab-7365-45cb-a7b7-6a282ca51457] Ignoring supplied device name: /dev/vda. Libvirt can't honour user-supplied dev names
    2024-11-22 21:59:30.618 1555 INFO nova.virt.block_device [req-e9cd51ee-a634-49a9-9c4d-dd17a0f78e08 6980aba2962c40529e666791f406b6a5 bf3b21acb3c84e0eb98bcc48482fa97b - default default] [instance: 48839aab-7365-45cb-a7b7-6a282ca51457] Booting with volume-backed-image d68df76e-f6fd-4095-871f-5c67342d11b5 at /dev/vda
    2024-11-22 21:59:37.426 1555 ERROR nova.volume.cinder [req-e9cd51ee-a634-49a9-9c4d-dd17a0f78e08 6980aba2962c40529e666791f406b6a5 bf3b21acb3c84e0eb98bcc48482fa97b - default default] Initialize connection failed for volume c61c7ca2-cdac-414a-966f-9e07588f9bf6 on host computer. Error: The server has either erred or is incapable of performing the requested operation. (HTT (Request-ID: req-13c48459-5d05-4760-a39f-583c2db7a22a) Code: 500. Attempting to terminate connection.: ClientException: The server has either erred or is incapable of performing the requested operation. (HTTP 500) (Request-ID: req-13c48459-5d05-4760-a39f-583c2db7a22a)
    2024-11-22 21:59:37.495 1555 ERROR nova.compute.manager [req-e9cd51ee-a634-49a9-9c4d-dd17a0f78e08 6980aba2962c40529e666791f406b6a5 bf3b21acb3c84e0eb98bcc48482fa97b - default default] [instance: 48839aab-7365-45cb-a7b7-6a282ca51457] Instance failed block device setup: ClientException: The server has either erred or is incapable of performing the requested operation. (H0) (Request-ID: req-13c48459-5d05-4760-a39f-583c2db7a22a)
    .......
    2024-11-22 21:59:37.570 1555 ERROR nova.compute.manager [req-e9cd51ee-a634-49a9-9c4d-dd17a0f78e08 6980aba2962c40529e666791f406b6a5 bf3b21acb3c84e0eb98bcc48482fa97b - default default] [instance: 48839aab-7365-45cb-a7b7-6a282ca51457] 实例48839aab-7365-45cb-a7b7-6a282ca51457的构建已中止:The server has either erred or is incapable of performing the requested operation. (00) (Request-ID: req-13c48459-5d05-4760-a39f-583c2db7a22a): BuildAbortException: \u5b9e\u4f8b48839aab-7365-45cb-a7b7-6a282ca51457\u7684\u6784\u5efa\u5df2\u4e2d\u6b62\uff1aThe server has either erred or is incapable of performing the requested operation. (HTTP 500) (Request-ID: req-13c48459-5d05-4760-a39f-583c2db7a22a)
    2024-11-22 21:59:37.571 1555 INFO os_vif [req-e9cd51ee-a634-49a9-9c4d-dd17a0f78e08 6980aba2962c40529e666791f406b6a5 bf3b21acb3c84e0eb98bcc48482fa97b - default default] Successfully unplugged vif VIFBridge(active=False,address=fa:16:3e:cc:e5:1b,bridge_name='brqc80a0e28-da',has_traffic_filtering=True,id=3a334cc8-addd-438b-8a68-f6fa4ed76412,network=Network(c80a0e28-daa4-470-8fe5162e8c2d),plugin='linux_bridge',port_profile=<?>,preserve_on_delete=False,vif_name='tap3a334cc8-ad')
    2024-11-22 21:59:37.888 1555 INFO nova.compute.manager [req-e9cd51ee-a634-49a9-9c4d-dd17a0f78e08 6980aba2962c40529e666791f406b6a5 bf3b21acb3c84e0eb98bcc48482fa97b - default default] [instance: 48839aab-7365-45cb-a7b7-6a282ca51457] Took 0.32 seconds to deallocate network for instance.
    2024-11-22 21:59:37.943 1555 INFO nova.compute.manager [req-e9cd51ee-a634-49a9-9c4d-dd17a0f78e08 6980aba2962c40529e666791f406b6a5 bf3b21acb3c84e0eb98bcc48482fa97b - default default] [instance: 48839aab-7365-45cb-a7b7-6a282ca51457] Detaching volume c61c7ca2-cdac-414a-966f-9e07588f9bf6
    2024-11-22 21:59:37.993 1555 ERROR nova.virt.block_device [req-e9cd51ee-a634-49a9-9c4d-dd17a0f78e08 6980aba2962c40529e666791f406b6a5 bf3b21acb3c84e0eb98bcc48482fa97b - default default] [instance: 48839aab-7365-45cb-a7b7-6a282ca51457] Unable to call for a driver detach of volume c61c7ca2-cdac-414a-966f-9e07588f9bf6 due to the instance being registered to the remote hos.: BuildAbortException: \u5b9e\u4f8b48839aab-7365-45cb-a7b7-6a282ca51457\u7684\u6784\u5efa\u5df2\u4e2d\u6b62\uff1aThe server has either erred or is incapable of performing the requested operation. (HTTP 500) (Request-ID: req-13c48459-5d05-4760-a39f-583c2db7a22a)
    2024-11-22 21:59:38.307 1555 INFO nova.scheduler.client.report [req-e9cd51ee-a634-49a9-9c4d-dd17a0f78e08 6980aba2962c40529e666791f406b6a5 bf3b21acb3c84e0eb98bcc48482fa97b - default default] Deleted allocation for instance 48839aab-7365-45cb-a7b7-6a282ca51457
  • 插曲 这里创建镜像时会报错启动盘选择为 “/dev/vda” 而事实应该是选择为”/dev/sda”
    查看别人对 该问题的描述,测试阶段我决定不创建新的存储,使用已创建存储,创建实例成功
    1
    2
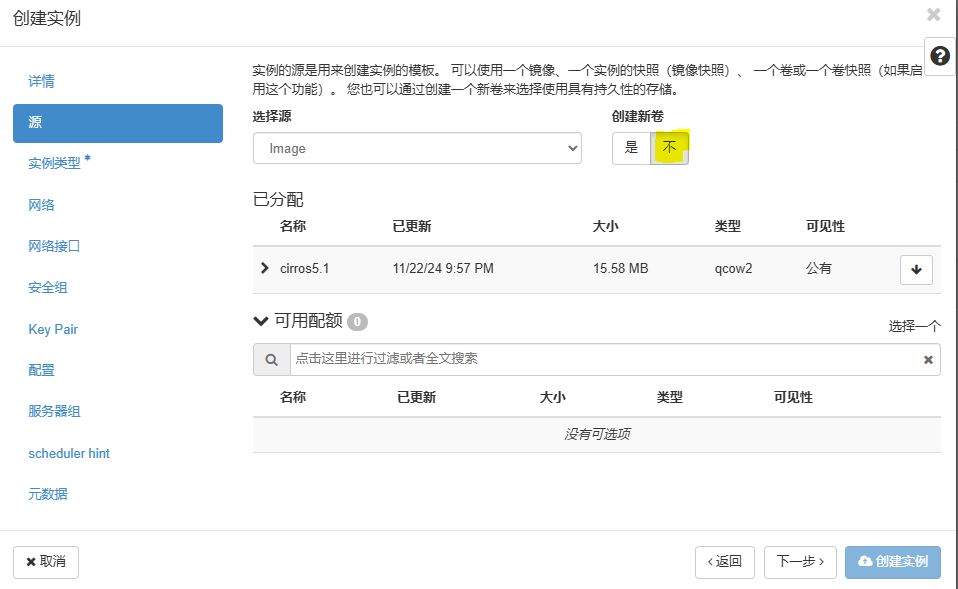
    Hi,I also met this bug under Pike(seems Ocata don't have this problem).I choose image below "Select Boot Source" and can create instance normally if choose Create New Volume with no.However,if choose yes with Create New Volume and type a number for saying 10.Then will got error Boot failed not a bootable disk in console and can see in the log with this error similar with #40.Also,I'm sure cinder is correctly configured because this 10G can be created and show in-use with that instance.
    Also,if I first create an instance then create volume in dashboard or ssh,can attach this volume to the instance successfully.
    BUG描述

该问题如何解决可以自行搜索后续.

安装成功

创建实例成功之后配置安全组

增加22端口

使用分配的IP 端口号 22

用户名: cirros

密码: gocubsgo

远程登录即可

至此平台已搭建成功. 虚拟管理可以自行探索操作.